Introduction
Even a carefully planned dryer vent installation can run into frustrating issues—weak airflow, long drying times, rattling noises, or moisture where it should not be. In Elizabeth, New Jersey, where housing styles vary and seasonal weather shifts from humid summers to cold winters, those challenges can be amplified if the vent path or components are not optimized. This guide delivers practical troubleshooting steps to diagnose and fix common problems so your dryer runs safely and efficiently. When you want a fast, reliable solution handled by experts, consider professional dryer vent installation that includes testing and verification.
Successful troubleshooting starts with a systematic approach. Begin with the symptoms you notice—longer cycles, heat building up in the laundry room, burning odors, or exterior dampers that barely open—and work backward to identify the root cause. Most problems stem from excessive length, too many tight elbows, crushed transitions, or poor sealing at joints.
Symptom: Long Drying Times
Long cycles usually point to restricted airflow. Check the lint screen first; a clogged screen can cut airflow dramatically. Next, observe the exterior hood while the dryer is running. If the damper barely opens or flutters weakly, suspect a blockage or a high-resistance route.
Inspect the transition behind the dryer. If it is crushed, kinked, or too long, replace it with a short semi-rigid metal connector and reposition the dryer to avoid strain. Evaluate the main duct for unnecessary elbows or sections that may have been compressed by storage or shifting framing. When the route is excessively long, consider relocating the dryer or changing the termination point to shorten the path.
Symptom: Burning Smell or Excessive Heat
A burning odor is a red flag and requires immediate attention. Shut the dryer off and unplug it. Inspect the lint screen and the transition for lint buildup. Check joints for internal screws or rough edges that could snag fibers and create hotspots. Ensure the duct is exclusive to the dryer and is not combined with any other exhaust system.
Look for lint deposits around joints, which indicate leakage and poor sealing. Reseal with HVAC-rated metal foil tape. Confirm that the exterior damper opens fully; a stuck damper can cause dangerous heat buildup. If the smell persists after clearing obvious issues, pause operation and consider a professional inspection to prevent further risk.
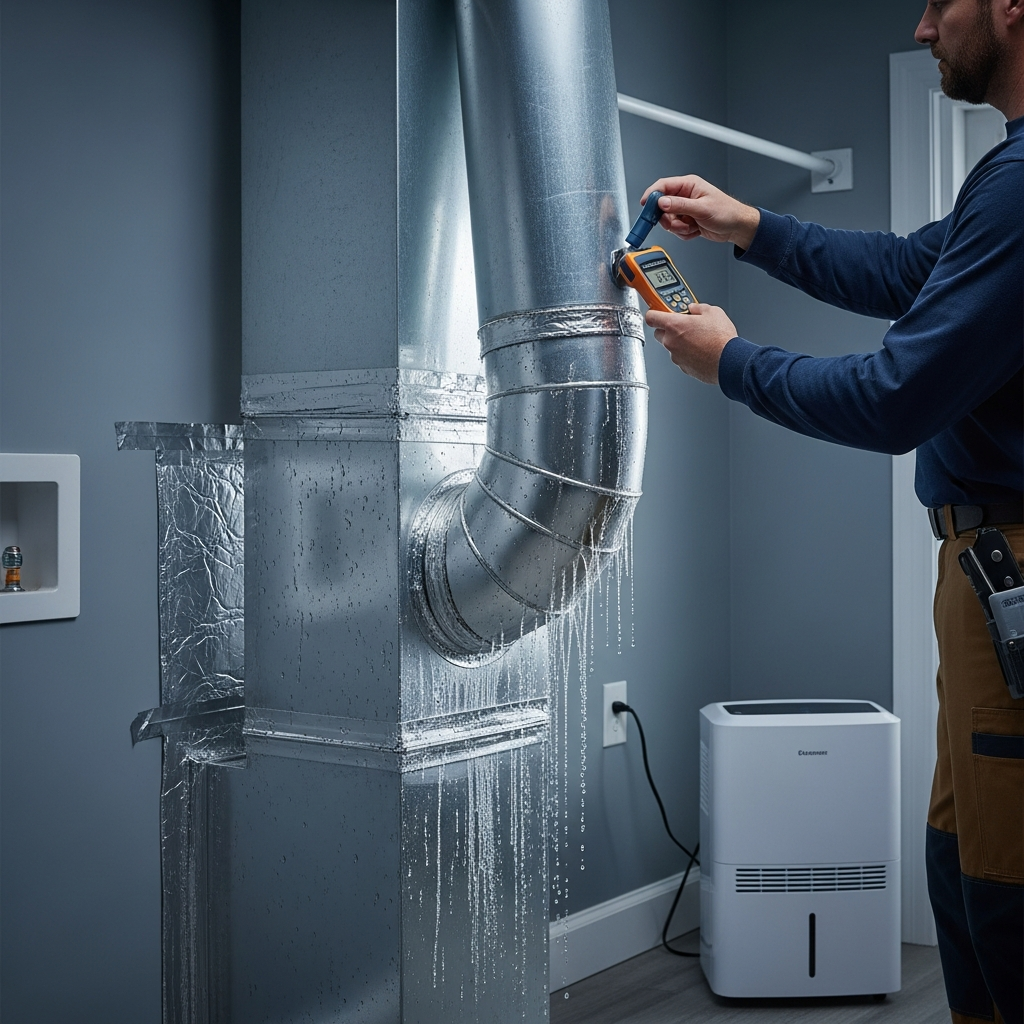
Symptom: Moisture or Condensation
Condensation can appear inside the duct or on nearby surfaces, especially in winter when warm exhaust meets cold metal or exterior walls. Verify that the duct slopes gently toward the exterior so moisture does not pool. Insulate duct sections in unconditioned spaces to moderate temperature differences and discourage condensation.
Check for air leaks that allow warm, moist air to escape before reaching the termination. Tighten joints with metal foil tape and ensure the hood is sealed to the wall. Clear landscaping or snow that could obstruct the damper, forcing moist air back into the system.
Symptom: Rattling or Whistling
Noise usually means movement or air leaks. Confirm that the duct is supported every few feet with pipe straps. Tighten loose hangers and add supports where sags have formed. Reseal joints that whistle under airflow, and ensure elbows are fully expanded to reduce turbulence.
Examine the transition connector. If clamps are loose or the connector is too long, vibration can amplify noise. Shorten the connector, use manufacturer-recommended clamps, and position the dryer so the transition runs straight without kinks.
Symptom: Damper Not Opening Fully
A sluggish damper reduces airflow and lengthens drying times. Inspect the hood for lint buildup or insect nests and clean as needed. Make sure the hood is level; a tilted housing can cause binding. If the damper is undersized for the duct or damaged, replace the hood with a properly matched model that opens freely under normal airflow.
Watch the damper during a drying cycle. It should lift fully and drop closed when the dryer stops. If it still struggles after cleaning and leveling, revisit the route length and the number of elbows—your system may have more resistance than the dryer can overcome.
Root Cause: Excessive Length and Elbows
Each elbow adds significant resistance, and long runs multiply the effect. Troubleshooting begins by counting elbows and measuring total equivalent length. Reduce turns by repositioning the dryer or selecting a different exit point. Replace tight, crimped bends with wider, smoother elbows expanded fully to reduce turbulence.
In Elizabeth’s older homes, framing irregularities can tempt installers to snake ducts around obstacles. A strategic reroute that shortens the path typically restores performance more effectively than adding a booster fan, which should be considered only when best-practice routing is truly impossible and when allowed by manufacturer guidance.
Root Cause: Poor Sealing and Leaks
Leaks at joints rob airflow and release lint and moisture indoors. Examine every seam for dust trails or visible gaps. Reseal with HVAC-rated metal foil tape, pressing firmly along the edges. Avoid cloth tapes that dry out, and do not rely on screws that protrude into the airstream.
At the exterior, check the hood-to-wall seal. Gaps here admit water and allow warm air to escape into wall cavities. Apply compatible sealant behind the flange on masonry and ensure siding installations tuck flashing properly to shed rain.
Root Cause: Inferior or Damaged Materials
Flexible foil or plastic ducts crush easily, trap lint, and tear over time. If your vent contains such materials, plan a replacement with smooth-wall rigid or semi-rigid metal. Inspect all sections for dents and sharp edges that could catch fibers. Replace any damaged components instead of trying to patch them.
Evaluate the transition behind the dryer. Use a high-quality semi-rigid metal connector, keep it as short as possible, and connect it with proper clamps. Position the dryer to avoid crushing the connector when you slide it into place.
Root Cause: Obstructed Termination
Hood obstructions reduce exhaust velocity and can cause moisture and lint to back up. Clean lint, remove nests, and trim vegetation. Ensure the damper swings freely without scraping the housing. In winter, check for ice formation around the hood if moist air condenses quickly in very cold conditions.
Verify the hood’s size matches the duct. An undersized collar chokes airflow; replace it with a properly matched model and confirm the damper opens fully under a normal drying cycle.
Verification Testing After Repairs
After any correction, run the dryer on a no-heat setting and observe the exterior hood. The damper should open decisively, and exhaust should feel strong and warm. Inside, check for steady suction at the lint screen and listen for any remaining rattles or whistles. Seal or support as needed and retest.
Record the final configuration and results, including route length, number of elbows, and any added insulation. Periodic rechecks will help you catch early signs of restriction before they affect performance significantly. If you want guaranteed results without the trial and error, book professional dryer vent installation that includes airflow measurement and damper verification.
Elizabeth-Specific Troubleshooting Tips
In closely spaced neighborhoods, be mindful of where the exhaust exits. If a damper blows into a corner or recess, air can swirl and slow, reducing effectiveness. Relocating the hood a short distance to a clearer surface can dramatically improve flow.
For brick or block walls, confirm that the penetration is clean and level. A misaligned sleeve can make the damper scrape or bind. Use corrosion-resistant anchors and a snug opening to support the hood and maintain weather sealing.
Preventive Practices
Clean the lint screen every load and vacuum the area around the dryer regularly. Inspect the exterior hood seasonally and confirm the damper moves freely. Schedule annual vent cleaning, or more often for heavy laundry users, to maintain strong airflow and minimize fire risk.
Teach everyone in the household to recognize warning signs—long cycles, unusual heat, burning smells, or visible lint around joints. Early response to these clues prevents more serious issues and extends the life of your dryer.
Frequently Asked Questions
Q: Why does my dryer work better after I clean the lint screen but then slow down again?
A: The lint screen is your first line of defense, but buildup inside the duct can still restrict airflow. Regular vent inspections and annual cleanings keep performance consistent.
Q: Can I add a booster fan to fix poor airflow?
A: Booster fans are a last resort and must comply with manufacturer instructions and local expectations. First, minimize length and elbows, seal joints, and ensure the termination is unobstructed.
Q: Is it okay to use screws to secure joints?
A: Avoid screws that protrude into the airstream, as they snag lint. Use HVAC-rated metal foil tape to seal joints and keep interiors smooth.
Q: My exterior damper barely opens; what should I check?
A: Clean lint and debris, ensure the hood is level, verify it matches the duct size, and reduce route resistance by shortening runs and expanding elbows fully.
Q: What materials should I use for the main duct?
A: Smooth-wall rigid or semi-rigid metal. Avoid flexible foil or plastic ducts, which crush easily and collect lint.
Q: Why is there moisture near the vent in winter?
A: Warm exhaust can condense on cold metal. Add insulation in unconditioned areas, maintain a slope toward the exterior, and seal leaks that allow moist air to escape indoors.
Q: How often should I clean or inspect the vent?
A: Inspect seasonally and clean at least annually. Larger households or heavy laundry usage may warrant more frequent maintenance.
Q: Is vertical venting a problem?
A: Vertical runs are acceptable if kept straight and supported, with proper backdraft protection and restored fire-blocking at penetrations between levels.
Restore Safe, Efficient Drying
With systematic troubleshooting and careful corrections, you can bring your dryer vent up to a high standard of performance suited to Elizabeth’s housing stock and climate. When you would rather have guaranteed results without the guesswork, schedule local dryer vent installation that includes verification testing and documentation for lasting confidence.
Protect your home, preserve your dryer, and reclaim your time by ensuring strong airflow, tight sealing, and a clear termination. If you are ready to act, book expert, code-aware dryer vent installation and enjoy dependable performance load after load.
