Introduction
Advanced dryer vent installations demand more than basic routing and a standard hood. In Elizabeth, New Jersey—home to a mix of historic masonry, multifamily townhomes, and compact laundry closets—achieving best-in-class airflow means optimizing every detail: duct selection, elbow geometry, fire-blocking restoration, condensation control, and verifiable testing. This guide explores refined techniques to deliver superior performance and durability. If you want expert execution with documented results, local professionals can provide turnkey dryer vent installation tailored to your building and workflow.
Advanced practice is about systems thinking. Each decision influences airflow, maintenance effort, and safety. By prioritizing a short, smooth route, minimizing turbulence, and managing temperature and moisture, you can build a vent that performs reliably through Elizabeth’s humid summers and chilly winters.
Optimizing Route Geometry
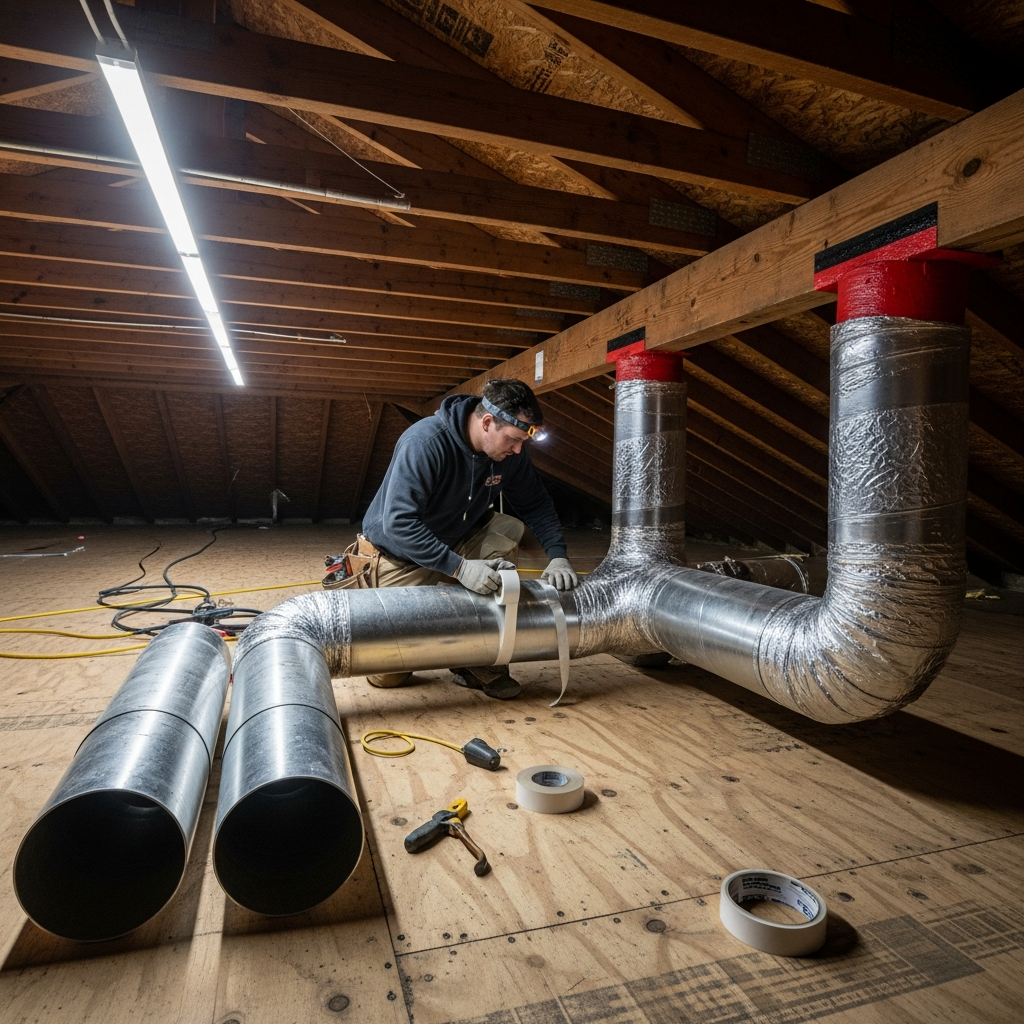
Start with route discipline. The shortest path with the fewest turns is still the gold standard, but advanced planning quantifies each design choice. Calculate equivalent length meticulously, assigning values for every elbow and transition. When a 90-degree elbow is unavoidable, consider replacing it with two 45-degree bends spaced apart, or use long-radius fittings that cut resistance significantly compared to tight elbows.
Align ducts to avoid micro-kinks at transitions. Even small ripples or partial collapses create turbulence that traps lint and reduces velocity. Use close-clearance elbows near the dryer only when necessary, and expand adjustable elbows fully to their smoothest curve. Keep clearance around the duct so storage or building movement cannot compress it over time.
Material Selection With Performance in Mind
Choose smooth-wall rigid metal for primary runs to minimize friction. Semi-rigid metal is acceptable in short sections where alignment demands flexibility, but do not substitute it for long stretches of rigid duct. Avoid thin foil and all plastic products for main runs; they crush, kink, and degrade under heat, undermining performance and safety.
Match duct diameter to the dryer outlet. Sudden reductions create choke points. Use factory-formed transitions when changing diameter is absolutely necessary, and position those changes where access for inspection remains easy. Select a robust exterior hood with a gravity damper that opens fully under flow and seals neatly when off.
Penetrations Through Complex Assemblies
In Elizabeth’s older brick homes, penetrating masonry cleanly is essential. A core bit matched to the hood sleeve produces an accurate opening with less risk of cracking. Keep the hole plumb and level so the damper does not bind. On framed walls with siding, integrate flashing so the hood sheds water, and maintain a snug fit to ease sealing.
When the route must traverse fire-blocked zones between floors or at top plates, plan how you will restore those barriers after installing the duct. Use approved methods and materials consistent with the existing assembly. Meticulous restoration preserves the building’s compartmentalization and safety performance.
Air Sealing for Velocity and Cleanliness
Every seam is a potential leak and lint trap. Assemble the duct with male ends facing the airflow direction, and seal joints with HVAC-rated metal foil tape. Press firmly and smooth edges to prevent peel-back. Avoid mechanical fasteners protruding into the airstream. If a connector requires screws, keep them low-profile and use the fewest possible.
At the exterior, the hood-to-wall interface must be tight. For masonry, use compatible sealant behind the flange and corrosion-resistant anchors. For siding, tuck the flange or flashing to shed water. Leaks at this junction not only waste energy but also admit moisture into the wall cavity, potentially damaging finishes and insulation.
Support, Alignment, and Slope Control
Support horizontal runs every few feet with pipe straps, preventing sags that collect lint. Maintain a gentle slope toward the exterior to discourage condensation pooling. Where the duct passes through framing, protect edges with grommets or sleeves to avoid abrasion.
Keep the vent route out of high-traffic storage zones. Over time, boxes and bins can press against ductwork and deform elbows. Provide visual markers or shields in utility areas to preserve clearances and alignment.
Condensation and Thermal Strategy
Elizabeth’s winter temperatures can chill exterior walls and unconditioned areas, encouraging condensation inside metal ducts. Consider insulating long runs in attics, crawlspaces, or exterior chases to stabilize temperature. Do not insulate the short transition behind the dryer, and do not bury flexible connectors in walls or ceilings.
Control interior humidity to support performance. A dehumidified laundry area reduces lint clumping and helps the dryer move moisture outdoors efficiently. Ventilate the room as needed, and avoid using the dryer when large amounts of indoor moisture are present from other activities.
Advanced Elbow Techniques
The geometry of elbows has outsized impact on airflow. Adjustable metal elbows should be expanded fully to a smooth curve; partial expansion creates ridges that snag lint. When space allows, substitute two 45-degree elbows with a short straight between them, which often yields better flow than a single tight 90-degree bend.
Where the dryer outlet sits close to the wall, consider a low-profile connector designed to align the appliance without crushing the transition. Keep that connector short and smooth, and avoid routing that forces immediate sharp turns.
Termination Science
The exterior hood is more than a cap; it is a flow-control device. Choose a design that opens fully at modest pressures and closes reliably to block backdrafts. Position the hood where air can exit unimpeded—avoid alcoves, corners, or dense shrubs. Place it at an accessible height for easy cleaning and seasonal inspection.
Test the hood during commissioning. Watch the damper open under airflow and verify it closes promptly when the dryer stops. Replace sticky or undersized hoods, and confirm that no screen is present to trap lint.
Commissioning and Verification
Advanced installations deserve objective validation. After assembly, run the dryer on a no-heat setting and observe damper action. Feel exhaust strength and listen for leaks. Inside, check for steady suction at the lint screen. If available, use an anemometer at the termination to quantify flow and document a performance baseline for future maintenance.
Record the route length, number and type of elbows, and any insulated sections. Photos of key joints and penetrations will speed future service and help identify subtle shifts that might occur over time due to building movement or storage impacts.
Maintenance Planning at a Higher Standard
Set a proactive maintenance schedule based on usage patterns. Large households or laundry-intensive workflows merit more frequent inspections and cleanings. Keep the lint screen clear every load, vacuum dust around the appliance, and verify the exterior damper’s movement seasonally.
Watch for early warning signs: longer cycles, unusual heat near the dryer, or a damper that opens weakly. Address issues immediately to protect the appliance and maintain energy efficiency. For a no-guesswork approach, establish an annual professional service interval.
Multifamily and Townhouse Considerations
In Elizabeth’s multifamily settings, stacked laundry closets and shared chases complicate routing and access. Prioritize vertical runs that remain straight and supported. Restore fire-blocking at every penetration and maintain dedicated, exclusive dryer exhaust pathways—never share with bathroom or kitchen fans.
Plan for cleanout access where the route includes hard-to-reach elbows. In some layouts, removable access panels near key turns enable quick lint removal and inspection without invasive demolition.
Common Pitfalls in Advanced Projects
Booster fans are often proposed as a cure-all, but they should be a last resort after optimizing route length, elbow geometry, and sealing quality. If used, follow manufacturer requirements for placement and controls, and confirm compatibility with your dryer. Avoid hidden, uninterrupted long runs that cannot be cleaned or inspected.
Do not overlook the dryer transition. A crushed or overly long connector can sabotage an otherwise high-performance system. Keep it short, semi-rigid, and properly clamped, and position the appliance to avoid strain.
Frequently Asked Questions
Q: What duct material delivers the best advanced performance?
A: Smooth-wall rigid metal for the primary run. Reserve semi-rigid metal for short alignment sections. Avoid flexible foil or plastic for mains due to crushing and lint accumulation risks.
Q: How do I decide between a single 90-degree elbow and two 45-degree bends?
A: When space allows, two 45-degree bends with a short straight often reduce resistance compared to a tight 90-degree elbow. Always expand adjustable elbows fully for the smoothest curve.
Q: Can I rely on sealant instead of tape for joints?
A: Use HVAC-rated metal foil tape on seams. Some specialized sealants can complement tape, but tape remains the primary, serviceable method for a smooth interior and durable seal.
Q: Is insulating the duct always necessary?
A: Not always. Prioritize insulation where ducts traverse unconditioned spaces susceptible to winter cold. Avoid insulating flexible transitions and never bury them in walls or ceilings.
Q: When are booster fans appropriate?
A: Only after the route is optimized and when allowed by manufacturer and local expectations. They require careful placement and maintenance and are not a substitute for sound routing.
Q: How do I confirm the termination hood is the right size?
A: Match the hood collar to the duct diameter and observe damper operation during a test cycle. If it fails to open fully under normal airflow, upgrade to a better-matched, freer-moving design.
Q: What documentation should I keep after an advanced installation?
A: Keep route diagrams, equivalent length calculations, photos of key joints, insulation notes, and test observations. Documentation supports future maintenance and troubleshooting.
Q: Can multiple dryers share a common exhaust?
A: Dryers require dedicated exhaust pathways unless a manufacturer-engineered and approved manifold system is specifically designed and permitted for that application, which is uncommon in residential settings.
From Design to Day-One Performance
Advanced results come from disciplined design, precise assembly, and verifiable testing. If you prefer a turnkey outcome with measured airflow and documented workmanship, schedule professional dryer vent installation that meets the demands of Elizabeth’s varied building stock and seasonal climate.
Protect your home and your time by building a vent that moves air decisively, resists lint accumulation, and remains serviceable for years. When you are ready to elevate performance, book local experts for proven, code-aware dryer vent installation and enjoy efficient, reliable drying from the first load.
