Understanding dryer vent installation requirements is essential for safety, performance, and compliance in Elizabeth, New Jersey. While specific enforcement and adopted editions can vary by jurisdiction and over time, core industry standards share common themes: exhaust to the outdoors, use of smooth interior metal ducting for the main run, limited and accessible transition duct at the dryer, careful management of total duct length, and a termination with a backdraft damper and no screen. This guide explains major provisions found in widely adopted model codes and manufacturer instructions so you can plan a compliant installation or better communicate with your installer. If you are beginning research or planning a project, ground your approach with credible fundamentals about dryer vent installation and the rationale behind each requirement.
Codes exist to minimize fire risk, reduce moisture problems, and ensure that appliances operate as designed. Dryers move hot, lint-laden air that must be expelled efficiently. When ducts are too long, too rough, or obstructed, the dryer runs hotter and longer, increasing wear and elevating hazard. A code-aligned vent system reduces those risks by maintaining adequate airflow from the appliance outlet to the exterior.
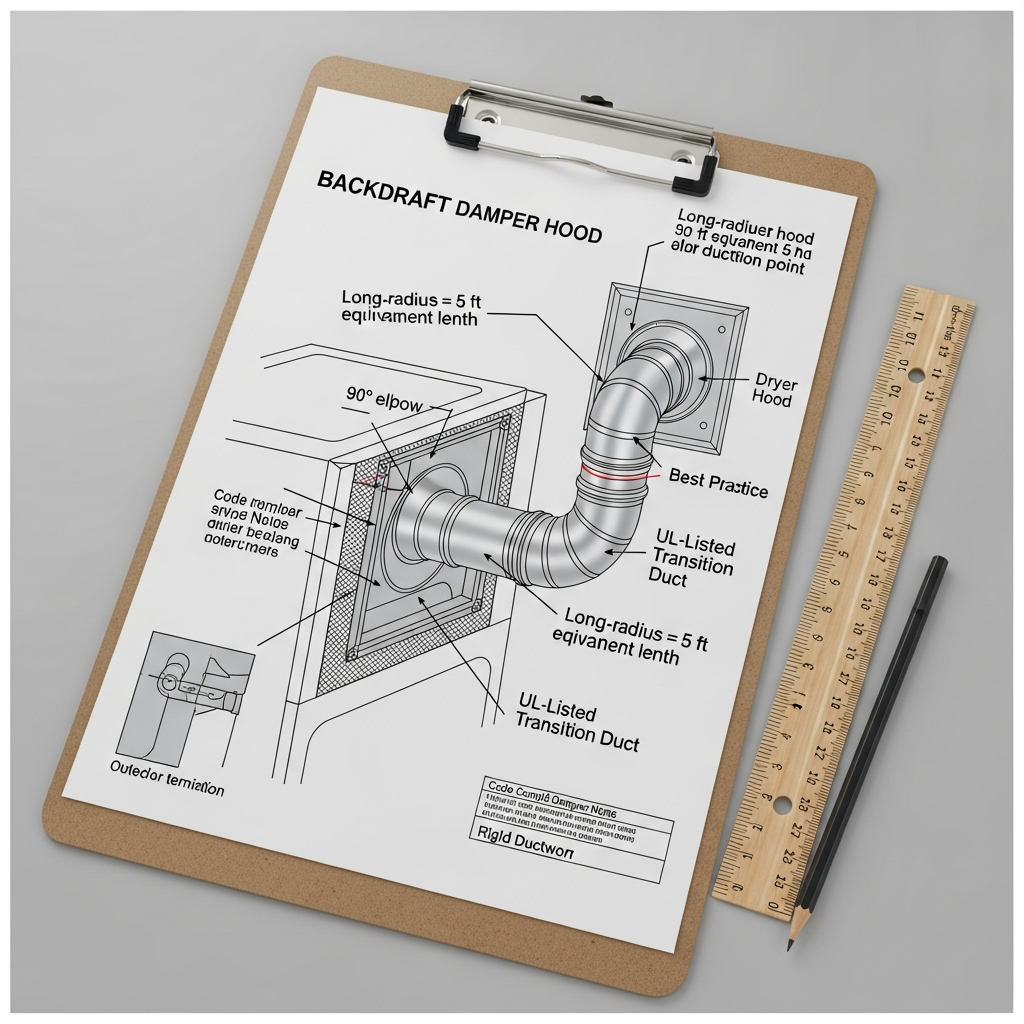
General Principles You Will See in Most Codes
- Exhaust must discharge to the outdoors. It cannot terminate in an attic, crawlspace, garage, or interior room.
- The main duct is typically smooth-wall metal with a nominal 4-inch diameter unless the dryer specifies otherwise.
- Transition duct between the dryer and the wall or floor inlet must be listed for dryer use, remain accessible, and not run through concealed spaces.
- Fasteners that penetrate the duct interior are generally prohibited because they trap lint and restrict flow.
- Terminations require a backdraft damper and should not include a screen.
- Total duct length must comply with the dryer manufacturer’s installation instructions or default values provided by the adopted code, with deductions for each elbow.
Manufacturer Instructions Take Priority
Contemporary codes give priority to the appliance manufacturer’s installation instructions. If your dryer specifies a maximum equivalent length and fitting deductions different from generic tables, follow the manufacturer. Keep documentation accessible for inspectors and for future service visits so everyone understands the system’s design basis. In Elizabeth, enforcement personnel typically expect installers to present manufacturer literature when length or routing questions arise.
Because many homes in the area have tight mechanical spaces or older walls, verifying the dryer’s outlet location and model-specific allowances helps you plan the route with accurate expectations. If you cannot meet the recommended length due to structure, discuss options such as rerouting with fewer elbows or using a listed booster fan when permitted.
Duct Materials and Joints
Codes emphasize smooth interior duct surfaces for the main run to minimize resistance and lint accumulation. Thin, accordion-style foil ducts are not acceptable for concealed or long runs. Joints should be oriented in the direction of airflow and sealed externally with foil-backed HVAC tape designed for high temperatures. Screws or fasteners that protrude into the airflow path are typically prohibited. Transition duct—used only between the dryer outlet and the wall inlet—must be listed (commonly UL 2158A) and remain accessible for inspection and cleaning.
In multifamily buildings, common shafts or chases may be present. Special provisions, listings, or engineered solutions can be required for shared or long vertical runs. Consult building management and the local authority before proceeding; unique fire-resistance and access rules often apply.
Length Limits and Elbow Deductions
Maximum duct length is a frequent point of confusion. Many codes provide a default maximum equivalent length—often used when manufacturer guidance is unavailable—along with deductions for each elbow. Long-radius fittings reduce friction compared to short-radius elbows, but both count toward equivalent length. The intent is to keep airflow robust so the dryer does not overheat. Short, direct routes are therefore favored, especially in Elizabeth’s older homes where space constraints tempt installers to weave around framing.
When planning, diagram each elbow and note its type. Add up equivalent lengths, and if the total exceeds allowed values, revise the route. If a booster fan is considered, it must be specifically listed for clothes dryer exhaust and installed according to both its instructions and local rules. Some jurisdictions require service access and interlocks for these devices.
Termination Requirements
Exterior terminations must feature a backdraft damper to prevent outdoor air, pests, and weather from entering the duct. Screens are typically prohibited because they trap lint. The hood or cap should be mounted flush, sealed to the exterior cladding or masonry, and oriented to shed water. In Elizabeth’s climate, a well-sealed, robust termination is vital to withstand storms and seasonal expansion and contraction. Avoid locations where snow, landscaping, or architectural features can block the outlet.
Terminations should be placed where they will not recirculate moist exhaust back into the home or onto surfaces that can collect lint. While model codes may specify distances from certain building features for other exhaust systems, dryer vent terminations are primarily governed by the damper requirement, prohibition on screens, and the mandate to discharge outdoors. Follow the manufacturer’s guidance for clearances and locate the outlet where air can disperse freely.
Routing and Support
The duct should take the most direct path practical to an exterior wall. Long horizontal runs must be supported at intervals to prevent sagging, which can trap lint and water. Maintain gentle slopes toward the outside to discourage condensation from pooling within the duct. Where the duct penetrates fire-resistance–rated assemblies, restore protection in accordance with the tested assembly details and local requirements.
In basements typical of Elizabeth homes, a direct route through the rim joist is often feasible. Upper floors can be trickier, sometimes requiring recessed dryer boxes to protect the transition duct from crushing. Roof terminations introduce waterproofing complexity; when permitted and necessary, use a listed cap without a screen and ensure excellent flashing to prevent leaks.
Prohibited Practices
- Terminating in indoor spaces, under floors, or into attics, garages, or crawlspaces.
- Sharing a dryer duct with kitchen or bath exhausts or other appliances.
- Using plastic duct or unlisted flexible duct for the main concealed run.
- Installing screens or any element that will capture lint at the termination.
- Running transition duct through walls, ceilings, or other concealed spaces.
Inspection Readiness
When a permit or inspection is required, be prepared with a simple diagram of the route, a count of elbows, and documentation from the dryer manufacturer showing maximum equivalent length. Inspectors appreciate accessible joints, properly supported duct, an identifiable listed transition duct, and a termination with a smooth-operating damper. Clear labeling or notes on total length help future service technicians maintain the system properly.
For projects in multifamily settings or where penetrations affect fire-resistance–rated assemblies, maintain product data for any firestop systems used and be prepared to show how the rating was preserved. The more complex the building, the more essential thorough documentation becomes.
Elizabeth, NJ Considerations
Elizabeth’s mix of historic structures and contemporary buildings presents varied scenarios. Brick facades may call for masonry-specific coring and robust, corrosion-resistant terminations. Vinyl-sided exteriors benefit from mounting blocks and flexible sealants that move with temperature swings. In neighborhoods near the waterfront, wind-driven rain underscores the need for tight exterior sealing and damper quality. Cold snaps can amplify condensation risks in long horizontal runs, so supporting the duct and maintaining a slight slope to the outdoors is especially important.
Local authorities can clarify whether your specific scope requires a permit, especially if you alter structural elements, penetrate fire-rated assemblies, or change the exterior appearance significantly. Always verify the current adopted code edition and any local amendments before you begin.
Maintenance and Owner Responsibilities
Even a perfectly code-aligned installation needs regular cleaning. Lint accumulates over time, and performance declines gradually. Clean the lint filter before each load, inspect the transition duct periodically, and schedule full-vent cleanings at least annually. After severe weather events, check exterior terminations for debris or icing that may limit damper travel.
Homeowners should also watch for subtle performance changes—longer drying cycles, hotter laundry rooms, or musty smells can indicate partial blockages. Addressing these early helps preserve both safety and appliance life.
Working with Professionals
Qualified installers and mechanical contractors are accustomed to balancing code requirements with real-world construction constraints. They evaluate alternate routes, choose fittings to reduce resistance, document length calculations, and protect finishes while working. If your route is unusually long or complex, or if you must penetrate rated assemblies, professional help is strongly recommended. A knowledgeable provider will also explain maintenance expectations and how to recognize warning signs of airflow decline. If you prefer a code-conscious, start-to-finish solution, consider engaging professional dryer vent installation and requesting documentation of route length, fittings used, and test results.
FAQ
Q: Do I need a permit to install a dryer vent in Elizabeth? A: Requirements can vary by scope and building type. Contact the local building department to confirm whether your project needs a permit or inspection.
Q: Can I use flexible duct for the whole run? A: No. The main concealed run should be smooth-wall metal. Listed flexible transition duct is intended only for the short, accessible connection at the dryer.
Q: Are screens allowed on the outside termination? A: No. Screens can trap lint. Use a termination with an integral backdraft damper.
Q: What if my calculated length exceeds what the manufacturer allows? A: Reroute to reduce elbows or length, or consult a professional about listed booster fans that may be permitted when installed per their instructions and local rules.
Q: Is roof venting permitted? A: Roof venting can be acceptable when done with a listed cap and proper flashing, but wall terminations are often preferred for simplicity and maintenance.
Q: How often should I clean the vent to stay compliant? A: Codes emphasize proper installation; maintenance intervals are a safety best practice. Clean at least annually and more often if drying times increase.
Move Forward with Clarity
By focusing on core code principles—outdoor termination with a damper, smooth metal ducting, controlled length, listed transition duct, and careful routing—you set your dryer up for safe, efficient performance. When in doubt, verify details with the local authority and your appliance documentation. If you would like a team to translate requirements into a reliable installation and provide clear documentation, contact a trusted provider and schedule your dryer vent installation with confidence.
