Every commercial kitchen in Elizabeth, New Jersey depends on a clean, efficient exhaust system to keep staff comfortable, protect property, and satisfy inspectors. Grease accumulation in the hood, plenum, ducts, and rooftop fan is inevitable during daily cooking, but it is also manageable with a clear, repeatable process. By following a step-by-step approach—and documenting each stage—you reduce fire risk, improve airflow, and maintain a professional appearance that inspires confidence. If you want support implementing a dependable workflow, partnering with specialists in kitchen exhaust hood cleaning can streamline your schedule and provide inspection-ready reports.
Step 1: Pre-Planning and Safety
Start by scheduling service during off-hours to minimize disruption. Notify staff of the timing and responsibilities: appliances must be cooled, food covered or removed, and pathways cleared from the kitchen to the rooftop. Confirm rooftop access, lighting, and fall protection for technicians. If your building has shared systems, coordinate with property management and neighboring tenants to avoid conflicts. Compile notes on known issues such as fan vibration, belt squeal, or odor complaints so the team can investigate during cleaning.
Step 2: Protection and Containment
Before any degreasing begins, protect equipment and floors with plastic sheeting and metal shields where appropriate. Set up drip containment to capture runoff and direct wastewater to collection containers. Good containment prevents contamination and demonstrates environmental responsibility—both important in tightly packed Elizabeth kitchens where space can be scarce and slip hazards must be avoided.
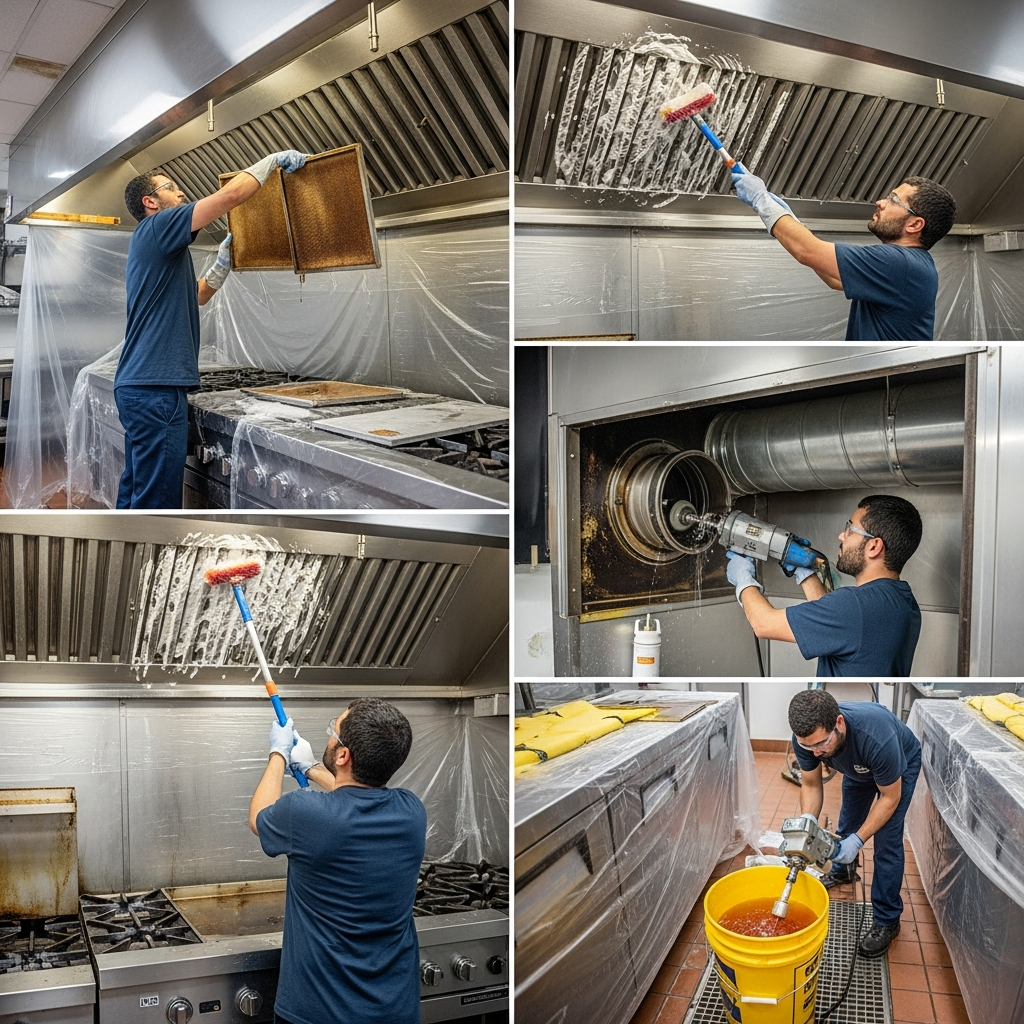
Step 3: Filter Removal and Treatment
Remove baffle filters carefully to avoid damage. Soak and degrease until clean to the touch. If filters remain heavy, sticky, or visibly warped after washing, plan for replacement. Clean filters are the first line of defense against duct contamination and support stronger airflow during peak service.
Step 4: Hood Canopy and Plenum Cleaning
Apply appropriate degreasers to the canopy and the plenum area behind the filters. Scrub seams, corners, and riveted sections where grease accumulates. Rinse thoroughly using hot water, then dry and polish visible stainless surfaces. This not only removes fuel sources but also presents a clean, professional look for your staff and any inspector who steps into the kitchen.
Step 5: Duct Access and Mechanical Agitation
Open access panels along the duct path to reach both vertical and horizontal sections. Use brushes and rotary tools to agitate deposits, paying special attention to elbows and transitions where airflow slows and grease tends to collect. If access is limited, document the deficiency and schedule installation of additional cleanouts to meet standards and facilitate future cleanings.
Step 6: Rooftop Fan Disassembly and Cleaning
Shut off power and hinge open the fan housing. Clean blades, housings, and grease containment systems thoroughly. Inspect belts, bearings, and electrical connections for wear. Verify that grease drains into approved containers rather than onto the roof surface. Note any recommended repairs, such as hinge kits or upgraded containment, especially in older buildings common around Elizabeth.
Step 7: Rinse, Dry, and Polish
Rinse all treated surfaces with hot water to remove emulsified grease and degreaser residue. Dry components to prevent streaking and ensure that areas are ready for immediate use once appliances are restarted. Polish exterior stainless for a finished appearance that signals cleanliness to staff, management, and inspectors.
Step 8: Reassembly and Function Check
Reinstall filters, close access panels, and secure the fan housing. Power up the system and verify airflow. Observe smoke capture on the line, and listen for irregular noises indicating belt or bearing issues. If airflow remains insufficient, plan for follow-up diagnostics, including potential fan upgrades, duct modifications, or makeup air adjustments.
Step 9: Documentation and Service Tags
Place an updated service tag on the hood with the cleaning date and next recommended service. Compile a report with before-and-after photos, technician notes, and any recommendations for repairs or upgrades. Store these documents in an inspection-ready folder or digital archive. Organized records speed up approvals and help you plan maintenance across busy seasons.
Step 10: Post-Service Review and Staff Briefing
Walk through the results with the technician or account manager. Review any flagged issues and commit to a maintenance cadence suited to your volume and menu. Provide a short briefing to shift leaders so they understand what was done, what to monitor, and how to keep surfaces clean between visits.
Daily, Weekly, and Seasonal Add-Ons
- Daily: Wipe exposed hood surfaces; confirm lighting and switches work
- Weekly: Wash baffle filters; check for dents or warping
- Seasonal: Inspect rooftop hinges, containment, and access paths before winter or summer peaks
These add-ons reinforce the step-by-step program and keep your system stable during rush periods.
Safety Considerations Throughout
Technicians should follow lockout/tagout for electrical components and use fall protection on rooftops. Kitchens should maintain clear egress routes and store combustibles away from the cookline. Chemicals must be food-safe and thoroughly rinsed. Containment and wastewater capture are essential for environmental compliance. Attention to these factors protects workers and reduces liability.
Common Challenges and How to Overcome Them
- Limited Duct Access: Plan for cleanout installation to reach elbows and horizontal runs
- Rooftop Damage: Upgrade grease containment to prevent overflow and roof deterioration
- Persistent Odors: Verify airflow, replace saturated filters, and balance makeup air
- Fan Vibration: Inspect belts, bearings, and alignment; consider component replacement
- Scheduling Conflicts: Book overnight or early-morning appointments and coordinate with building management
Tackling these challenges proactively keeps your step-by-step plan on track.
Quality Control: Mid-Process Audit
At least once per quarter, perform a mid-process audit. Review your last service report, check filter condition, look for visible streaks on the hood, and listen to the fan at start-up. If anything seems off, schedule an interim evaluation. Reaffirming a commitment to consistent, professional kitchen exhaust hood cleaning at this stage can prevent costly surprises and keep your documentation airtight.
Integrating With Broader Maintenance
Align your step-by-step hood cleaning with fire suppression inspections, extinguisher checks, equipment service, and HVAC balancing. Use a shared calendar and keep records organized by hood and fan. This holistic approach minimizes repeated downtime and gives inspectors a clear view of your diligence.
Training Your Team
Educate staff on the basics of ventilation: what the hood does, why filters matter, and how grease acts as fuel. Assign filter washing to specific roles and set reminders. Encourage prompt reporting of smoke roll-out, hot spots on the line, or fan noise. When the whole team understands the process, your step-by-step plan becomes a daily habit rather than a periodic event.
Frequently Asked Questions
How long does the full process take? Timing depends on system size and grease levels, but most services are scheduled overnight to ensure your kitchen is ready by morning.
Can multiple hoods and fans be serviced at once? Yes. Coordinated appointments can clean several systems during a single visit, reducing total downtime.
What if we lack access panels? Document the limitation and schedule installation of cleanouts to meet standards and enable thorough cleaning.
Will cleaning affect our fire suppression system? Technicians work around nozzles and piping carefully. After cleaning, verify that all components are in place and unobstructed.
How do we maintain results between visits? Wipe down exposed surfaces daily, wash filters weekly, and monitor fan noises or odors to catch issues early.
Keep Your Kitchen Steps on Track
A clear, step-by-step approach transforms hood maintenance from a daunting task into a reliable routine. By protecting equipment, cleaning each component methodically, verifying airflow, and documenting results, you create a system that stands up to any inspection. When you are ready to reinforce your workflow and ensure consistent outcomes in Elizabeth, schedule professional kitchen exhaust hood cleaning with a trusted local team. You will safeguard your staff, strengthen ventilation, and keep service moving—one well-planned step at a time.
