A clear dryer vent protects your home from unnecessary heat build-up, improves drying performance, and reduces everyday wear on your appliance. In Elizabeth, New Jersey—where housing ranges from historic townhouses to multifamily buildings with complex duct routes—following a structured, repeatable checklist makes maintenance simpler and safer. Use the step-by-step plan below to prepare, clean, verify, and maintain your vent. If you encounter conditions beyond DIY scope, consider scheduling expert dryer vent cleaning to ensure every section of the duct is addressed.
1) Preparation and safety
- Identify your dryer type: electric or gas. Shut off power and, if gas, close the gas valve before moving the appliance.
- Gather PPE: safety glasses, gloves, and a dust mask or respirator suitable for fine lint.
- Protect the area: lay a drop cloth and move items away from the dryer to create working room.
- Locate the entire vent path from the dryer outlet to the exterior hood, noting elbows and potential pinch points.
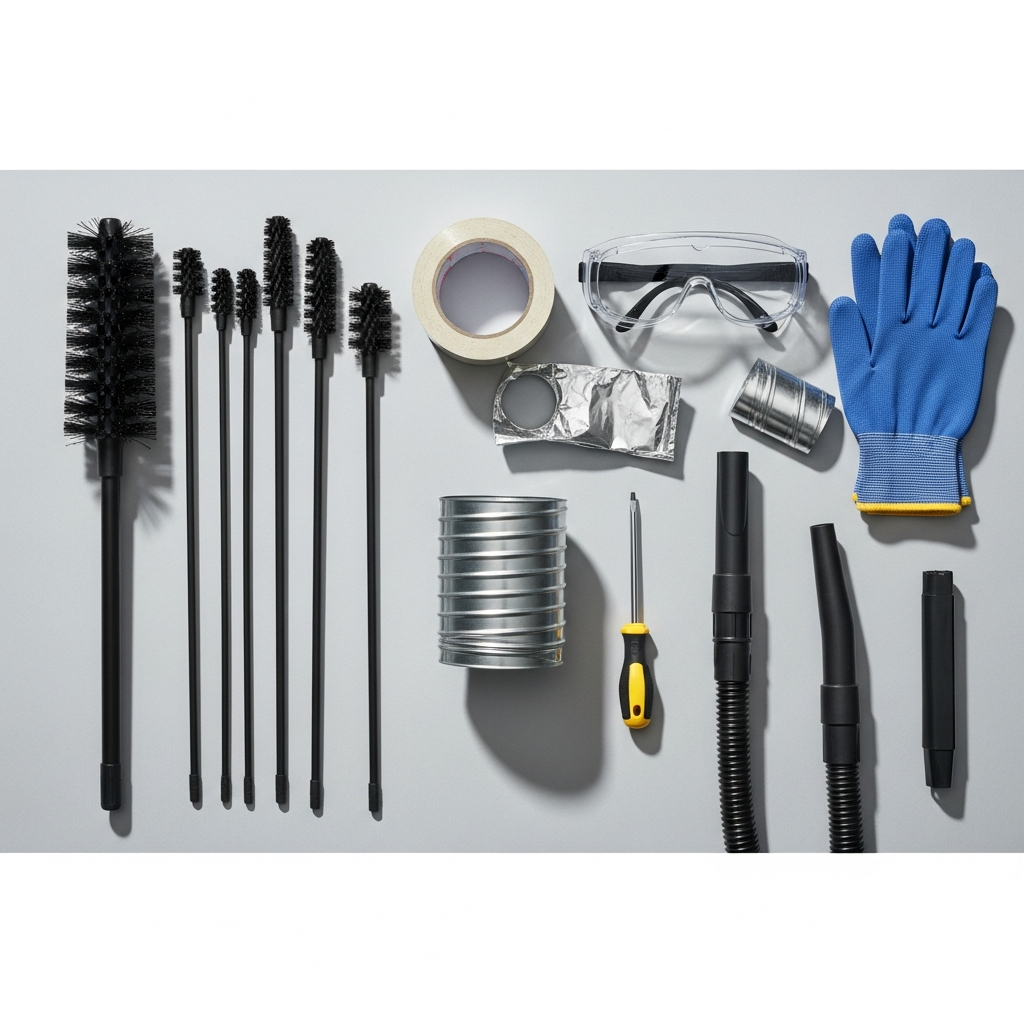
2) Tools and materials
- Vacuum with hose and brush attachment
- Dryer vent brush kit with flexible rods
- Screwdriver or nut driver
- HVAC-rated foil tape
- Semi-rigid or rigid metal transition duct (if replacement is needed)
3) Initial inspections
- Check the lint screen; wash with mild soap if residue is present from fabric softeners.
- Inspect the transition hose for crushing, kinks, or damage; plan to replace substandard materials.
- Find the exterior termination and ensure the damper moves freely and the guard is intact.
4) Interior disassembly
- Carefully pull the dryer forward without straining cords or gas lines.
- Loosen clamps and detach the transition duct from both the dryer outlet and the wall/floor connection.
- Vacuum lint from the dryer outlet grille and from the accessible section inside the wall or floor connection.
5) Brushing the vent run
- From the interior connection, feed the brush into the duct while rotating clockwise. Advance slowly through bends.
- Withdraw periodically to remove lint from the brush and vacuum the debris.
- If accessible, move to the exterior and brush from the termination back toward the interior, alternating with vacuuming.
6) Exterior termination service
- Open or remove the hood guard. Clear lint and debris from louvers and screens.
- Confirm the damper opens fully during operation and closes when the dryer is off.
- Reattach any guards securely after cleaning.
7) Reassembly and sealing
- Install a smooth, properly sized semi-rigid or rigid transition duct with gentle bends.
- Tighten clamps securely without deforming the duct.
- Seal necessary joints with HVAC foil tape; avoid screws that protrude into the airstream.
- Restore power and, if applicable, reopen the gas valve.
8) Airflow verification
- Run the dryer on a no-heat cycle and check airflow at the exterior hood for a strong, steady stream.
- Indoors, briefly remove the lint screen and hold a tissue near the opening to feel for suction, then replace the screen immediately.
- Note drying time on your next regular load as an additional verification.
9) Ongoing maintenance schedule
- Every load: Clean the lint screen.
- Monthly: Inspect the exterior hood for free damper movement.
- Quarterly: Vacuum behind and under the dryer.
- Semiannually: Brush the duct if you have a short, accessible run.
- Annually: Plan a full inspection and cleaning; increase frequency for large families or pet-heavy homes.
Elizabeth’s climate and building styles present a few nuances worth noting. Winter storms can freeze a hood partially open or shut, so check after snow and ice. Spring nesting behavior may bring birds to unprotected terminations; verify that guards are secure and not overly restrictive. In humid summers, lint may clump more readily, reducing airflow faster than you expect. For long or concealed vent routes in townhouses and multifamily buildings, professional-grade equipment may be needed to reach and fully clear obstructions. When you encounter those conditions, booking professional dryer vent cleaning is a practical way to ensure the entire system is serviced without damage.
Common pitfalls to avoid
- Using plastic or thin foil flex duct that crushes and traps lint
- Driving screws through joints into the airstream
- Forcing brushes through tight elbows and separating joints
- Neglecting to verify airflow at the exterior hood
- Pushing the dryer back so close that the hose kinks
Quick reference mini-checklist
- Lint screen cleaned and washed monthly
- Transition hose smooth, undamaged, and properly supported
- Exterior hood clear with full damper travel
- No vinyl or plastic duct materials in use
- Documented airflow improvement after cleaning
FAQ
Q: How long should a typical cleaning take for a straightforward vent run?
A: The timeline varies by layout and access. What matters most is thoroughness: interior and exterior access, careful brushing, and airflow verification at the end.
Q: Do I need to replace my transition duct every year?
A: Not if it remains smooth, undamaged, and appropriately sized. Replace it when crushed, torn, or of an unsafe material.
Q: Can I add a screen to the vent hood to block pests?
A: Use a purpose-made guard that doesn’t overly restrict airflow. Avoid improvised screens that can clog quickly.
Q: Is roof access required to clean my vent?
A: Only if your termination is on the roof and you cannot reach it from below. Roof work should be done only in safe, dry conditions or by a pro.
Q: What signs suggest a concealed blockage?
A: Weak airflow at the hood after interior cleaning, persistent long drying times, or visible moisture near duct paths can indicate deeper obstructions.
Ready to put this checklist to work?
Following this checklist will help you restore and maintain safe airflow in your Elizabeth home. If you find inaccessible sections, roof terminations, or stubborn clogs, bring in a qualified team with the right tools and training. For dependable results and long-term reliability, schedule a thorough dryer vent cleaning service and keep your laundry system running at its best.
