Searching for the right professional to install or replace a dryer vent in Elizabeth, New Jersey involves more than a simple web query. You want a solution that improves safety, reduces drying time, and holds up to local weather. This guide explains how to identify qualified providers, what to expect during an installation visit, and how to prepare your home for a smooth experience. Along the way, you will learn how to compare approaches, understand common materials, and evaluate results so you can make a confident decision from the start. If you are just beginning your research, start by reviewing trusted information about dryer vent installation and the benefits of a well-designed system.
Dryer venting is a critical safety feature that often goes overlooked until drying times stretch longer than normal or lint accumulates around the exterior hood. In Elizabeth’s humid summers and chilly winters, moisture management and airflow are vital to controlling odors, preventing mold, and supporting energy efficiency. A knowledgeable installer brings the right tools, materials, and route planning to your specific home layout, whether you have a basement laundry, a second-floor closet, or a compact utility nook.
What Makes a Qualified Dryer Vent Installer
Experience and a clear, safety-first process distinguish the best providers. Look for companies that specialize in vents and ducts or demonstrate deep familiarity with dryer exhaust systems. They should explain how they will plan the shortest, straightest route, choose rigid metal ducting for the main run, avoid screens at the termination, and use listed transition duct behind the dryer. Competent installers also discuss how they will protect your finishes, seal exteriors against weather, and minimize elbows for airflow.
Professional communication matters. The company should discuss your specific dryer model, laundry location, and any structural considerations such as joists, fire-rated assemblies, or brick and stucco exteriors. They should be able to describe their approach to cutting clean openings, sealing penetrations, and supporting ducts with hangers at appropriate intervals.
Choosing Local in Elizabeth, NJ
Local expertise pays off because Elizabeth homes range from historic rowhouses near the waterfront to newer townhomes and multifamily buildings. A provider who knows these construction styles can anticipate typical challenges like thick masonry walls, tight rear lots, or basement-to-exterior transitions through rim joists. They will also be familiar with local weather patterns and the importance of sturdy, well-sealed terminations that shed wind-driven rain and withstand seasonal temperature swings.
When you call, be ready to describe your dryer’s location, the type of exterior wall, and where you think the vent should exit. Photos of the intended route help installers pre-plan and arrive with the right fittings and terminations for vinyl, brick, or stucco. Many providers offer site assessments that include airflow checks and lint risk evaluations.
Questions to Ask Before You Book
- What duct materials do you use for the main run, and how do you secure joints without protruding screws?
- What is your plan to minimize total equivalent length and elbows, and how do you account for the dryer manufacturer’s limits?
- How will you handle the exterior termination to ensure a free-moving damper and weatherproof seal, without a lint-catching screen?
- How do you protect finished interiors and exteriors during drilling and cutting, and how do you contain dust?
- What testing do you perform after installation to verify airflow and damper operation?
- How do you address special cases like multi-story runs, roof terminations, or fire-resistance–rated assemblies?
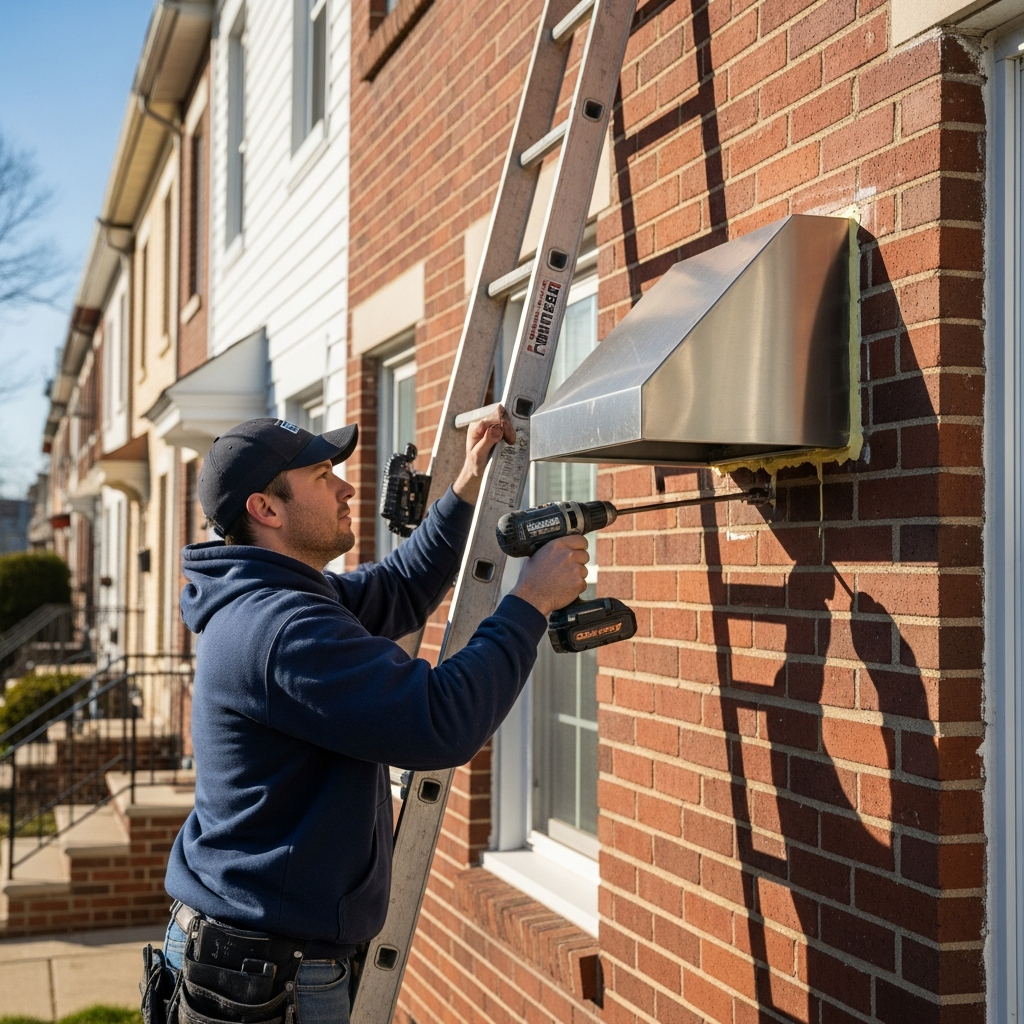
What to Expect on Installation Day
On the day of service, technicians will locate studs, joists, and utilities to confirm a clear pathway. They will mark pilot holes, drill carefully, and use the correct hole saws or masonry bits to create a clean opening. For exteriors, expect them to use a termination designed for dryers with an integral damper and to seal the flange neatly to your siding or masonry. Inside, they will assemble rigid duct with smooth interior seams, tape external joints with foil-backed HVAC tape, and support runs with hangers to prevent sagging.
Behind the dryer, a UL 2158A–listed transition duct connects the outlet to the wall inlet. Competent installers avoid crushing this connection; some may suggest a recessed dryer box for tight spaces, allowing the machine to sit closer to the wall without compressing the duct. The job concludes with a performance test where the damper opens fully under airflow, and the exterior exhaust feels strong and steady.
How Pros Plan Routes for Performance
Effective route planning minimizes resistance from elbows and length. Installers will survey alternative paths and choose the one with the fewest turns, using long-radius elbows where possible. They will avoid terminating in corners that trap lint, and they will position the hood a suitable distance above grade. In many Elizabeth homes, the best path is straight through the rim joist from a basement laundry, or via a short, direct route from a main-floor or second-floor wall.
Pros also consider maintenance access. They plan joints where sections can be taken apart for cleaning and ensure the transition duct is accessible. They may label or note the route length and fittings used so you know the system’s effective length for future reference.
Preparing Your Home for a Smooth Visit
- Clear a path from the entry to the laundry area to protect floors and finishes.
- Pull the dryer forward and disconnect power if you are comfortable doing so; otherwise, the technicians will handle it.
- Remove stored items that block access to likely wall or floor pass-throughs.
- If you are in a multifamily building, confirm access permissions and any community rules before the appointment.
Evaluating the Finished Work
After the installation, look closely at the exterior termination: the damper should open and close freely, and sealant around the flange should be smooth and continuous. Indoors, joints should be taped on the exterior only, with no screws penetrating the duct interior. The transition hose should not be crushed. Run a test cycle and confirm that airflow at the termination is strong and that drying times are reasonable for your typical loads.
Ask the installer to show you the route, explain the number of elbows, and discuss a cleaning schedule. A well-informed homeowner is better prepared to keep the system efficient and safe over time.
Maintenance and Ongoing Care
Clean the lint screen before each load and inspect the transition duct periodically. Plan for a full vent cleaning at least annually. Keep landscaping clear of the exterior vent and check after storms for debris or snow. In older Elizabeth neighborhoods, windblown lint can collect at corners; a quick seasonal check prevents blockages and moisture issues.
Signs It Is Time to Replace or Reroute
- Drying cycles take longer than they used to, even with a clean lint screen.
- You see condensation or moisture near the laundry area, especially in winter.
- The exterior damper barely opens during a cycle, indicating poor airflow.
- You discover long, convoluted runs with multiple tight elbows or crushed sections.
Professional Insight You Can Use
The most effective installers communicate clearly, choose durable materials, and respect manufacturer limits on duct length. They prioritize safety by avoiding common pitfalls like shared vents or screen-covered terminations. If an unusual condition arises—such as an extra-long run or a need to pass through a fire-rated barrier—they will explain your options, which may include long-radius fittings or purpose-built booster fans listed for clothes dryers. When comparing providers, the right choice is the one who demonstrates a thorough understanding of these details and documents their approach from planning to testing. If you would prefer an end-to-end solution, consider the convenience of professional dryer vent installation for a route that balances code awareness with practical, clean workmanship.
FAQ
Q: How long does a typical installation take? A: It varies with complexity, but many straightforward wall terminations can be completed in a single visit once the route is confirmed and accessible.
Q: What materials should I insist on? A: Smooth-wall metal duct for the main run, a listed transition duct at the dryer, foil-backed HVAC tape on exterior seams, and a termination with a backdraft damper and no screen.
Q: Is a roof termination acceptable? A: Yes, when done with a listed roof cap and careful flashing, but wall terminations are often simpler and easier to maintain in Elizabeth’s climate.
Q: How often should I clean the vent? A: Plan on at least annual cleaning, or sooner if drying times increase or you notice lint accumulation.
Q: Can I run the dryer into a crawlspace or garage? A: No. The dryer must vent outdoors to remove heat, moisture, and lint safely.
Q: What if my route is longer than recommended? A: Ask about rerouting to reduce length or explore listed booster fans designed for dryers, installed per instructions and local rules.
Take the Next Step with Confidence
Now that you know how to evaluate providers, prepare your home, and assess finished results, you are ready to move forward with a safer, more efficient installation. Choose a local team that understands Elizabeth’s housing styles and weather, and ask the right questions before work begins. For a streamlined experience from planning to final airflow testing, contact a trusted specialist and schedule your dryer vent installation with confidence.
