Taking on a home improvement project in Elizabeth, New Jersey can be deeply satisfying, especially when it makes your home safer and more efficient. This comprehensive DIY dryer vent installation guide walks you through planning, materials, tools, and step-by-step execution tailored to homes in the Elizabeth area, where older housing stock, coastal weather influences, and mixed construction types can pose unique challenges. Whether your laundry is in a basement, utility closet, or on an upper floor, you will learn the fundamentals you need to complete the job confidently. If at any point you feel uncertain, you can still benefit from this guide’s planning insights and then seek expert help for the actual work. To get started on the right foot, learn the essentials of dryer vent installation so your system vents outdoors efficiently and safely.
Proper dryer venting is about more than convenience. A well-installed vent reduces drying time, controls humidity, prevents mold growth, and lowers fire risks by moving hot, moisture-laden air and lint safely out of your home. In a region like Elizabeth, where humid summers and cold winters put HVAC and appliances through their paces, an efficient vent helps your dryer perform consistently year-round. This guide emphasizes safety, local considerations, and industry best practices that align with common building standards, while reminding you to verify final details with the local building department and your dryer’s manufacturer.
Understand How a Dryer Vent System Works
Every residential dryer vent system has a few core parts. First is the short transition duct that connects the dryer outlet to the wall or floor duct inlet. Beyond that connection runs the main duct, ideally smooth-wall metal, which directs exhaust to the exterior termination hood. The termination must have a damper to prevent backdrafts and pest intrusion, but it should not include a screen that can trap lint. The entire pathway should be as short and as straight as possible, with gentle turns and minimal fittings to maintain airflow.
Airflow is your guiding principle. The more resistance created by long runs, tight bends, or corrugations, the harder your dryer must work. Excess resistance means longer cycles, more lint accumulation, hotter dryers, and greater safety concerns. With smart planning, you can create a route that balances structural realities of your Elizabeth home with excellent performance.
Plan for Elizabeth, NJ Homes and Weather
Elizabeth features a variety of housing types: single-family homes, duplexes, multifamily buildings, and historic rowhouses. Many have basements where laundry machines reside, while others tuck dryers in second-floor closets or near kitchens. Moisture control matters in all of them. If your laundry is in a basement, confirm you can route the duct up and out with minimal elbows. If upstairs, map a path to an exterior wall that avoids concealed spaces where transition ducting is not permitted. Consider the coastal weather patterns too; persistent winds and storms off the bay make a sturdy, well-flashed exterior termination a must.
If your home uses vinyl siding, plan a clean, sealed termination with a sturdy mounting block. For brick or stucco, choose a termination hood with a flange that seats flush and seals neatly with exterior-grade materials. Aim to terminate several inches above grade, away from dryer lint re-circulation and moisture-prone corners.
Materials and Components You Will Need
- Smooth-wall metal duct, 4 inches in diameter, in rigid sections suitable for interior runs.
- UL 2158A–listed transition duct for the short connection between dryer and duct inlet.
- Low-resistance elbows (preferably long-radius) and couplings designed for dryer ducts.
- Exterior wall termination with an integral backdraft damper and no screen.
- Foil-backed HVAC tape rated for high temperature; do not use cloth duct tape.
- Mechanical fasteners as permitted for exterior mounting and support hangers for ducts.
- Firestop materials if you pass through fire-resistance–rated assemblies, as required.
- Wall sleeve or thimble for safe passage through finished walls, if needed.
Essential Tools for a Clean Installation
- Drill/driver with hole saw and pilot bits sized for a 4-inch duct opening.
- Stud finder and inspection mirror or borescope to check inside walls.
- Tin snips and a fine-tooth saw for metal adjustments and exterior siding cuts.
- Level and measuring tape for accurate layout and slope toward the outside.
- Caulk gun with exterior sealant appropriate for your siding or masonry.
- Safety glasses, gloves, and a dust mask for cutting and drilling.
- Vacuum with a brush attachment to clean up metal shavings and drywall debris.
Map the Shortest, Straightest Route
Short and straight translates to performance. Each 90-degree elbow can significantly reduce allowable duct length. Keep bends to a minimum and use long-radius elbows where possible. Avoid crushing or kinking flexible transition ducts behind the dryer; allow just enough length to slide the machine forward for maintenance. If you must cross joists or studs, plan a neat, code-compliant passage and restore fire and draft barriers as required.
Check for conflicts such as plumbing, electrical, or gas lines in your intended pathway. Use a stud finder and small inspection openings to confirm that your route is clear before cutting any large holes. This pre-work saves time and prevents costly repairs.
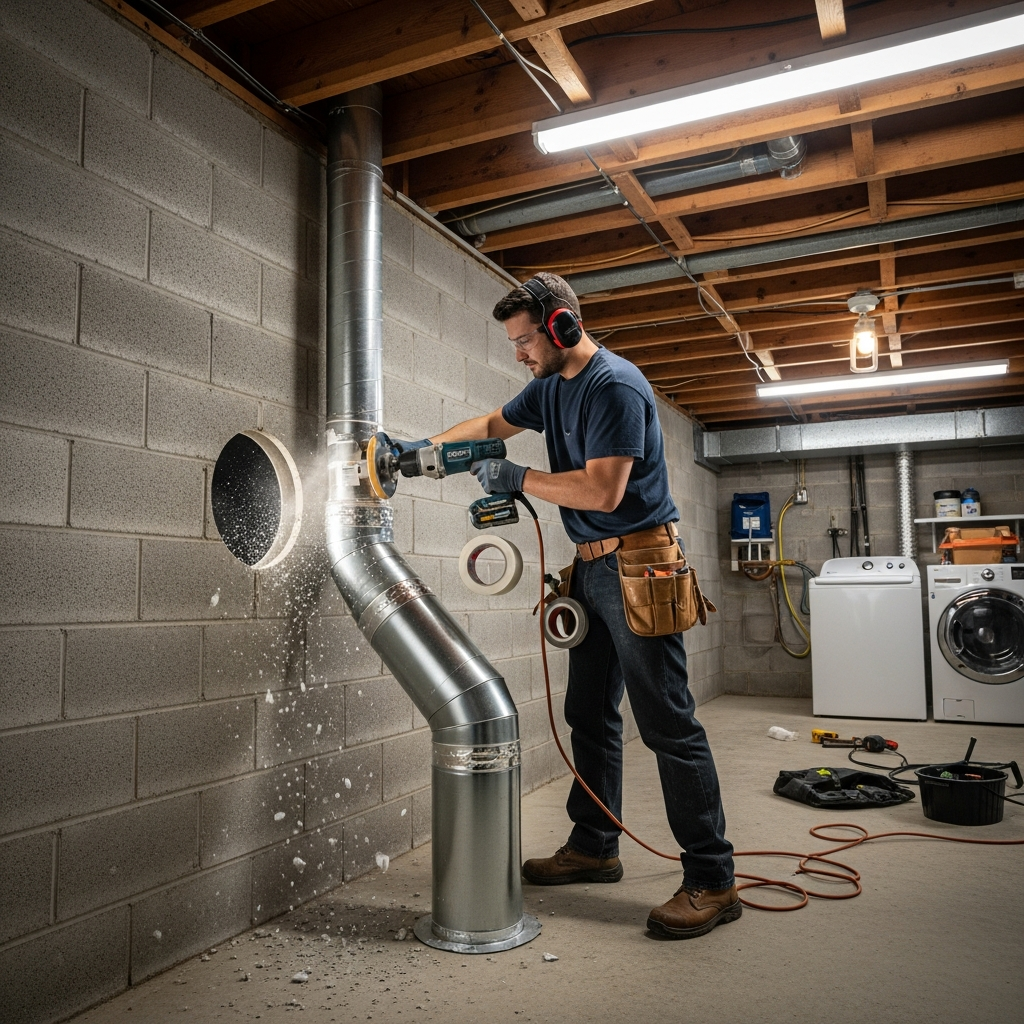
Step-by-Step DIY Dryer Vent Installation
- Unplug and position the dryer. Turn off the gas supply if you have a gas dryer. Gently pull the dryer forward to access the rear outlet and surrounding area.
- Confirm the outlet size. Most residential dryers use a 4-inch outlet. Verify compatibility with your transition duct and wall inlet.
- Choose the exit point. From inside, mark the ideal centerline for the duct opening on the wall or ceiling. Aim for the shortest path to an exterior wall with minimal bends.
- Drill a pilot hole. Use a long pilot bit to confirm the exterior exit point is free of obstructions. Check outdoors to see where the bit emerges and confirm the location is clear of trim, utilities, or tight corners.
- Cut the main opening. From outside, use a hole saw sized for the termination hood’s collar. Cut carefully through siding and sheathing; if masonry is present, use a masonry-specific hole saw or core bit.
- Install the termination hood. Insert the hood’s collar through the opening, ensuring the damper moves freely. Flash or seal per manufacturer instructions, using exterior-grade sealant and fasteners appropriate for your siding or masonry.
- Prepare interior duct sections. Dry-fit rigid duct and elbows from the wall inlet to the area where the dryer will sit. Keep joints oriented with the crimped end in the airflow direction, away from the dryer.
- Attach duct sections. Use foil-backed HVAC tape on exterior joints. Avoid using screws that protrude into the airflow path; they catch lint and add resistance.
- Support the run. Use support straps to secure horizontal runs at regular intervals. Ensure the duct slopes gently toward the exterior to help moisture drain out.
- Connect the transition duct. Cut the transition to the shortest functional length. Attach one end to the dryer outlet and the other to the wall inlet. Tighten clamps evenly to avoid leaks.
- Move the dryer into place. Slide the dryer back gently, checking that the transition duct is not crushed or sharply bent. Confirm clearance for vibration and service.
- Seal and finish. Seal any interior wall plates, reinstall trim if removed, and vacuum debris. Outside, verify all perimeter sealant is smooth and shed-ready for rain.
- Power up and test. Restore power and gas if applicable. Run a timed dry cycle on warm. Check for strong airflow at the termination and listen for the damper opening and closing smoothly.
Safety Priorities You Should Not Overlook
Dryer vents move hot air and carry lint that can ignite if trapped. Never vent a dryer into an attic, crawlspace, or garage. Do not share the dryer duct with bathroom fans or other exhausts. Keep clearance from combustible materials per manufacturer instructions. Verify that the exterior damper opens freely and closes when the dryer is off, helping block pests and weather.
Transition duct must remain visible and accessible; it is not intended to run through walls or concealed spaces. Replace any old plastic or vinyl transition with a UL 2158A–listed product designed for dryers. Keep the total effective length of the system within the limits recommended by your dryer manufacturer; if you cannot, consider a booster fan listed for clothes dryers, installed per its instructions and local code allowances.
Common Mistakes and How to Avoid Them
- Too many elbows: Plan the route to minimize turns, and use long-radius elbows when you must turn.
- Piercing screws inside the duct: Tape and listed connectors are the proper methods to secure joints.
- Crushed transition behind the dryer: Allow clearance and measure before pushing the dryer back into place.
- Termination screen: Screens trap lint; use a dampered termination listed for dryers without a screen.
- Excessively long runs: Keep within recommended lengths; longer runs increase lint accumulation.
When to Consider Professional Help
Even seasoned DIYers sometimes encounter surprises, especially in older Elizabeth homes with intricate framing, masonry, or limited exterior access. If you discover structural obstacles, fire-rated walls, or complex multi-story pathways, calling a qualified installer can save time and ensure compliance. Mid-project adjustments, such as rerouting to improve airflow, are easier for pros who carry specialized tools and components on the truck. If you decide to bring in help at any stage, you will already have a smart plan, and you can discuss options like long-radius fittings or recessed dryer boxes to protect the hose and provide space. Many homeowners choose to combine DIY planning with mid-course expert execution for the best outcome, leveraging insights from this guide and the advantages of professional dryer vent installation.
Testing and Commissioning Your New Vent
After installation, verify performance. At the exterior termination, you should feel a strong, steady stream of warm air during a drying cycle. The damper should swing fully open, not flutter weakly. Indoors, note whether drying times shorten compared to your previous setup. You can also tape a lightweight ribbon at the termination to observe airflow. If airflow seems weak, re-check for kinks, crushed sections, or unsealed joints, and confirm that elbows are properly oriented to minimize resistance.
Monitor the system across a few cycles with different loads. Listen for unusual vibrations that might indicate a poorly supported section. Address any rattles by adding or adjusting supports. Revisit the transition duct after moving the dryer back; make sure it still has a gentle curve without sharp compressions.
Maintenance for Long-Term Performance
Every vent system needs periodic lint removal. Clean the lint filter before each load. Every few months, disconnect the transition duct and vacuum accumulated lint around the dryer outlet and wall inlet. At least annually, brush and vacuum the entire duct run and the termination hood. In Elizabeth’s variable climate, seasonal changes in temperature and humidity can cause slight material shifts, so re-check exterior sealants and screws once or twice a year to ensure a weather-tight fit.
Keep landscaping trimmed away from the termination. Snow accumulation in winter can block low terminations; maintain clearance so exhaust can escape freely. Observe the exterior damper for lint buildup and clean it promptly.
Special Cases: Basements, Upper Floors, and Tight Spaces
Basements often require an upward rise to the rim joist followed by a straight exit. Use long-radius elbows to reduce resistance. For upper-floor closets, consider a recessed dryer box that allows the transition duct to curve gently without crushing. When limited to interior runs, verify there is a path to an exterior wall; roof terminations can be more complex and should use listed caps without screens, with careful flashing to prevent leaks in severe weather.
In multifamily buildings, consult building management and local authorities. Shared shafts or horizontal common vents introduce additional rules and may require professional installation and inspection. Never connect a residential dryer to systems designed for other exhausts or shared with other appliances unless specifically engineered and approved for that purpose.
FAQ
Q: Can I use plastic or foil accordion duct for the entire run? A: No. Use smooth-wall metal duct for the main run to reduce lint buildup and resistance. Keep flexible, UL 2158A–listed transition duct only for the short, accessible connection between the dryer and the wall inlet.
Q: How long can my dryer duct be? A: Follow your dryer manufacturer’s instructions. If no guidance is available, installers often use a default maximum equivalent length with deductions for elbows. Shorter is always better for safety and performance.
Q: Do I need a screen on the outside vent? A: No. Screens trap lint and can create blockages. Use a termination with an integral backdraft damper designed for dryers.
Q: How often should I clean the vent? A: Inspect the transition duct several times per year and clean the full run at least annually, or more often if you dry heavy loads or notice longer cycle times.
Q: Can I share the dryer vent with a bathroom fan? A: No. The dryer must have its own dedicated exhaust pathway to the outdoors.
Q: What if my route is very long? A: Consider rerouting to shorten it or consult a professional about listed booster fans that are permitted and sized for dryers, installed per instructions and local rules.
Q: Is roof venting acceptable? A: It can be, but it is more complex and requires a listed roof cap without a screen and excellent flashing. Where possible, a direct exterior wall termination is simpler.
Bring Your Project to the Finish Line
You now have a clear roadmap to plan, install, test, and maintain a safe, efficient dryer vent in your Elizabeth home. If you run into framing surprises, masonry challenges, or tricky multi-story routes, pair your preparation with expert hands. For a smooth, code-conscious finish and reliable airflow, reach out to trusted local specialists and schedule your dryer vent installation with confidence.
