Introduction: Step-by-Step Clarity for Elizabeth, New Jersey Homes
Installing a dryer vent the right way improves safety, shortens dry times, and protects your home from moisture. This guide gives you a practical sequence of steps and key code-conscious tips tailored to typical homes and multifamily buildings in Elizabeth, New Jersey. If you want a head start with expert planning and execution, you can request professional help for dryer vent installation and then use this guide to understand exactly what should be done.
While code language varies by jurisdiction and manufacturers, the principles remain consistent: keep the run short and smooth, minimize fittings, use listed materials, and terminate outdoors with a low-restriction hood. The following sections walk through planning, materials, installation, and verification so your laundry space performs at its best.
Pre-Planning: Map the Route Like a Pro
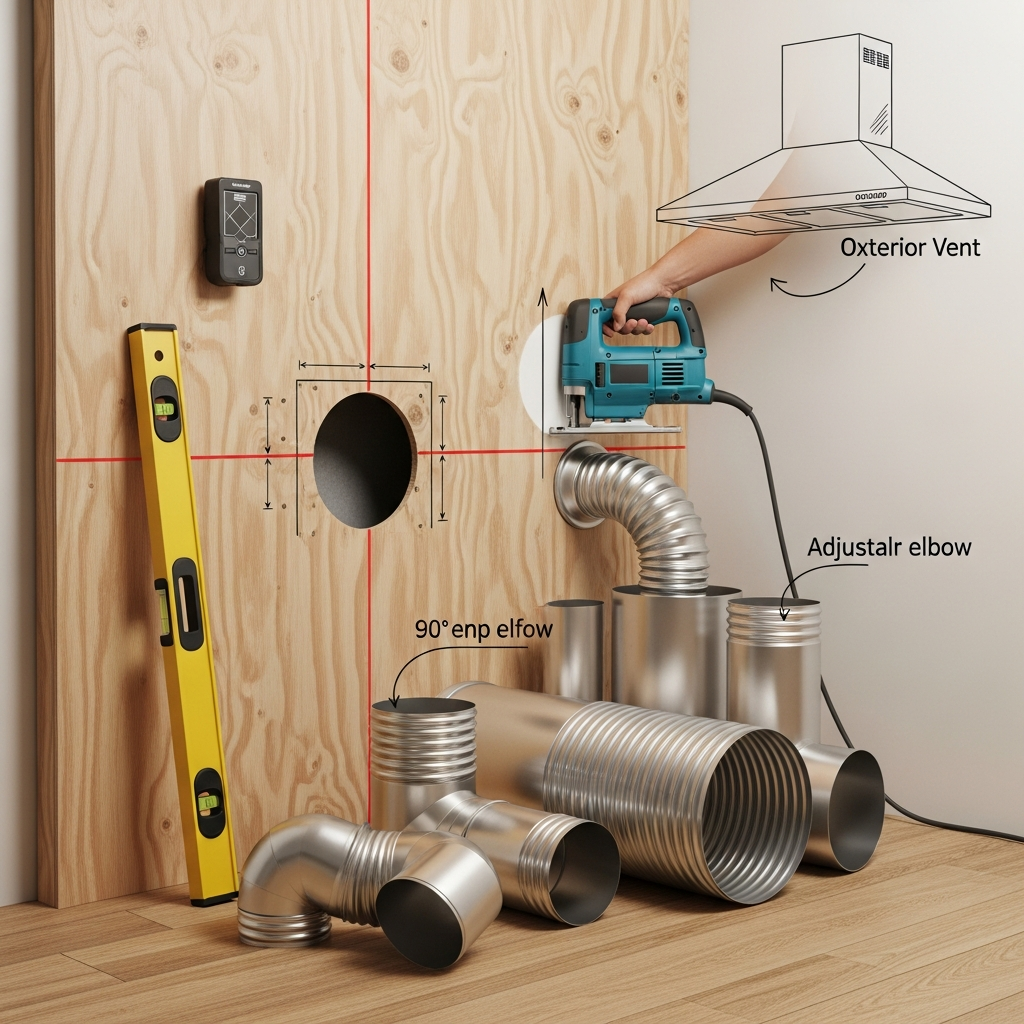
- Identify the nearest exterior wall: Exiting directly behind or beside the dryer often yields the best performance.
- Minimize elbows: Each elbow adds resistance; choose gentle changes of direction only when necessary.
- Avoid concealed terminations: The vent must discharge outdoors, not into attics, crawlspaces, or garages.
- Consider access: You should be able to inspect and service joints whenever feasible.
Code-Aware Planning Basics
Most dryer manufacturers specify a maximum equivalent length for the vent that accounts for the straight sections plus penalties for each fitting. Local code generally defers to the appliance listing and limits obstructions such as screens. The main points to keep in mind include the following concepts:
- Use smooth, rigid metal duct for the main run. It maintains diameter and resists damage.
- A short, listed transition duct connects the dryer to the wall outlet. Keep it uncrushed and as short as possible.
- Terminate outdoors with a backdraft damper and without a screen. Screens can trap lint and restrict airflow.
- Seal mechanical joints with quality foil tape suitable for dryer exhaust temperatures.
Materials and Tools Checklist
- Rigid metal duct sections and long-radius elbows
- Listed transition duct for dryer-to-wall connection
- Exterior hood with integral damper, no screen
- Foil tape and metal support straps
- Drill, hole saw, jigsaw or reciprocating saw, metal snips
- Level, measuring tape, stud finder, and PPE
Step-by-Step Installation Sequence
- Confirm layout and measurements: Verify the centerline of the dryer outlet and transfer to the exterior wall. Double-check clearances behind and beside the appliance.
- Cut the termination opening: Bore a pilot hole, then use a hole saw or saw to match the hood collar size. Keep cuts neat for better sealing and aesthetics.
- Install the exterior hood: Fasten to the siding or masonry and seal with appropriate caulk or flashing to prevent water intrusion.
- Dry-fit the interior duct: Assemble rigid duct sections with minimal elbows. Adjust angles for gentle sweeps rather than sharp turns.
- Secure and seal: Tape the seams with foil tape and support the run every few feet with metal straps to prevent sagging.
- Connect the transition: Attach a short, listed transition duct from the dryer outlet to the wall duct. Verify that it is not kinked or crushed when the dryer is pushed back.
- Verify damper action: Run the dryer on air-only or a timed setting and confirm that the exterior damper opens wide and moves freely.
- Final checks: Look for air leaks at joints, listen for vibration, and ensure the laundry area does not overheat during operation.
Clearances and Termination Considerations
Position the hood so it remains accessible for cleaning and is not blocked by shrubs, snow, or outdoor storage. Keep the termination away from areas where lint could accumulate on screens or louvers used for other equipment. Avoid terminating near interior intake openings to prevent re-entrainment of moist air.
Common Code Considerations for Elizabeth
Local enforcement typically expects a safe, listed installation that follows the dryer manufacturer’s specifications. A few broad themes apply in most cases:
- Equivalent length limitations: Each elbow counts toward the overall allowable run; long runs need careful design or an alternative layout.
- Prohibited screens: Exterior screens catch lint and can create blockages, so choose a hood with a damper only.
- Independent venting: Each dryer should have its own dedicated vent; combining multiple dryers on a single residential duct is not appropriate unless a listed, engineered system is specifically designed for it.
- Accessibility: Joints should be installed so they can be serviced if needed; avoid burying critical connections behind immovable finishes.
Special Cases: Interior Laundry Rooms and Roof Terminations
When the laundry is in the middle of the home, you may need to run the duct through ceilings or floor cavities to reach an exterior wall. Keep bends to a minimum, and support the duct at regular intervals. If a roof termination is necessary, use a vent cap designed for dryer exhaust and install it with proper flashing to avoid leaks. Expect to perform maintenance with safe roof access as lint accumulates over time.
Testing and Commissioning After Installation
Testing confirms that the system performs under real conditions. Turn the dryer to a no-heat or air-fluff cycle and check for strong exhaust at the exterior. The damper should open fully. A short drying cycle should complete without unusual heat in the laundry area or musty odors. Listen for rattles that indicate loose hardware or misalignment.
Maintenance Routines That Keep You Compliant
- Clean the lint screen before every load.
- Inspect the exterior damper monthly to ensure it opens freely and closes when the dryer is off.
- Check the transition duct each season for crushing or kinks when the appliance is moved.
- Schedule a deeper cleaning of the run annually or as needed based on drying times and usage.
Performance Red Flags
- Longer drying times than usual
- Excess heat in the laundry area
- Minimal damper movement during dryer operation
- Visible lint at the termination or around joints
- Burning or musty odors
When Professional Help Makes Sense
Condos, row homes, long runs, and rooftop terminations are common around Elizabeth and often warrant expert design and tools for a clean, efficient build. An experienced installer can measure airflow, optimize routing, and ensure the final system aligns with manufacturer guidance and local expectations. If you want a streamlined experience, consider professional dryer vent installation to reduce disruption and get verification testing the same day.
Frequently Asked Questions
Q: What kind of duct should I use for the main run?
A: Use smooth, rigid metal duct for the main sections. It minimizes friction, resists damage, and is easier to keep clean. Connect the dryer to the wall with a short, listed transition duct.
Q: Can I vent into a garage or attic?
A: No. Dryer exhaust must terminate outdoors. Venting into enclosed spaces introduces moisture and lint where it does not belong.
Q: How many elbows are too many?
A: Fewer is always better. Each elbow adds resistance that counts against your allowable equivalent length. If you need several elbows, shorten the overall run or explore a different route.
Q: Do I need a screen over the exterior hood?
A: No. Use a hood with a backdraft damper but without a screen. Screens trap lint and create blockages.
Q: How do I know if the vent is performing well?
A: The exterior damper should open fully under operation, drying times should be normal, and the laundry room should not overheat. If drying slows down, inspect and clean the vent.
Q: Are roof terminations acceptable?
A: They can be if properly flashed and if a low-restriction, dryer-rated cap is used. Expect additional maintenance due to access needs.
Q: What about a combined vent for two dryers?
A: Residential dryers typically require dedicated vents unless a specifically engineered and listed system is used. Separate vents are the norm.
Final Thoughts for Elizabeth Homeowners
Clear planning, correct materials, and careful sealing are the backbone of a safe, efficient dryer vent. Keep the path short, reduce elbows, and terminate with a damper-only hood that remains lint-free. Your dryer will run cooler, clothes will dry faster, and your home will be better protected from moisture.
Make Your Project Simple
If you want a smooth installation with airflow verification and tidy finishes, book local help to ensure a strong start. Schedule your convenient dryer vent installation and enjoy faster, safer drying in your Elizabeth, New Jersey home.
