Complete Dryer Vent Installation Guide for Elizabeth, New Jersey
Clothes dryers are workhorses in homes from Peterstown to North Elizabeth, but they rely on a safe, efficient exhaust path to perform at their best. A purpose-built dryer vent system improves drying times, reduces energy waste, and lowers fire risk by moving warm, moisture-laden air and lint outdoors. This comprehensive guide walks Elizabeth homeowners, landlords, and property managers through key decisions—materials, routing, code expectations, and maintenance—so every load finishes faster and safer. To jump-start your planning with trusted local insight, begin with a proven partner for dryer vent installation and map a design that fits your building and your routine.
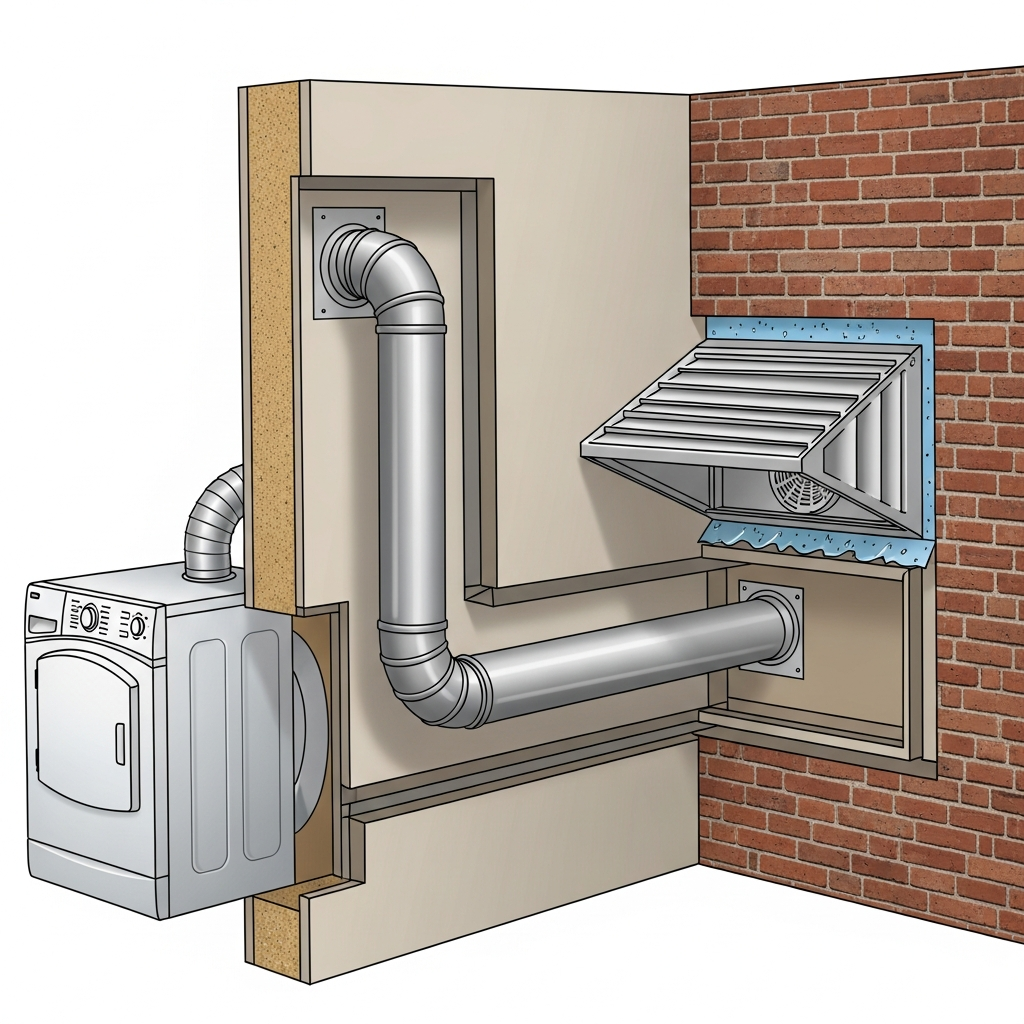
A dryer vent is more than a hose. It is a system that must be matched to your appliance and your home’s layout. Rigid metal ducting, sealed joints, and a properly sized, well-placed termination ensure that exhaust leaves the building quickly and cleanly. When any piece is compromised—kinked transition, long winding route, or a screened exterior hood—airflow slows, heat rises, and lint can accumulate. The result is longer cycles, increased wear on the dryer, and elevated risk. The good news: a thoughtful installation solves these problems and keeps laundry running smoothly.
Know the Building: Elizabeth Homes and Their Challenges
Elizabeth’s neighborhoods feature a wide range of construction styles. Historic homes in Peterstown may have brick or stucco exteriors that require careful drilling and sealing. Townhomes near the shopping district and apartments around Midtown often have compact laundry closets with very limited clearance. Multi-family buildings can include shared chases or stacked laundry spaces with strict rules about penetrations and firestopping. Each scenario benefits from a route that minimizes elbows and length to preserve airflow and reduce maintenance.
Older homes sometimes inherit legacy venting that was acceptable years ago but no longer meets today’s standards. Long runs of foil duct, indoor terminations, or vents that empty into crawlspaces can cause moisture damage and raise fire risk. If that describes your current setup, plan for a replacement with rigid, smooth-wall metal ducting and a direct path to the outdoors. This one change often delivers dramatic improvements in drying time and safety.
Materials That Matter
Most residential dryers are designed for a four-inch, smooth, rigid metal vent. Aluminum or galvanized steel duct sections are cut to length, deburred, and assembled so that joints face the direction of airflow. Heat-rated metal foil tape seals the joints; ordinary cloth duct tape should never be used because it fails at dryer temperatures. A short, UL-listed transition connects the dryer to the wall, allowing the appliance to be pulled out for service without crimping the connection.
Terminology is important. The full vent is the permanent duct that carries exhaust to the outdoors. The transition is the short, flexible connection from the dryer to the wall. Keeping the transition short, straight, and protected from crushing is essential. Many performance complaints trace back to a crushed transition rather than the main vent. Careful placement of the dryer and small adjustments to shelving or hoses can prevent recurring problems.
Designing the Route
Effective route design starts with the shortest practical path to an exterior termination. Side-wall exits are common because they reduce total length and elbow count. Vertical routes or roof terminations can work when side-wall access is limited, but they require special attention to support, condensation control, and termination style. Every elbow adds equivalent length, so designers aim for gentle bends and minimal turns. The route should be accessible enough for future cleaning, and access points should be considered if long runs cannot be avoided.
Exterior placement deserves careful thought. The termination hood should include a backdraft damper that opens fully under airflow and closes when the dryer is off. No screens should be installed, because lint can collect and create a blockage. The location must be clear of obstructions and set away from soffit or intake vents to avoid moisture issues. In Elizabeth’s climate, sealing and flashing protect the penetration from rain, wind, and winter freezes.
Code Expectations and Best Practices
While exact requirements vary by jurisdiction and building type, best practices are broadly consistent. Smooth, rigid metal ducts are preferred. Equivalent length must remain within the limits set by the dryer manufacturer. Joints should be airtight and installed in the direction of airflow. Support spacing prevents sagging, and protective sleeves guard the duct where it passes through framing. Gas dryers require special attention to clearances and shutoff access. Multi-family buildings may require firestopping and specific documentation for inspections.
These guidelines are not arbitrary. They drive tangible outcomes: better airflow, cooler operating temperatures, and shorter cycles. Over time, those advantages protect the dryer’s motor and heating elements and reduce the chances of lint ignition. If your current system veers away from these principles, re-routing or replacing certain components can produce immediate, measurable benefits.
Installation Day: What to Expect
Professional crews begin by protecting floors and appliances, then confirming the route and exterior termination location. They cut or core the penetration with tools appropriate to the exterior—vinyl, brick, stucco, or stone—keeping dust controlled where possible. The duct sections are cut, fitted, and sealed. Supports hold the run straight and prevent sags. The exterior hood is mounted with flashing and sealant, and the damper is tested for free movement. Finally, the dryer is reconnected with a short, UL-listed transition.
Testing is the last and crucial step. The team runs the dryer and confirms strong airflow and free damper movement. If measurements suggest resistance, they check joints, bends, and the transition for corrections. This attention to detail separates a merely functional vent from a system that performs at its best.
Common Mistakes to Avoid
Several pitfalls can undermine performance. Long, winding routes reduce airflow and lengthen cycles. Thin foil or plastic duct sags easily and traps lint. Screens at the termination clog quickly. Overly long transitions or those crushed behind the dryer become choke points. Venting into an attic, crawlspace, or garage introduces moisture and safety hazards. Avoiding these missteps is the fastest way to improve performance and reduce maintenance demands.
Another common issue is neglecting maintenance. Even perfect installations collect lint over time. If cycle times begin to increase or if the exterior hood shows visible lint, schedule cleaning sooner rather than later. Quick action helps preserve airflow and protects dryer components from overheating or premature failure.
Mid-Project Checkpoints
During planning or on installation day, take a moment to confirm the essentials. Is the route as short and straight as possible? Are joints oriented with airflow and sealed with heat-rated tape? Is support adequate to prevent sagging? Does the termination hood’s damper open and close freely? Verifying these points mid-project saves time and ensures the final result meets expectations. If you want a second set of eyes, consult an Elizabeth-based specialist for professional dryer vent installation to validate your choices.
Maintenance: The Key to Consistent Performance
Cleaning frequency varies with household size, laundry volume, and route complexity. Many homes benefit from annual cleaning; larger families or households with pets may need service more often. During maintenance, technicians remove lint from the entire run, verify transition condition, and confirm proper damper movement. You can help by cleaning the lint screen every load, checking the exterior hood monthly, and ensuring the dryer is not pushed so far back that it crushes the transition.
Keep a simple log of service dates and any changes in performance. If cycles begin to take longer or if the laundry room feels hotter than usual, use that log to schedule service. Staying proactive not only protects your dryer; it also maintains the integrity of the ductwork and helps prevent surprises at home inspections or during a sale.
Frequently Asked Questions
Q: Do I need a permit for a new dryer vent in Elizabeth? A: Permit requirements depend on scope, building type, and whether new penetrations are created. Multi-family buildings and projects involving fire-rated assemblies are more likely to require documentation and inspection.
Q: What duct material should I use? A: Smooth, rigid metal ducting is the standard for safety and performance. Semi-rigid transition duct may be used in a short length between the dryer and the wall. Plastic venting is discouraged or prohibited because it traps lint and degrades in heat.
Q: How long can the vent be? A: The total equivalent length is limited by the dryer manufacturer and must account for each elbow. If a proposed route exceeds that limit, re-routing is necessary to protect performance and safety.
Q: Can two dryers share one vent? A: Residential systems typically require dedicated vents. Shared lines complicate airflow and cleaning and may violate code or manufacturer instructions. Consult a professional for multi-dryer or commercial scenarios.
Q: How often should I clean the vent? A: Annual cleaning suits many households, with more frequent service for heavy usage or pet-heavy homes. Watch for longer cycles or visible lint at the exterior hood as signs to schedule sooner.
From Planning to Peace of Mind
A great installation delivers immediate benefits: faster cycles, cooler laundry rooms, and confidence that lint-bearing air is exiting the building safely. The combination of correct materials, efficient routing, airtight joints, and a quality termination hood produces a dependable system that serves your home quietly and effectively. If your current vent falls short or if you are renovating and want a clean start, now is the time to put best practices into action.
Take the Next Step in Elizabeth
Turn this guide into results by partnering with a local team that understands Elizabeth homes, codes, and climate. Schedule an assessment, review your route options, and set up routine maintenance to protect your investment. For a streamlined path from design to tested performance, choose a provider known for comprehensive dryer vent installation services. With expert planning and careful workmanship, your dryer will run better, safer, and more efficiently every day.
