Installing a dryer vent in Elizabeth, New Jersey requires more than a quick hookup. Homeowners and property managers must ensure the system moves moist, lint-laden air safely outdoors while aligning with commonly adopted code principles. This guide explains core requirements for materials, routing, termination, and maintenance so you can plan and verify a compliant setup. If you prefer an expert to interpret standards and handle the details, consider booking trusted dryer vent installation support to help ensure safe operation and strong airflow.
Core Material Requirements
Most widely used standards for residential dryer exhaust share similar fundamentals. Always confirm details with your local authority having jurisdiction, but expect these baseline requirements:
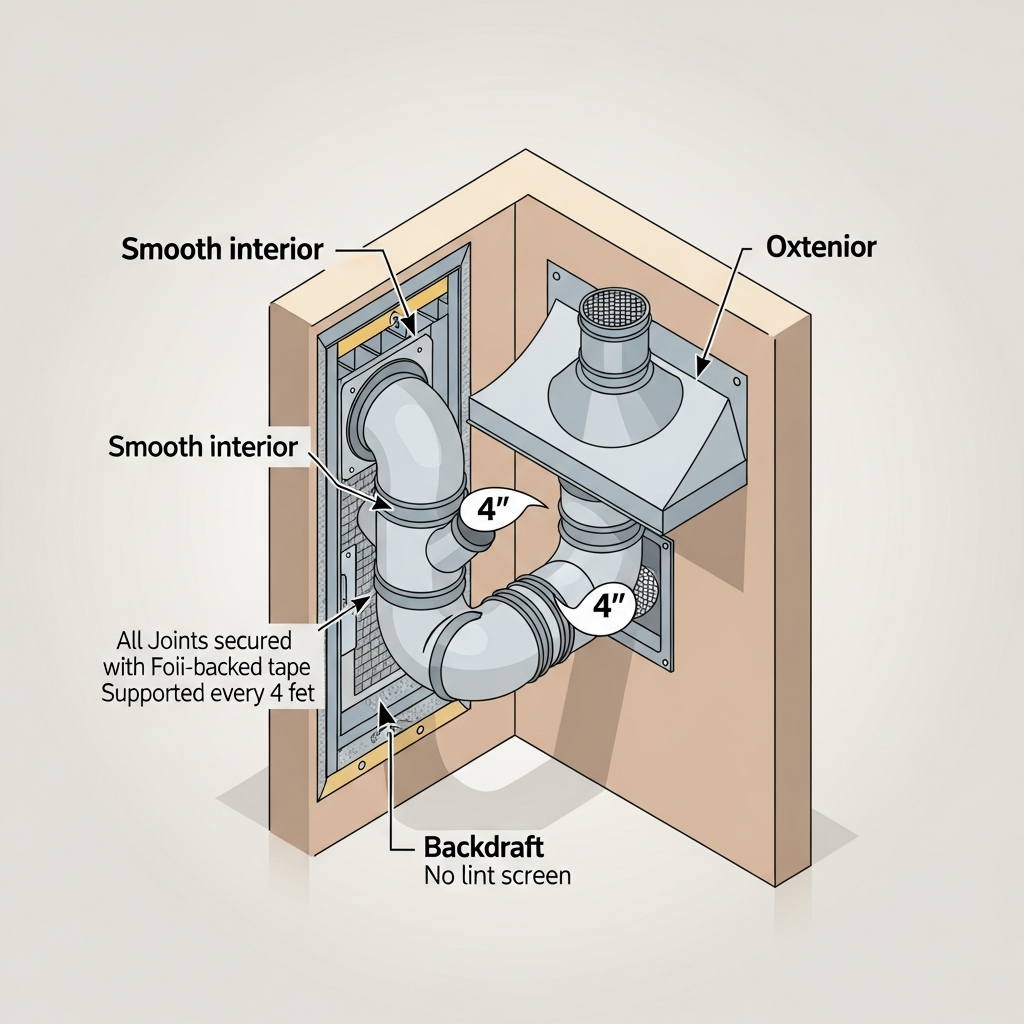
- Diameter: Typically 4 inches for residential dryers.
- Material: Smooth-interior metal duct for the permanent run. Avoid plastic or thin foil for concealed or permanent sections.
- Transition connector: A short, listed connector between the dryer and the first rigid fitting. Keep it as short and straight as possible.
- Joints: Oriented in the direction of airflow; sealed with foil-backed HVAC tape rated for dryer ducts; avoid screws that penetrate the airstream.
- Supports: Hangers or straps every 4 to 6 feet to prevent sagging in horizontal runs.
Routing and Length Considerations
Airflow is king. To keep resistance low, plan a route with minimal turns and a short overall length. Manufacturers specify maximum equivalent lengths for their models; each elbow adds to that total.
- Keep runs as short and straight as possible.
- Use long-radius elbows or 45-degree turns when feasible to reduce resistance.
- Maintain a gentle slope toward the exterior to drain condensation.
- Protect penetrations with thimbles or sleeves where required.
In Elizabeth, many homes feature basements and masonry exteriors. Exiting through a rim joist is often efficient; brick or block penetrations require careful drilling and may extend installation time. For upper-floor laundry rooms, routes through interior cavities to an exterior wall or, when necessary, a roof termination are common.
Termination Requirements
A listed exterior termination completes the system and prevents backdrafts and pest entry without trapping lint. Key expectations include:
- Backdraft damper: The hood must include a damper that opens with airflow and closes when the dryer stops.
- No screens: Screens capture lint and can quickly clog, increasing fire risk.
- Clearances: Maintain separation from doors, windows, and building openings per adopted standards and manufacturer guidance.
- Height: Mount high enough above grade and expected snow levels to avoid blockage.
- Orientation: Position to shed water and allow free damper movement in all seasons.
Prohibited Practices
- Terminating into attics, crawlspaces, garages, or interior rooms
- Sharing the duct with other systems such as bath fans or range hoods
- Using screws that penetrate the duct interior and snag lint
- Relying on unlisted tapes or cloth duct tape to seal joints
- Installing screens or louvers that trap lint
Special Situations in Elizabeth, NJ
Elizabeth’s housing mix—historic properties, multifamily buildings, and tightly spaced homes—adds a few decision points. If your home is part of a shared-wall structure, verify whether the HOA or property manager requires specific terminations, colors, or locations. For brick exteriors, you may need a masonry sleeve to protect the duct and present a clean edge. In winter, ice and snow can impede dampers located too close to grade; mount higher and verify free movement after storms.
Gas Dryers and Combustion Safety
Gas dryers produce combustion byproducts that must be expelled outdoors. Ensure the vent is airtight and well supported. Keep the laundry area supplied with adequate combustion air as recommended by the appliance manufacturer and adopted codes. After reconnection, use approved leak detection to confirm gas-tight joints.
Verification and Testing
After installation, test the system to confirm it meets performance expectations. Run the dryer on an unheated cycle, and verify the damper opens fully. Indoors, listen for rattles or air leaks at joints. In long runs, small leaks can accumulate into noticeable performance losses, so walk the line and re-tape if needed. Measure drying times across a few loads to confirm consistent operation.
Maintenance Requirements
Routine maintenance supports long-term compliance and safety. Create a schedule and stick to it:
- Before every load: Clean the lint screen.
- Monthly: Inspect the exterior hood and remove visible lint.
- Quarterly: Vacuum the transition connector and accessible interior joints.
- Annually: Arrange a complete duct cleaning, especially for high-usage households.
- After storms: Ensure snow, leaves, or debris have not blocked the termination.
Frequently Asked Questions
Q: Do I need a permit for a new dryer vent in Elizabeth? A: Requirements vary based on the scope of work and building type. Check with the local construction office to see if your project requires a permit or inspection.
Q: What duct size should I use? A: Most residential dryers require a 4-inch diameter duct. Confirm with the appliance manual.
Q: Can I vent into a garage or attic to shorten the route? A: No. Dryer exhaust must terminate outdoors.
Q: Are roof terminations allowed? A: With proper flashing and a listed cap, yes, though wall terminations are often easier to inspect and maintain.
Q: Can I connect my dryer to an existing bath fan duct? A: No. Shared ducts are not allowed for dryer exhaust.
Q: What kind of tape should I use? A: Use foil-backed HVAC tape rated for dryer ducts, not cloth duct tape.
Q: How many elbows are acceptable? A: Minimize them. Each elbow increases resistance. Follow the dryer manufacturer’s maximum equivalent length.
Q: Why can’t I use screws? A: Screws can protrude into the airstream, catching lint and creating a fire hazard.
Q: What maintenance is required? A: Clean the lint screen before each load, keep the exterior hood clear, and schedule periodic duct cleaning.
Q: What if my run is very long? A: Rework the layout to shorten the run, use long-radius fittings, or consult a professional for code-compliant solutions.
Putting It All Together
Meeting dryer vent requirements is about combining the right materials, a smart route, and a proper termination. In Elizabeth’s varied housing stock, attention to masonry, weather, and shared-wall rules can make the difference between a passable setup and an optimal one. If you would like knowledgeable help applying these requirements to your specific home, reach out to schedule reliable dryer vent installation that emphasizes safety, performance, and long-term durability.
