Dryer vent installation may look simple at first glance, but doing it the right way helps protect your home from fire hazards, excessive humidity, and inefficient drying cycles. If you are in Elizabeth, New Jersey, where older homes, tight lots, and varied building materials are common, careful planning makes all the difference. This step-by-step guide explains how to plan the route, choose materials, follow typical code expectations, and perform a safe installation. Early on, it is smart to decide whether you will DIY or partner with a pro. If you prefer assistance, explore trusted dryer vent installation options to ensure your project meets current safety standards.
Why Proper Dryer Vent Installation Matters
Dryers expel warm, moist air and fine lint particles. If that air and lint do not exit your home effectively, you risk slow drying, condensation damage, mold growth, and increased fire risk. In Elizabeth, New Jersey, many homes feature basements, stacked multifamily layouts, or row-house configurations. Those characteristics can complicate dryer vent routing and termination. A well-planned installation reduces elbows, keeps runs short, and ensures an effective exterior termination point, even when space is limited.
Good installation also protects your dryer’s warranty and extends its lifespan. When the duct is smooth, properly supported, and sealed at each joint with the correct tape, the blower faces less resistance. That means faster cycles, better energy performance, and fewer service calls. Homeowners also benefit from cleaner indoor air when combustion or humidity is properly exhausted outdoors.
Safety and Code Basics to Know in Elizabeth, NJ
Although you should confirm the specifics with your local authority having jurisdiction (AHJ), typical dryer vent standards align with widely adopted building codes such as the International Residential Code (IRC). In practical terms, these expectations usually include:
- Use 4-inch diameter, smooth interior metal duct for the main run. Avoid plastic or thin foil duct for the permanent run.
- Keep the total equivalent length within recommended limits; elbows count as additional length because they add resistance.
- Avoid screws that protrude into the airstream. Fasten joints using listed clamps or foil-backed metal HVAC tape rated for high temperatures.
- Vent directly outdoors; do not terminate into attics, crawlspaces, garages, or interior rooms.
- Install a proper exterior hood with a backdraft damper and without screens that could trap lint.
- Provide adequate clearance to grade and avoid placing terminations too close to windows or doors.
In Elizabeth, neighborhoods can be dense, and some properties feature shared walls or limited exterior access. If you live in a multifamily building, check with your property manager and the local construction office for approval and any permit requirements. When in doubt, document the existing conditions, sketch your proposed route, and confirm allowable materials and locations before cutting any holes.
Planning Your Vent Route
The shortest, straightest path to the exterior is ideal. Begin by identifying the dryer’s location, the nearest exterior wall, and obstacles between them. In basements or first-floor laundry rooms, a direct back-vent through a rim joist is often possible. On higher floors or in interior laundry closets, you may need to run vertically through framing cavities before turning out to an exterior wall or the roof.
- Minimize elbows: Each 90-degree elbow adds significant resistance; 45-degree turns are more efficient.
- Limit length: Keep the equivalent length within the dryer manufacturer’s recommendation. This varies by model but is often around 35 equivalent feet for many dryers, reduced by each elbow used.
- Choose safe termination points: Avoid soffits, crawlspaces, and areas prone to snow accumulation.
- Consider maintenance access: Plan for joints and support points you can inspect and clean later.
Sketch the route and label each elbow and straight section. Measure twice and note joist directions, plumbing stacks, electrical wiring, and framing that might influence your path. If the run must be long, check whether your dryer can accommodate it or whether a dryer booster fan with a proper sensor and listing may be required by code and manufacturer guidance.
Materials and Tools Checklist
- 4-inch diameter smooth metal duct (rigid, with smooth interior)
- Short length of listed transition duct from the dryer to the wall connection (often semi-rigid or a listed flexible connector)
- Metal elbows (preferably adjustable, smooth-interior)
- Foil-backed, UL-listed HVAC tape (not cloth duct tape)
- Appropriate clamps or band connectors
- Exterior vent hood with backdraft damper (no screen)
- Wall thimble or roof flashing, as applicable
- Drill/driver, tin snips, hole saw or jigsaw
- Stud finder, level, tape measure
- Masonry drill bits and anchors, if exiting through brick or block
- Safety gear: gloves, eye protection, dust mask
- Support straps or hangers for long runs
Step-by-Step Installation
- Unplug and move the dryer. If you have a gas dryer, close the gas valve and disconnect the flexible gas connector following manufacturer and safety guidance.
- Confirm the outlet location on the back of the dryer and the planned penetration point in the wall or floor. Mark your centerline.
- Locate studs and utilities. Use a stud finder and visual inspection to avoid framing members, wires, or pipes when choosing an exit point.
- Cut a pilot hole. Drill a small hole from inside to mark the intended exit point, then verify from the outside that the location is clear and accessible.
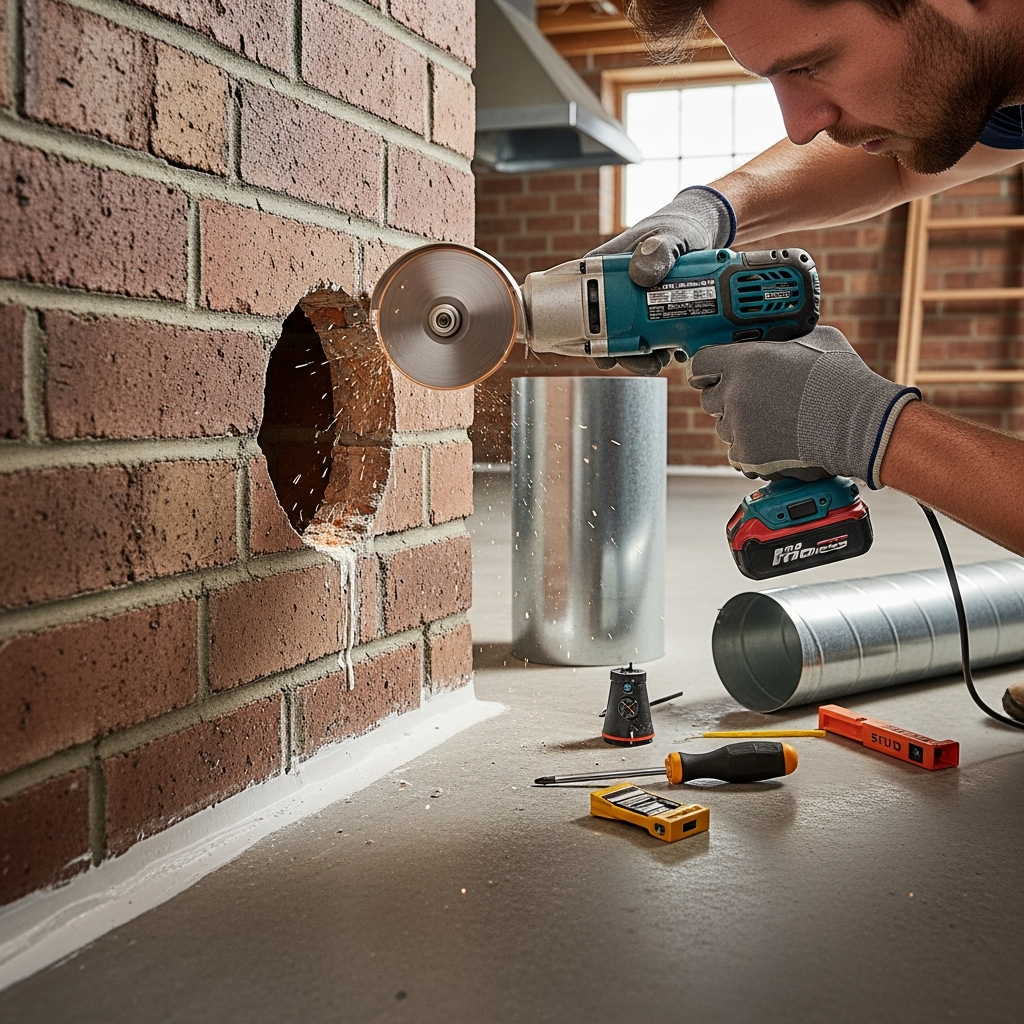
- Cut the full opening. Use a hole saw or jigsaw to match the duct diameter and any required thimble size. In brick or block, drill a series of holes around the perimeter and finish with a chisel, or use a core bit as appropriate.
- Install the wall thimble or sleeve if required. This protects combustibles from heat and provides a neat finish at the opening.
- Dry-fit the duct layout. Assemble elbows and straight sections without sealing to confirm alignment. Keep joints oriented in the direction of airflow so the crimped male end points away from the dryer toward the exterior.
- Assemble from the outside in. Attach the vent hood to a short piece of duct, feed it through the wall, and temporarily secure the hood outdoors. Maintain a slight downward pitch toward the exterior to shed any condensation.
- Connect interior sections. Starting near the wall exit, add rigid sections and elbows as planned. Support the run with hangers every 4 to 6 feet to prevent sagging.
- Seal appropriately. Use foil-backed HVAC tape rated for dryer ducts at each joint. Avoid screws that penetrate the duct interior; if necessary, use minimal-length fasteners designed not to protrude inside.
- Connect the transition duct. Use a listed transition connector from the dryer to the first rigid fitting or wall connector. Keep this piece as short and straight as possible.
- Install the exterior hood. From outside, secure the hood to the siding or masonry with appropriate fasteners and seal around the flange with an exterior-grade sealant, taking care not to block the damper.
- Reposition the dryer carefully. Avoid crushing the transition duct while sliding the unit back. Verify a gentle bend with no kinks.
- Restore power and, if applicable, gas. Check for gas leaks using an approved leak detection method if you disconnected a gas line.
- Test airflow. Run the dryer on air fluff. Go outside and confirm strong airflow and that the damper opens fully. Check indoors for any unusual noise or vibration.
Special Considerations for Elizabeth Homes
Many Elizabeth houses were built decades ago and may have irregular wall thicknesses, brick exteriors, or plaster and lath interiors. When exiting through masonry, expect additional drilling time and consider a masonry sleeve to protect the duct. In attached homes or multifamily buildings, choose a termination location that does not exhaust into a shared stairwell or under a neighbor’s window.
Winters bring cold snaps, and summers can be humid. Maintain a slight slope toward the exterior to discourage condensation pooling in the duct. In areas prone to snow, mount the exterior hood high enough to avoid blockage and ensure the damper can swing freely even after storms.
Common Mistakes to Avoid
- Using plastic or thin, unlisted foil duct for the permanent run
- Excessive run length or too many sharp elbows
- Penetrating joists or studs without proper reinforcement or protection
- Installing screens on the exterior hood that trap lint
- Failing to pitch the duct slightly toward the exterior
- Sealing joints with cloth duct tape rather than foil-backed HVAC tape
- Crushing the transition connector when pushing the dryer back
If any step feels beyond your comfort level—especially exterior penetrations through masonry or roofs—consider scheduling professional dryer vent installation to ensure the run length, materials, slope, and termination meet modern safety expectations.
Testing and Commissioning
Once installed, verify airflow and check each joint for leaks. Indoors, listen for rattling that may indicate a loose elbow or clamp. Outdoors, confirm that the damper opens fully and closes when the dryer stops. You can hold a piece of tissue near interior joints while the dryer runs to detect escaping air. If airflow feels weak, reassess the number of elbows, look for crushed sections, or confirm the exterior damper is not stuck.
Measure drying performance over the first week. Loads should finish within the time recommended by your dryer’s manual. If cycles run long, or if you notice the laundry room getting humid or musty, investigate for obstructions or kinks. Cleaning the lint filter before every load and inspecting the transition connector monthly will help keep the system efficient.
Maintenance Tips to Keep Your System Safe
- Clean the lint screen before every cycle.
- Inspect the exterior damper monthly to remove lint buildup.
- Vacuum the transition connector and the first section of duct every 3 to 6 months.
- Schedule a comprehensive duct cleaning annually, or more often if you dry heavy lint items like towels and fleece.
- After severe storms or heavy snowfall, verify the exterior hood is clear and the damper moves freely.
FAQ
Q: Can I vent a dryer into a garage or attic to shorten the run? A: No. Dryer exhaust must terminate outdoors to remove moisture and lint safely.
Q: Do I need a permit for dryer vent installation in Elizabeth? A: Requirements can vary. Contact the local construction office to ask whether your project needs a permit or inspection, especially for new penetrations or multifamily buildings.
Q: What duct material is best? A: Use 4-inch smooth metal duct for the main run. A short, listed transition connector may be used from the dryer to the wall connection.
Q: How long can my dryer vent be? A: Follow your dryer manufacturer’s maximum equivalent length, which accounts for elbows. Shorter and straighter is always better.
Q: Can I use screws on joints? A: Avoid fasteners that protrude into the airflow. Use listed clamps or foil-backed HVAC tape on joints made for dryer ducts.
Q: Is roof termination acceptable? A: Yes, with proper flashing and a listed roof cap. However, wall terminations are often easier to maintain in Elizabeth’s climate.
Q: What about birds or rodents? A: Do not install screens that trap lint. Instead, use a proper hood and keep it clean to discourage nesting while maintaining free airflow.
Q: My laundry room is interior. What are my options? A: Plan a route up through framing to an exterior wall or roof. If the run is too long, consult an expert about code-compliant solutions.
Q: Why is there water in my vent? A: Condensation can form in long or poorly pitched runs. Ensure a slight slope toward the exterior and consider insulating sections in unconditioned spaces.
Q: How often should I clean the duct? A: At least annually for most households, more frequently for high-use dryers or homes with pets.
Ready to Install With Confidence
With smart planning, quality materials, and careful workmanship, you can complete a safe and effective dryer vent installation in Elizabeth. If you decide you would prefer expert help—or simply want a final check of your layout—reach out to a trusted team and schedule your dryer vent installation so your home benefits from strong airflow, faster drying, and long-term safety.
