Dryer vent safety is a year-round priority for households in Elizabeth, New Jersey, where dense neighborhoods, older housing stock, and seasonal humidity can all influence how well your laundry equipment performs. If you are determined to handle routine cleaning yourself, it is essential to approach the job carefully, methodically, and with the right tools. In this step-by-step guide, you will learn how to prepare your space, clean effectively, and recognize when to stop and bring in a professional. To set expectations up front, there are moments when a trained technician is the safer option, and you will learn how to recognize those scenarios as well. If you prefer to skip the do-it-yourself route at any point, you can always book trusted dryer vent cleaning with a local team that serves Elizabeth and surrounding communities.
Why safe dryer vent cleaning matters in Elizabeth, NJ
Dryers move large volumes of humid air through a duct to the outdoors, and the more lint and debris that accumulates inside, the harder the system has to work. In Elizabeth, New Jersey—where many homes are attached, multi-level, or include basement laundry spaces—restricted vents can quickly become a fire hazard. Additionally, gas dryers must vent combustion byproducts safely outside; blockages can lead to dangerous backdrafting. Even with electric units, a clogged vent means longer drying cycles, higher utility usage, and more wear on fabrics.
Local conditions play a role, too. Shoreline humidity and seasonal temperature swings can cause lint to stick to the vent walls. Multi-family buildings sometimes share complex vent paths that require extra vigilance. And if your home is older or includes renovations, vent runs may be longer or include unnecessary turns that catch lint. All of these factors underline why safety must guide your approach from start to finish.
Safety first: preparation and protective steps
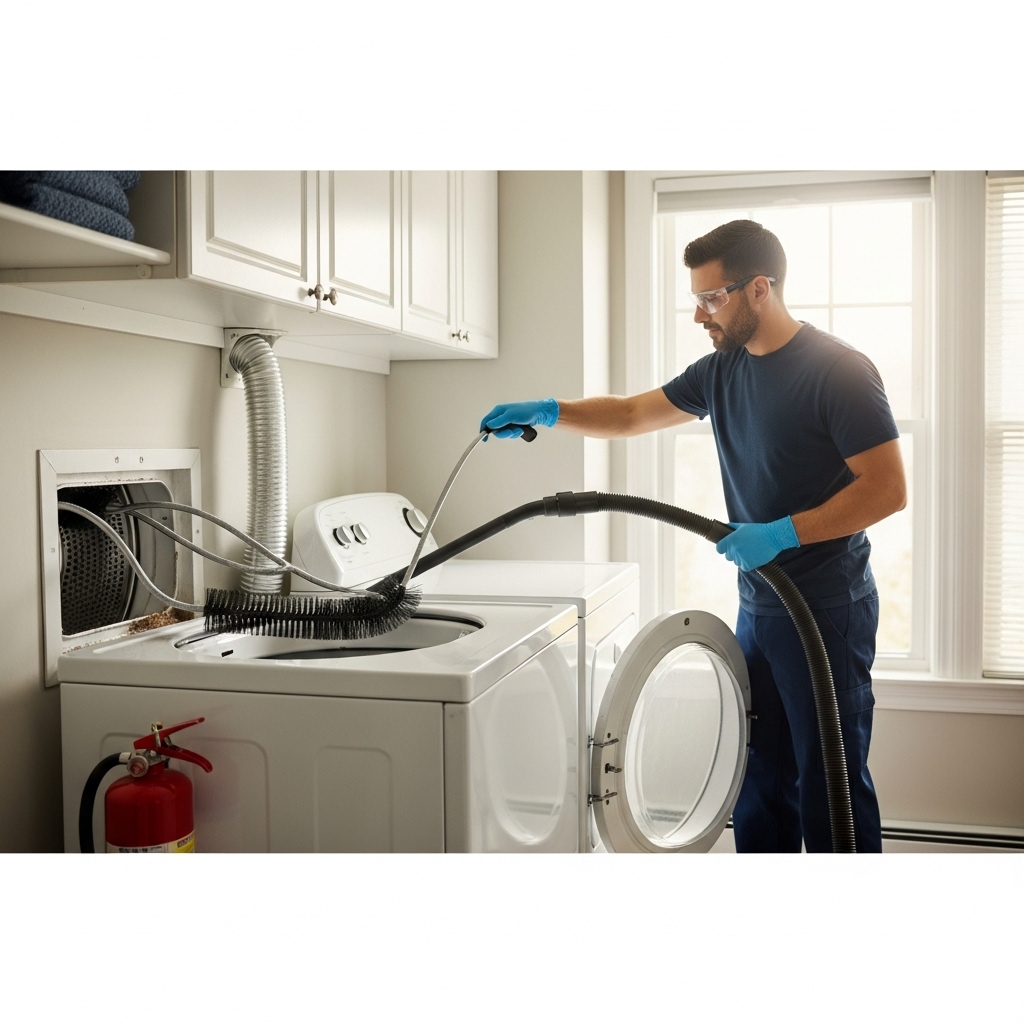
Before any cleaning begins, safeguard yourself, your home, and your appliance. Unplug the dryer from its electrical outlet. If you have a gas dryer, carefully close the gas shutoff valve and verify there is no gas smell; if you detect any odor, stop and call a professional immediately. Move the dryer gently away from the wall to create working room without straining the gas line or kinking the vent hose.
Wear safety glasses to keep dust and lint out of your eyes, and consider a mask—especially if you are sensitive to dust. Gloves are helpful when handling metal ducts, which can have sharp edges. Keep a fire extinguisher in the area as a best practice, and open a nearby window to improve ventilation while cleaning.
Know your dryer vent type
Not all vent systems are the same. Rigid or semi-rigid metal ducts are preferred because they resist crushing and hold their shape. Thin, vinyl, or flexible plastic vents are unsafe for dryer exhaust and should be replaced; they can burn and they trap lint. Many Elizabeth homes, including older houses and multi-family residences, may still have accordion-style foil ducts. While these are commonly sold, the ridges can collect lint; if you cannot replace them immediately, plan to clean more often and arrange for an upgrade when feasible.
It is also important to locate your exterior termination. Some vents exit through a side wall near the ground; others go up through a roof. If the vent exits to the roof, exercise caution—roof work poses fall risks and should usually be handled by a qualified professional. If the exit is elevated, ensure you have a stable ladder and a second person present for safety or consider professional help.
Tools and materials you will need
A well-chosen set of tools ensures you can loosen and remove lint without damaging the vent. A quality dryer vent brush kit with flexible rods is the core tool; these kits connect to a drill or can be used manually. A vacuum with a hose attachment helps capture loose debris. A small flashlight lets you inspect inside the duct. Keep a screwdriver or nut driver on hand to loosen clamps, and have metal foil duct tape (UL-listed for HVAC use) ready to reseal joints. Avoid duct tape that uses cloth backing, as it dries out and fails in warm air.
Have a drop cloth or old towel ready to collect lint, and consider a shallow tray for capturing debris beneath the transition hose connection. If your unit is stacked in a closet, plan extra time to carefully maneuver it without straining electrical or gas lines. Finally, a digital timer or your phone can help you track how long the process takes and set reminders for future maintenance.
Step-by-step: how to clean the dryer vent safely
Step 1: Disconnect the power and, for gas units, close the gas valve. Again, safety is priority one. Confirm the dryer is off and cool before working.
Step 2: Pull the dryer out gently. Give yourself enough space to access the transition hose and the back panel without yanking cables or hoses.
Step 3: Remove the transition hose. Loosen the clamp with a screwdriver or nut driver. Carefully detach the hose from the dryer and from the wall or floor duct connection. Inspect the hose for damage like tears, kinks, or heavy lint accumulation. If it is foil accordion-style or plastic, plan to upgrade to semi-rigid metal to improve airflow and safety.
Step 4: Vacuum the accessible lint. Use a vacuum hose to clean around the dryer port, the transition hose (if reusing), and the first few feet of the in-wall duct. Be gentle around sensors and wiring. Vacuum the floor and surrounding areas where lint has collected.
Step 5: Brush the duct run. Connect the flexible rods to your vent brush, insert carefully into the duct, and rotate gently as you move forward. If using a drill, use low speed and a smooth motion, withdrawing periodically to remove loosened lint. Avoid aggressive force that could puncture the duct or dislodge joints. Work from the interior connection toward the exterior, then repeat from the exterior going inward if accessible.
Step 6: Clean the exterior hood. Check the flap or louvered cover for obstructions. Birds or rodents sometimes attempt to nest in vent terminations, particularly during spring in New Jersey. Remove any debris, vacuum the area, and ensure the flap moves freely. If the flap is stuck or broken, replace the hood with a model that includes a backdraft damper and a pest screen designed for dryer exhaust (never use fine mesh that can trap lint).
Step 7: Inspect joints and supports. Look for screw fasteners that protrude into the duct interior; these can trap lint. Replace them with band clamps or foil tape as needed. Ensure the duct run is supported at proper intervals to prevent sagging. In basements or crawl spaces common to Elizabeth, look for sections that may dip or collect condensation—these low points can accumulate wet lint.
Step 8: Reconnect with care. Reattach the transition hose to the dryer and the wall or floor connection, and secure with clamps or foil tape (do not use screws that puncture the duct). Make sure the hose is not crushed or sharply bent when you push the dryer back toward the wall. Leave a gentle radius so airflow is not restricted.
Step 9: Test run. Restore power and, for gas units, reopen the gas valve. Run the dryer on air-only or a low-heat cycle for 10–15 minutes. Go outside to confirm that a strong stream of warm, moist air is exiting the vent. Inside, listen for unusual vibrations or rattles that could indicate a loose connection.
Deep cleaning details that make a difference
Clean the lint screen thoroughly with warm water and mild soap if you use fabric softener sheets; residue can coat the screen and reduce airflow. Vacuum around the lint trap housing with a narrow attachment. If your dryer has a removable front panel or access to the blower housing, vacuum built-up lint there as well, but do not disassemble beyond the manufacturer’s guidelines.
Pay attention to the duct length. The longer the run and the more bends involved, the more friction the air encounters. In some Elizabeth homes, the vent may run from a basement or interior laundry closet across the house to an exterior wall. These extended routes collect lint in multiple sections. If you routinely find heavy accumulations even with regular cleaning, consider a reroute to shorten the path, increasing safety and efficiency.
Common challenges in Elizabeth, New Jersey homes
Attached homes and multi-family buildings often have laundry spaces that were added during renovations, sometimes forcing longer vent runs. You may also find vents traveling through unconditioned spaces like garages or crawl spaces where temperature differences can condense moisture inside the duct, causing “lint paste” to accumulate. In older Elizabeth neighborhoods, it is not unusual to see creative retrofits. When you encounter inaccessible sections or suspect hidden damage, it is time to involve a professional.
Shared exterior walls can limit where vents are allowed, and homeowners associations or building codes may restrict roof penetrations. Always verify that your vent terminates outdoors and never into an attic, crawl space, or chimney. Improper terminations allow moisture and lint into hidden cavities, risking mold growth and structural damage over time.
How often to clean and what warning signs to watch
For a typical household, a thorough cleaning once a year is a good baseline, with more frequent attention if you do laundry daily, dry pet bedding, or wash heavy fabrics like towels and blankets. If your vent length is long or includes multiple bends, consider semi-annual cleanings. Watch for warning signs: loads that take longer to dry, the dryer cabinet feeling excessively hot, a burning or musty odor, and the exterior flap failing to open fully while the dryer runs. Excessive lint behind or under the dryer is another cue that airflow is compromised.
Gas dryers deserve special attention. If you ever notice soot, scorch marks, or the smell of combustion, stop using the appliance immediately and call for service. Carbon monoxide is a serious risk when vents are blocked or disconnected in gas systems. Install a CO detector near your laundry area as an added layer of protection.
When DIY stops and professional service starts
There are clear moments when bringing in an expert is the safest choice. If your vent terminates on a steep or high roof, do not climb; roof work requires specialized equipment and training. If you discover damaged metal ducts inside a wall or ceiling, a professional can repair and seal the system correctly. Multi-unit buildings often have shared chases or unusual routing; in those cases, trained technicians use special brushes, high-powered vacuums, and inspection tools like cameras to ensure the entire route is clear.
Professional technicians also test airflow and can verify that the dryer is operating within safe limits. If you suspect a persistent blockage you cannot reach or you want confirmation that your work succeeded, schedule an inspection. Midway through your maintenance planning, remember that a periodic appointment for professional dryer vent cleaning can complement your own routine and extend appliance life.
Aftercare: keep it clean between deep services
After a thorough cleaning, adopt simple habits to keep the system clear longer. Empty the lint screen after every load—every single one. Avoid overloading the drum, which impedes tumbling and traps moisture longer in fabrics. If you use dryer sheets, rinse the screen monthly to remove residue. Consider air drying bulky items occasionally to reduce lint production and keep heat exposure in check.
Visually check the exterior vent monthly to ensure the flap opens freely. During fall in Elizabeth, leaves and windblown debris can collect around sidewall vents; clear these promptly. In winter, snow and ice can freeze louvers; keep the area accessible. If you hear wildlife noises or notice nesting materials near the termination, address this right away and evaluate whether your hood needs an upgrade designed for dryer exhaust applications.
Environmental and energy benefits
Safe dryer vent cleaning is not just about avoiding hazards—it improves efficiency. With a clear vent, air moves faster, moisture leaves clothes sooner, and cycles shorten. Shorter cycles mean less energy used per load and less heat exposure for fabrics. In an older housing stock like Elizabeth’s, small upgrades such as switching to semi-rigid metal transition ducts and sealing joints with foil tape can add up to meaningful energy savings across the year.
Efficiency also supports the dryer’s longevity. Motors, belts, and heating elements face less strain when airflow is unobstructed. Keeping a maintenance log—dates of cleaning, vent condition observed, parts replaced—helps you spot patterns and schedule preventive care before problems escalate.
Documentation and safety logs
Make a quick record after each cleaning. Note the date, tools used, any damage found, and whether the exterior flap worked properly. If you live in a multi-family property or landlord-tenant situation in Elizabeth, having documentation can simplify compliance with building maintenance policies. It can also help technicians if you later request service; the more detail you provide, the faster they can diagnose issues.
Frequently Asked Questions
Q: How long should a typical dryer vent cleaning take for a single-family home in Elizabeth? A: If your vent run is short and accessible, expect about 60–90 minutes for a careful DIY job. Complex setups, stacked units, or vents with many turns will take longer. Do not rush; thoroughness is more important than speed.
Q: Can I use a leaf blower to clear my dryer vent? A: It is not recommended. Leaf blowers can compact lint into wads, push debris into hidden corners, or separate duct joints, releasing lint into walls or ceilings. A brush kit designed for dryer vents is safer and more effective.
Q: Is foil tape safe for sealing duct joints? A: Yes, UL-listed metal foil tape is appropriate for dryer exhaust. Do not use cloth-backed duct tape; it degrades under heat and fails. Avoid screws that protrude into the airstream, as they snag lint.
Q: How do I know if my roof vent is blocked? A: Tell-tale signs include weak or no airflow at the termination while the dryer runs, longer drying times, and the vent hood flap failing to open. If the vent is on a roof, it is best to have a professional check and clear it safely.
Q: How often should I schedule professional cleaning? A: Many households benefit from an annual professional service, especially if the vent run is long or partially inaccessible. High-use homes or those with pets may need semi-annual service.
Q: Are dryer balls or certain fabrics a factor? A: Dryer balls can help separate garments, improving airflow around clothes, which indirectly reduces lint accumulation in the vent. Heavy textiles like towels and blankets shed more lint and may warrant more frequent cleanings.
Ready to improve safety and efficiency in your Elizabeth home?
If your schedule is packed or your vent route is complex, there is no need to take risks on ladders or with hidden ductwork. Choose a trusted local team that understands Elizabeth housing styles, older duct layouts, and multi-family challenges. For fast results and peace of mind, book expert dryer vent cleaning and enjoy safer drying, shorter cycles, and reliable performance throughout the year.
