Installing a dryer vent the right way is essential to safety, efficiency, and peace of mind. In Elizabeth, New Jersey, homes range from pre-war brick structures to newer townhomes and multifamily properties, so a one-size-fits-all approach does not work. This guide walks you through a practical, step-by-step method that respects local conditions, building assemblies, and the performance needs of modern dryers. If you prefer a professional to take measurements, ensure code compliance, and complete the work with specialized tools, scheduling trusted dryer vent installation can make the process faster and predictably high quality.
Before you begin, confirm the dryer’s electrical or gas requirements, review the manufacturer’s venting specs, and identify potential exit points. Mapping the shortest, straightest path is your top priority. Each elbow adds resistance to airflow, and prolonged runs can strain the appliance and lengthen cycles. With a clear plan in place, you can move from preparation to clean, code-aligned execution.
Step 1: Assess the space and select the route
Document the current laundry area, especially the space behind the dryer. Look for crushed or kinked connectors, long loops of duct, or materials that are not compliant for use as a main vent run. Identify walls that lead directly outdoors, and consider whether a wall termination or roof termination makes more sense given the laundry location and framing. In basements, a straight shot through a rim joist is often ideal. On upper floors, venting straight out an exterior wall or through the attic and roof may be required.
- Prioritize the shortest path with minimal bends.
- Confirm there’s room for a smooth transition connector without crushing behind the dryer.
- Visually inspect the likely exit point outside to avoid damaging utilities or finishes.
Step 2: Choose compliant materials
For the main duct, use smooth, rigid metal. Avoid accordion-style foil or plastic ducts for anything beyond a short, listed transition connector at the dryer. Select elbows that maintain a generous radius and minimize airflow resistance. Use appropriate clamps for the transition connector and UL-listed foil tape on duct seams. Choose an exterior termination with a backdraft damper that opens and closes freely, and ensure the cap is compatible with the cladding or roofing system.
- Smooth, rigid metal duct sections sized to your dryer outlet (commonly 4-inch).
- Gentle elbows that minimize equivalent length penalties.
- UL-listed foil tape; avoid standard cloth duct tape.
- Exterior wall or roof cap with a self-closing damper and pest-resistant design.
- Hangers or straps for supporting horizontal runs at proper intervals.
Step 3: Mark and prepare penetrations
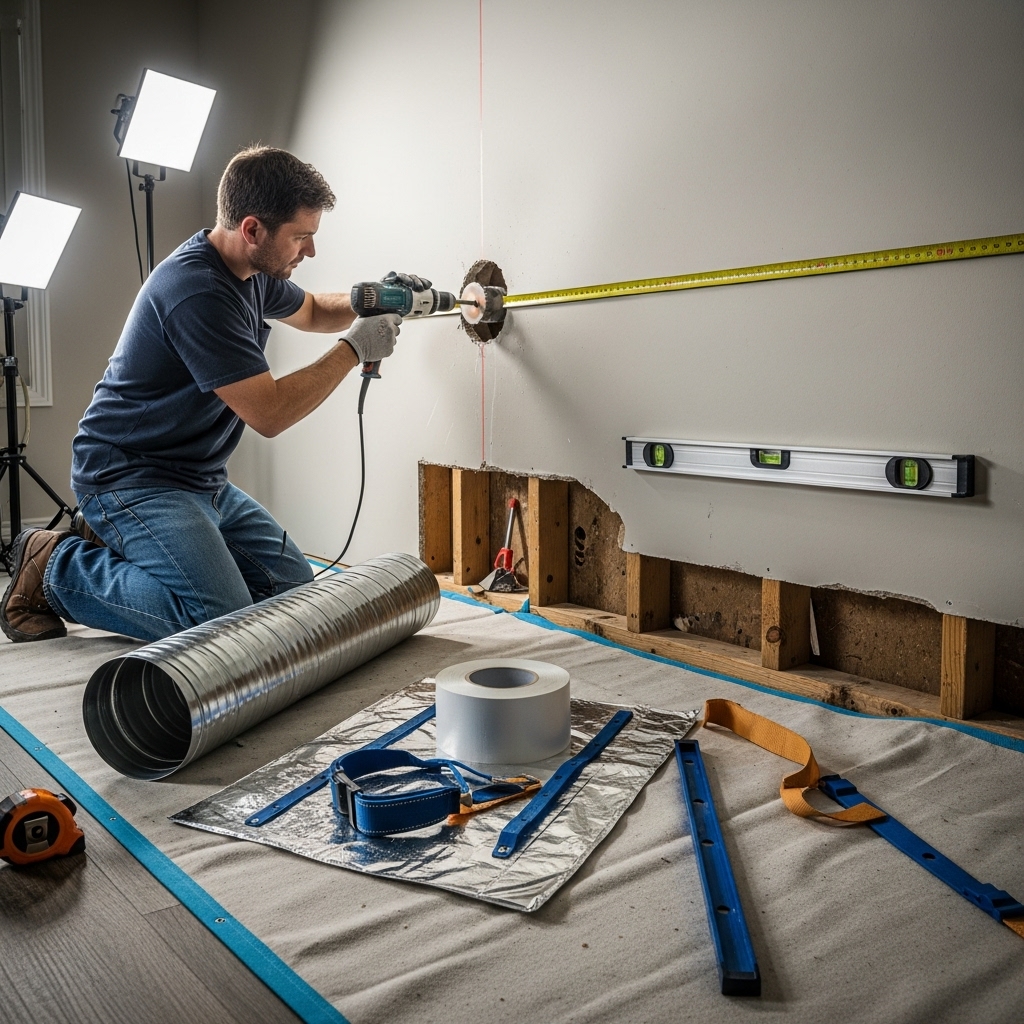
Once the route is set, mark the penetration for the wall or roof. If you will exit through a wall, confirm framing and siding details. For masonry, plan for coring and sealing. When going through a roof, verify the location from both sides, pilot through at the center, and use a hole saw or appropriate cutting method to create a clean opening. Carefully protect finished surfaces and collect debris to maintain a tidy work area.
- Use a pilot hole to confirm alignment before cutting the full opening.
- Protect insulation and finishes around the penetration.
- Dry-fit the termination cap to verify clearances and orientation.
Step 4: Install the termination cap
For wall terminations, slide the cap into the opening and secure it according to manufacturer instructions, ensuring a weather-tight seal. For roof terminations, carefully integrate the cap and flashing with the roofing system. Proper shingle lift and re-lay, flashing placement, and sealant use are crucial to keep water out. Confirm that the damper moves freely and that louvers or a hood design will not trap lint.
Step 5: Assemble the duct run
Build from the exterior toward the dryer, or vice versa, depending on access. Maintain a gentle slope toward the exterior so any incidental moisture doesn’t run back toward the appliance. Keep joints fully seated and securely taped on the exterior of the duct with UL-listed foil tape. Avoid screws or other fasteners that protrude inside the duct, as they can snag lint.
- Limit elbows; when necessary, use smooth-radius elbows.
- Support horizontal sections at required intervals to prevent sagging.
- Ensure each joint is airtight to maintain strong exhaust velocity.
Step 6: Connect the dryer with a proper transition
Use a short, listed transition connector between the dryer outlet and the first rigid section. This connector should be routed to avoid crushing when the dryer is moved back into place. If space is tight, a recessed outlet box in the wall provides a cavity for the connector to curve without kinking. Secure both ends with appropriate clamps rather than tape alone, and double-check alignment.
Step 7: Test airflow and check for leaks
Run the dryer on an air-only or low-heat setting and test at the exterior termination for a strong, steady exhaust. Inside, check each joint for air leakage using your hand or a simple smoke source. If airflow feels weak, reexamine the routing for unnecessary elbows, crushed sections, or obstructions. Verifying performance now avoids nuisance issues like slow drying and overheating alarms later.
Step 8: Final cleanup and homeowner orientation
Vacuum any dust from cutting openings, gather debris, and wipe down surfaces. Ensure the exterior cap is seated and sealed. Review basic maintenance habits: clean the lint screen after every load, inspect the exterior damper seasonally, and plan periodic professional duct cleanings to preserve performance. Record the route, including elbow count, so you can reference it for future maintenance and troubleshooting.
Tools and materials checklist
- Rigid metal duct sections and elbows sized to appliance output
- Short, listed transition connector
- UL-listed foil tape and proper clamps
- Exterior termination cap with damper
- Hangers or straps for support
- Drill, hole saw, or coring tools appropriate to the wall/roof material
- Measuring tape, marker, and level
- Safety gear: eye protection, gloves, dust mask
Safety and code considerations in Elizabeth
Installations should align with code requirements governing duct materials, equivalent lengths, and termination details. Internal screws are avoided, flexible plastics are not used as the main run, and vents terminate outdoors rather than in attics or crawlspaces. Where penetrations cross fire-rated assemblies in multifamily structures, rated components and methods are required. Roof terminations demand careful flashing and sealing due to New Jersey’s weather, and all ducts must be accessible for inspection and cleaning.
When you want the assurance that every fitting, joint, and termination meets standards—and that the vent performs from the first cycle—consider bringing in local experts. Professional dryer vent installation includes route planning, precision cutting, compliant materials, and robust testing, all tailored to the unique construction styles found across Elizabeth.
Commissioning: Verify performance like a pro
- Air velocity check: At the termination, confirm brisk exhaust that increases with higher dryer settings.
- Damper operation: Ensure the damper opens fully during operation and closes fully when the dryer is off.
- Leak detection: Feel for air at joints while the dryer runs; re-tape or re-seat as needed.
- Noise audit: Rattles may indicate insufficient support or a misaligned elbow.
- Temperature sanity check: The duct should be warm during operation but not excessively hot; excessive heat may signal restriction.
Maintenance timeline after installation
- After every cycle: Clean the lint screen.
- Monthly: Visually inspect the connector behind the dryer for kinks or crushing if the unit is moved.
- Seasonally: Check the exterior cap for free damper movement and remove debris.
- Annually or as usage dictates: Schedule a professional cleaning of the duct run and a system check.
Common pitfalls to avoid
- Using screws that penetrate into the airstream and catch lint.
- Allowing long, looping runs with multiple elbows when a shorter route exists.
- Terminating indoors, in an attic, or in a crawlspace rather than outdoors.
- Crushing the transition connector behind the dryer due to tight clearances.
- Skipping airflow testing at the end of the job.
Frequently Asked Questions
How do I know if my route is too long? Compare your planned equivalent length, including elbow penalties, to the dryer manufacturer’s allowance. If you exceed it, choose a shorter route or reduce elbow count.
Can I vent through a roof in Elizabeth? Yes, roof terminations are acceptable when installed with proper flashing and sealing. They are common when the laundry area is far from exterior walls.
Is flexible foil okay for the main run? No. Use smooth, rigid metal for the primary duct. A short, listed transition connector at the dryer is acceptable.
What size duct do most dryers need? Many dryers use a 4-inch duct, but always verify your appliance specifications.
How often should I clean the vent? Frequency depends on usage, but annual cleanings work well for many households. High-use homes may need more frequent service.
What if I live in a multifamily building? You may need coordination with building management and adherence to fire-resistance requirements for penetrations. Access scheduling and documentation are often part of the process.
Do elbows count more than straight pipe? Yes. Elbows add resistance and count as additional equivalent length, so minimize them.
Ready to get your vent installed the right way?
If you want a smooth process from route planning to final airflow testing, partner with local pros who understand Elizabeth’s varied housing and New Jersey’s weather. Book professional dryer vent installation to ensure your system is safe, efficient, and built to perform for years.

