The Dryer Vent Installation Process and Timeline in Elizabeth, New Jersey
Whether you live near Elizabethport’s waterfront or on a quiet street in Elmora Hills, a well-planned dryer vent installation delivers safer, faster laundry cycles and peace of mind. Understanding the process from first call to final testing helps you prepare your space, set expectations, and minimize disruption. If you are just starting, reviewing a proven dryer vent installation process can clarify your options and highlight where professional expertise saves time and prevents headaches.
Dryer vent installation is not simply attaching a hose. It is a series of careful decisions and precise steps: choosing materials, mapping the route, creating an exterior penetration, assembling and sealing the duct, and testing performance. Each step affects the next. Good planning reduces change orders, protects finishes, and results in a system that moves air efficiently while keeping lint accumulation in check. The following overview describes how professionals in Elizabeth typically approach the job and how long each phase takes.
Initial Consultation and Assessment
The process begins with a phone or on-site consultation. Professionals gather details about your appliance, the current setup, and the home’s layout. They ask about drying times, heat buildup, and any lint issues you have noticed. Photos of the laundry area and exterior walls can speed up planning. For multi-family buildings, they will also consider shared chases, access logistics, and any requirements from building management or HOAs.
During an assessment, the installer identifies a preferred route to the outdoors. Side-wall terminations are common because they help keep runs short. Vertical or rooftop routes may be used when side-wall access is limited. The installer also evaluates where to place the exterior hood so it opens freely, avoids soffit vents, and stays accessible for future maintenance. While on site, they check for sufficient clearances behind the dryer and confirm that electrical and, if applicable, gas connections can be protected during and after installation.
Planning, Materials, and Scheduling
After the assessment, you receive a plan that outlines materials, route length, elbow count, and termination type. Rigid, smooth-wall metal ducting is the cornerstone of a long-lasting installation. The plan also covers sealing methods, support spacing, and any insulation or firestopping that may be necessary. For brick or stucco exteriors common in parts of Elizabeth, the installer notes the tools and steps needed for a clean, weather-tight penetration.
Scheduling considers crew availability, building access, and, in some cases, permit timing. Single-family projects often fit into a half-day slot. Multi-family properties require coordination to enter shared spaces and may be phased to minimize tenant disruption. Clear communication at this stage helps everyone know what to expect on installation day and reduces last-minute changes.
Preparation on Installation Day
On the day of installation, crews protect nearby floors and appliances, then verify the agreed route. They move the dryer forward, disconnect utilities as needed, and confirm there is enough space to avoid crushing the transition upon reinstallation. If cabinetry or shelving crowd the area, temporary removal or repositioning may be necessary. Good preparation prevents accidental dents, drywall damage, or scuffs on finishes.
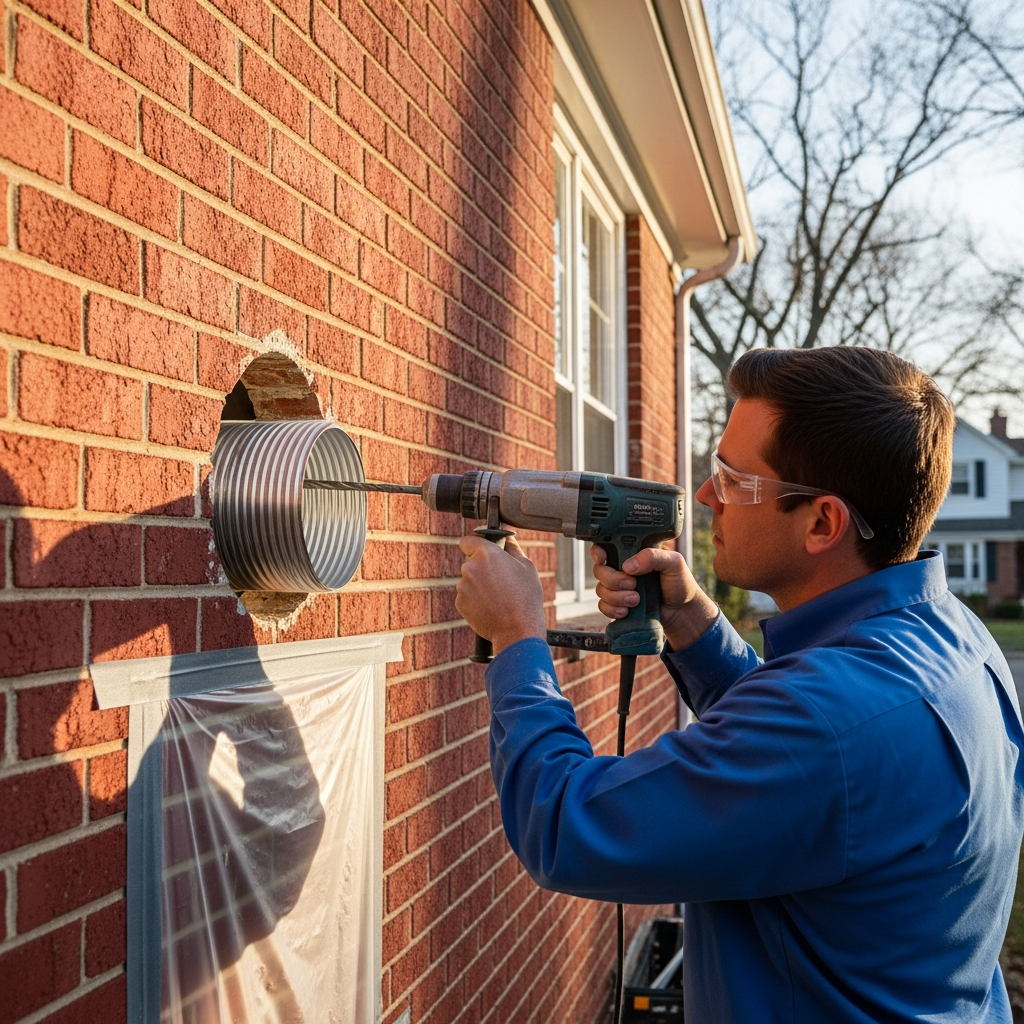
Before cutting, the installer double-checks measurements inside and out to ensure the penetration emerges exactly where intended. This step is crucial on brick, stone, or stucco exteriors where misaligned holes are difficult to correct. With the path confirmed, the team sets up dust control and selects the proper bit or coring tool for a clean, controlled opening.
Creating the Exterior Penetration
Penetrations through different exteriors demand different techniques. Vinyl siding requires careful drilling and flashing to prevent water intrusion. Brick and masonry need hammer drills or core bits and patience to avoid cracking. Stucco calls for controlled cuts and patch-ready edges. In each case, the goal is a round, correctly sized hole that accepts the duct and termination snugly while leaving room for flashing and sealant.
Once the opening is complete, the crew dry-fits the termination hood and verifies that the damper swings freely. They confirm the location is level, appropriately clear of obstructions, and visually aligned with the home’s exterior. Precise placement also helps future cleaning because technicians will be able to access the hood easily to test airflow and brush lint away from the outlet if needed.
Duct Assembly and Sealing
The heart of the installation is the duct run. Professionals prefer rigid, smooth-wall metal ducting because it minimizes resistance and resists heat and crushing. Sections are cut to length, deburred, and oriented with joints in the direction of airflow. Heat-rated metal foil tape seals each joint. Mechanical fasteners are used where appropriate, and supports keep the duct aligned with no sags that could trap lint. Where the duct passes through framing, protective sleeves or grommets prevent abrasion.
Terminology matters here: a short transition between the dryer and the wall is not the same as the full vent run. The transition should be UL-listed, kept as short as practical, and installed so that the dryer can be pulled out for service without crushing it. This attention to detail preserves airflow and makes future maintenance visits quicker and cleaner.
Reconnecting the Dryer and Testing
After assembling the duct and securing the termination hood with proper sealing and flashing, the crew reconnects the dryer. They ensure gas shutoffs are accessible, cords are protected, and the appliance slides back without kinking the transition. Then they run the dryer on a warm cycle to verify airflow. Technicians check that the damper opens fully, listen for any rattles that indicate loose sections, and measure exhaust velocity where possible. If results are below expectation, they troubleshoot immediately—examining bends, seals, and potential obstructions until performance meets standard.
Testing is more than a formality; it is the proof that the system you just installed does what it is supposed to do. Reliable airflow lowers cycle times, reduces heat buildup, and helps protect your dryer from premature wear. Documenting results gives you a baseline for future maintenance and confirms to building managers, buyers, or inspectors that the work was completed properly.
Cleanup and Final Walkthrough
Professional crews leave the space tidy. They remove dust control, vacuum debris, and wipe surfaces they touched. Before leaving, they review maintenance recommendations and show you how to avoid crushing the transition when moving the dryer. If interior touch-ups around the penetration are needed, they explain the scope so that finishes can be restored neatly. For multi-family buildings, they also provide route notes for property records and future service scheduling.
Midway through the lifecycle of your new system—months or a year down the line—it pays to revisit performance. If cycles lengthen or if you notice heat or humidity, schedule a checkup. For quick reference and to ensure you remain on track with a code-compliant setup, consult a trusted local resource for dryer vent installation to validate that everything is functioning as intended.
Typical Timeline Overview
Every home is different, but many single-family installations in Elizabeth follow a predictable timeline. The initial consultation can be completed in a day or two, often with photos and a quick conversation. Scheduling typically lands within a week or two, depending on access and any permit needs. The installation itself usually fits into a morning or afternoon. Complex routes, masonry penetrations, or multi-family logistics may extend the schedule, though thoughtful planning keeps momentum strong.
Weather can play a role. Extremely cold days make sealants slower to cure and may require additional time at the termination. Rain may delay exterior drilling to protect finishes and keep debris manageable. Professional teams anticipate these conditions and build contingencies into the plan so you are not left guessing about next steps.
Frequently Asked Questions
Q: How long will my laundry be out of service? A: Most of the day’s work happens with the dryer pulled forward, and the actual outage is limited to the installation window. For many homes, you can run a load the same day after testing concludes.
Q: Is there dust or debris? A: Penetrations and drilling produce some dust, but professionals use containment and clean thoroughly. If masonry is involved, expect more dust, though crews plan for capture and cleanup.
Q: Can the vent go to the roof? A: Yes, if designed and installed correctly, but side-wall terminations often provide shorter runs and better airflow. The best choice depends on your layout and code constraints.
Q: What maintenance is required after installation? A: Plan for periodic cleaning of the full run, inspection of the exterior hood and damper, and checks to ensure the transition remains uncrushed and secure. Your installer will suggest an interval based on your household’s laundry volume.
Q: Will I need a permit? A: It depends on scope. New penetrations and multi-family work are more likely to require permits. A local professional can outline documentation and inspection steps for your specific project.
Set Yourself Up for Long-Term Success
When a vent is installed with precision and tested for performance, you see the difference immediately. Clothes dry faster, the laundry area stays cooler, and you spend less time re-running cycles. If your current venting is makeshift or if you are renovating and want to start fresh, partnering with an experienced team simplifies every decision and ensures clean results.
Get Your Elizabeth Installation on the Calendar
Take the next step toward a safer, more efficient laundry routine. Connect with a local expert to discuss your layout, route options, and scheduling. For clear guidance, careful craftsmanship, and reliable outcomes, choose a provider offering end-to-end dryer vent installation services. With the right plan and a skilled crew, your project can move from idea to tested, finished system in less time than you think.
