If you have ever wondered what truly happens during an air duct installation, this guide explains the process step by step with an eye toward Elizabeth, New Jersey homes. From initial assessment and load calculation to the final balancing that ensures quiet, even airflow, a successful project is built upon planning, craft, and verification. Whether your home sits near Elizabethport or in the tree‑lined streets of Elmora, the right approach adapts to local building styles and climate realities. To start on firm footing, it helps to understand the complete air duct installation process before the first register is removed or the first sheet metal is cut.
Step 1: The discovery meeting and walkthrough
Everything begins with a conversation. A professional listens to your comfort concerns, hot or cold rooms, noise issues, and air quality goals. They then walk the home, noting attic access, basement or crawlspace conditions, and obstacles that might shape duct routing. In Elizabeth’s mixed‑age housing, this walkthrough often uncovers helpful details like plaster thickness, soffits that can hide new runs, or existing chases that can be repurposed for returns. Good notes now save time later.
Step 2: Load calculation and airflow targets
Next comes the math. A room‑by‑room load calculation takes into account window size and orientation, insulation levels, air leakage, ceiling heights, and how often rooms are used. The result is an airflow target for each space. Bedrooms that overheat in summer receive more supply air; quiet zones like nurseries and home offices are designed with registers that deliver comfort without drafts or noise. These targets guide trunk sizing, branch diameters, and return strategies.
Step 3: Layout and material planning
With targets in hand, the installer drafts a layout. The plan shows trunk lines, branches, transition pieces, and register locations. It also identifies where rigid sheet metal, duct board, or short flex connections will be used, and where insulation and sealing are required. In Elizabeth, installers often account for tight joist bays and consider routing to minimize exposure to attic heat or basement humidity. The plan anticipates equipment service access and future maintenance needs.
Step 4: Site preparation and protection
Before installation begins, floors and furnishings are protected, access paths are cleared, and safety checks are completed. Crews set up tools and materials for efficient workflow. If existing ducts are being removed or modified, returns and supplies are covered to contain dust. Thoughtful preparation reduces disruption to your household and preserves a tidy environment from start to finish.
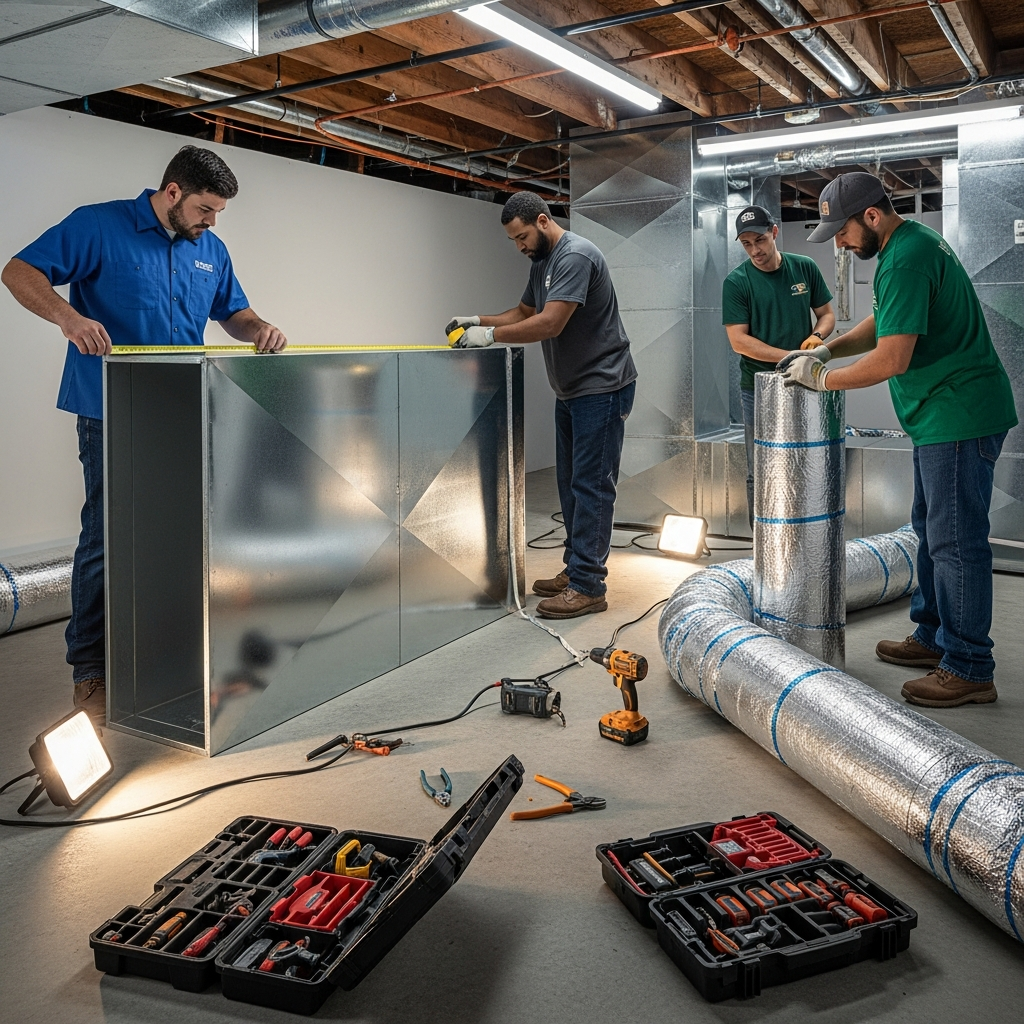
Step 5: Fabrication and rough‑in
During rough‑in, trunk lines and primary branches are installed according to the plan. Transitions are fabricated to provide smooth, gradual changes in size that minimize static pressure. Where flex connections are appropriate, they are pulled tight and supported at regular intervals. Penetrations through framing are made cleanly and sealed to prevent air leakage. Returns are placed for quiet operation and balanced pressure. This is where craftsmanship becomes visible: straight runs, secure supports, and careful alignment of registers.
Step 6: Sealing and insulating
Once the ducts are positioned, every joint and seam is sealed with mastic or approved foil tape. Sealing prevents conditioned air from escaping into attics or basements and keeps dust and odors from infiltrating supply streams. Insulation is then applied to ducts that travel through unconditioned spaces, protecting against heat gain in summer and heat loss in winter. In Elizabeth’s humid months, this step also reduces the chance of condensation forming on cold duct surfaces.
Step 7: Register placement and finishing details
Registers and grilles are installed square to walls and ceilings, and their orientation is set for best air throw and mixing. Supply and return openings are trimmed neatly, and any drywall or ceiling repairs are coordinated as needed. The system begins to look complete as grilles go in and equipment connections are finalized.
Step 8: Start‑up, testing, and balancing
With the physical work complete, technicians start the system and measure performance. They check static pressure, verify airflow delivery to key rooms, and adjust dampers to fine‑tune balance. They listen for whistling or vibration, look for air leakage, and ensure filters fit properly in their cabinets. The goal is a steady, quiet system that meets the airflow targets established at the beginning.
Step 9: Homeowner orientation and documentation
Good installers walk you through what they have done. They show you where dampers are located, how to change filters, and how to keep registers clear. They provide any as‑built notes, including duct sizes and locations, to simplify future service or renovations. This orientation empowers you to get the most from your new system and understand how it was tuned for your home.
Elizabeth‑specific nuances that shape the process
Older homes may limit access to joist bays, requiring creative transitions or soffits. Split‑level layouts need careful return strategies to keep temperatures consistent across levels. Homes near busy corridors can benefit from upgraded filtration and tightly sealed returns to protect indoor air quality. Attic‑run ducts demand robust insulation to reduce heat gain in the summer sun, while basement runs must be protected from humidity that can lead to condensation. The process adapts to each house so that the final system performs predictably across seasons.
Quality indicators you can spot
Look for straight, supported ducts; smooth transitions; and careful sealing at every seam. Note that flex connections are short, taut, and well supported. Registers sit square to finishes and throws are oriented thoughtfully. Quiet operation after start‑up is another positive sign, along with even temperatures from room to room.
Why thorough planning shortens total project time
A clear plan reduces mid‑project changes, which saves time and prevents patchwork fixes. When crews know where ducts will run, where returns will be placed, and which materials to use, they can move quickly and confidently. Permits and inspections also proceed smoothly when the scope is documented and code‑compliant from the outset.
Communication throughout the installation
Expect proactive updates. Top installers explain what will happen each day, when testing will occur, and how the space will be cleaned. If unexpected framing or hidden obstacles appear, they present options that respect both performance and appearance. Clear communication builds trust and helps you plan your household routine during the project.
Post‑installation care and maintenance
With new ducts in place, keep registers clear and replace filters on the recommended schedule. Inspect accessible sections seasonally for insulation integrity and signs of moisture. If you reconfigure rooms or undertake renovations, alert your installer to protect ducts and maintain proper airflow. These simple steps preserve the performance you invested in.
Frequently asked questions
Q: How long does the process usually take? A: Timelines vary with access, house size, and the extent of new runs. A clear plan helps keep the schedule efficient by reducing surprises and rework.
Q: Can I stay home during installation? A: Yes. Crews typically coordinate noise and access with you and protect living areas. They will let you know if certain spaces need to be clear on specific days.
Q: Will new ducts reduce energy waste? A: Sealed and insulated ducts reduce leakage and protect conditioned air as it travels to rooms. Balanced airflow then helps your equipment run more steadily and quietly.
Q: Do I need new registers and grilles? A: Not always. If existing grilles are compatible and in good condition, they may be reused. However, register style and size can affect throw and noise, so upgrades are often part of the plan.
Q: What about indoor air quality? A: Tight seams, proper returns, and a good filter cabinet help control dust and odors. Discuss filter options that your equipment can support without excessive pressure drop.
Q: How is noise addressed? A: Noise is managed through proper sizing, return placement, smooth transitions, and balancing. Flexible connectors near equipment and isolation of vibration points also help.
Bring clarity to your project
Understanding the process makes it easier to make decisions with confidence. A thoughtful plan, careful installation, and measured verification deliver quiet, even comfort that lasts through Elizabeth’s seasons. If you are ready to move from research to results, speak with a team that can guide you through every step of ductwork installation steps and provide a smooth path from assessment to final balancing. When you want to act, connect with professionals who can evaluate your home and implement a system designed for consistent, reliable comfort.
