Whether you are updating an older property or fine-tuning a newer system, understanding duct installation and repair principles is essential for comfort, efficiency, and indoor air quality. Elizabeth, New Jersey presents a range of housing styles—from historic homes with tight chases to multi-level residences with long trunk runs—that challenge airflow and accessibility. This guide explains how to plan, install, and repair ducts with methods that stand up to seasonal demands. If you prefer expert help, partnering with a local team experienced in air duct repair and installation can streamline the process from design to verification.
Fundamentals of Good Duct Design
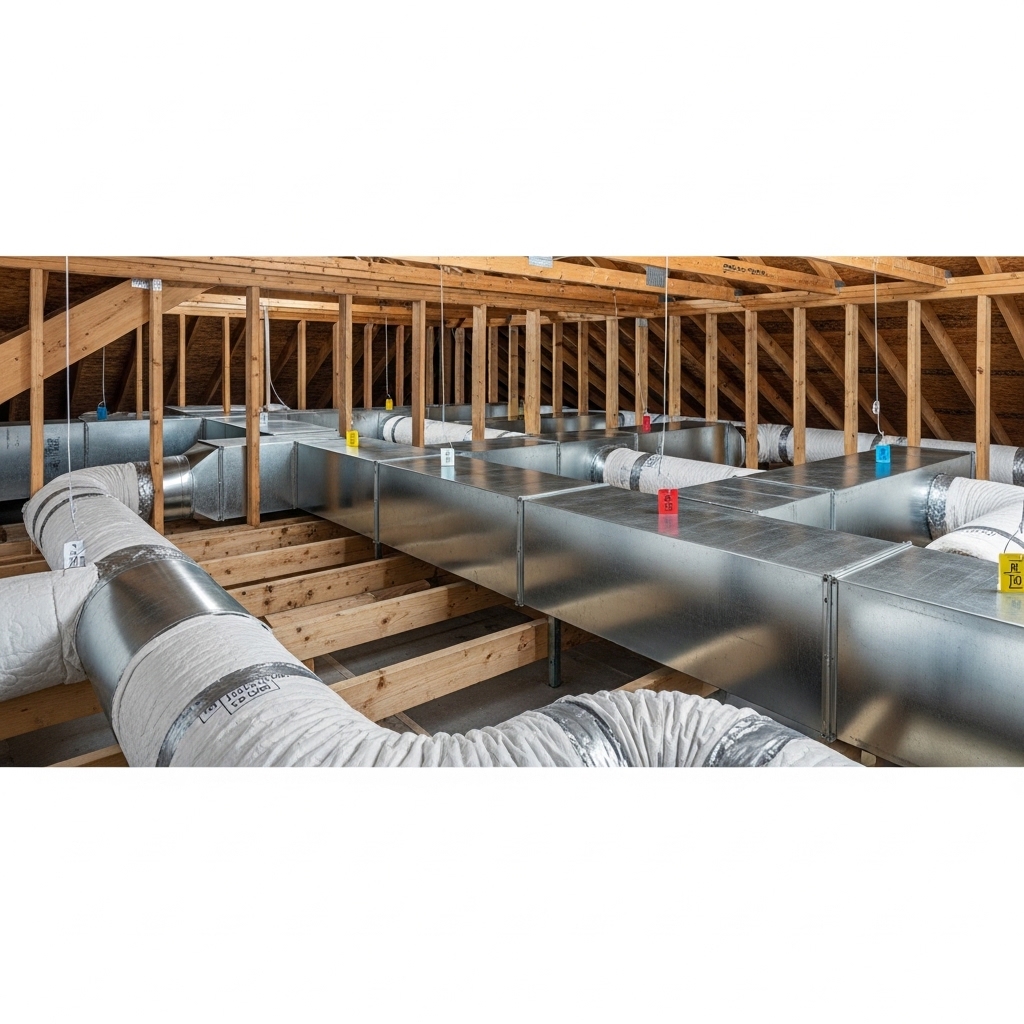
Sound installation starts with proper sizing and thoughtful layout. The goal is to deliver the right amount of air to each room with minimal loss. That means appropriately sized trunks and branches, smooth transitions, and limited sharp turns. A balanced system ensures that supply and return capacities align, preventing pressure imbalances that can cause drafts or starve certain rooms of airflow.
Material selection matters. Galvanized steel offers durability and smooth interiors; flexible duct provides installation flexibility but demands proper supports and gentle bends. Ductboard is lightweight and can be effective when seams are sealed correctly. In unconditioned spaces, continuous insulation and intact vapor barriers are critical to prevent condensation and thermal losses.
Installation Best Practices for Elizabeth Homes
- Plan the route: Favor straight runs with gradual turns and minimal transitions.
- Support properly: Follow spacing guidelines for flex ducts to prevent sagging and kinks.
- Seal every joint: Use mastic and UL 181 foil tape where appropriate; never rely on cloth duct tape.
- Insulate in unconditioned areas: Maintain continuous coverage and sealed vapor barriers.
- Protect returns: Ensure filter racks and return boxes are airtight and accessible.
- Provide access: Include service panels and thoughtful placement for future maintenance.
Repair Strategies That Deliver Durable Results
Effective repair begins with diagnostics. Inspect for leaks at seams, loose collars, crushed flex, and deteriorated ductboard edges. Mechanical fastening with screws or clamps provides the foundation for sealing. Apply mastic to joints and reinforce larger gaps with mesh. Replace damaged sections rather than patching if structural integrity is compromised. Restore insulation and vapor barriers after sealing to maintain performance.
Balance the system after repairs. Adjust dampers, verify airflow at registers, and confirm even temperatures across rooms. In basements and attics common to Elizabeth, ensure ducts remain off damp surfaces and away from sharp edges or heat sources that can degrade materials over time.
Common Installation Pitfalls and How to Avoid Them
- Excessive bends: Each sharp turn increases resistance; opt for smooth radius elbows and straighter runs.
- Undersized returns: Starved returns can make supplies noisy and reduce delivery to distant rooms.
- Poorly supported flex: Sagging creates friction and restricts flow; use proper hangers and spacing.
- Gaps at boots: Unsealed boot-to-drywall joints leak into wall cavities; seal these interfaces carefully.
- Insulation gaps: Missing or compressed insulation undermines performance in unconditioned spaces.
Elizabeth’s Climate and Construction Considerations
Hot summers and cold winters require ducts that maintain performance through wide temperature swings. In attics, insulation and vapor barrier integrity protect against heat gain and condensation. In basements, sealing and insulating returns help control moisture and odors. Older homes often have metal trunks feeding newer flex runs; extra care at transitions is essential to prevent leaks and whistling.
Multi-family buildings may limit access to certain chaseways, calling for coordination with building management. Where ducts pass through fire-rated assemblies, follow proper sealing and protection requirements to preserve safety and compliance.
Step-by-Step Installation Workflow
- Load calculation and layout: Determine room-by-room airflow needs and map efficient routes.
- Material selection: Choose appropriate duct types, fittings, and insulation levels.
- Rough-in: Install trunks and branches with proper supports and gentle bends.
- Seal joints: Apply mastic and appropriate tape to every seam and connection.
- Insulate: Ensure continuous insulation and sealed vapor barriers in unconditioned spaces.
- Set registers and returns: Secure boots, seal to framing, and provide accessible filter locations.
- Test and balance: Verify airflow and temperatures; adjust dampers as needed.
- Document: Record damper positions, take photos, and note materials and methods used.
Repair Workflow for Existing Systems
- Inspection: Identify leaks, crushed runs, and deteriorated components.
- Access planning: Clear pathways and plan safe working platforms in attics and basements.
- Mechanical fixes: Re-seat collars, add screws or clamps, and replace damaged sections.
- Sealing: Apply mastic to seams and reinforce as needed.
- Insulation: Restore or upgrade insulation and vapor barriers.
- Balancing: Fine-tune dampers and confirm even room temperatures.
- Verification: Perform airflow checks and, if possible, duct pressurization.
Quality Assurance and Verification
Reliable results come from testing. After installation or repair, measure airflow at registers, observe temperature differences across rooms, and listen for whistling that might indicate a missed leak. A professional can provide duct pressurization to quantify leakage and support final adjustments. Documentation—photos and notes—ensures transparency and helps future technicians understand the system.
Working With a Professional Partner
When choosing a contractor, look for clear communication, documented procedures, and familiarity with Elizabeth’s housing stock. Ask how they plan to verify improvements and what materials they use at different joints. If your project includes both installation and repair, confirm that the team can handle design, execution, and testing in one coordinated workflow. For comprehensive support, consider a partner skilled in professional air duct repair who can integrate diagnostics with durable workmanship.
Frequently Asked Questions
Q: What materials are best for long-term performance? A: Galvanized steel with properly sealed seams is durable; flexible duct can perform well when installed with correct supports and gentle bends. Ductboard is lightweight and effective when seams are sealed carefully.
Q: Can I mix duct types? A: Yes, many systems combine metal trunks with flex branches. Pay special attention to transitions and supports to avoid leaks and restrictions.
Q: How important are returns? A: Return capacity is crucial. Undersized or leaky returns drive noise, reduce comfort, and strain equipment.
Q: What about insulation? A: In unconditioned spaces, continuous insulation with a sealed vapor barrier helps prevent condensation and reduces heat gain or loss.
Q: How do I verify performance? A: Check airflow at registers, room temperatures, and overall system cycling. Professional pressurization testing offers a quantified view of leakage and improvements.
Q: Can repairs fix a chronically hot or cold room? A: Often yes. Sealing leaks, correcting kinks, and balancing dampers can improve delivery. In some cases, adding a return or rerouting a branch is needed.
Q: Is there a best season for installation or repair? A: Work can be done year-round. Verification is easiest when the system is actively heating or cooling, allowing clear performance comparisons.
Q: How do I maintain the system after repairs? A: Replace filters on schedule, keep returns clear, and inspect visible joints and supports seasonally.
Let Your Ducts Do Their Best Work
Thoughtful installation and precise repairs turn your HVAC into a quiet, consistent comfort provider in every season. Plan routes carefully, seal thoroughly, insulate properly, and verify results. If you want guidance from a local team with experience across Elizabeth’s diverse homes, take the next step and schedule air duct repair or installation support that aligns with your home’s layout and your comfort goals.
