Why Proper Dryer Vent Installation Matters in Elizabeth, New Jersey
Dryers move large volumes of warm, moist air loaded with lint. When this air is not exhausted outdoors through a smooth, direct, code-compliant vent, it lingers in the home, causing damage, extending drying times, and increasing fire risk. In Elizabeth, New Jersey—where many homes blend historic construction with newer additions—thoughtful planning and precise installation make all the difference. With older masonry walls, tight rowhome lots, and varied siding types, each house presents unique logistics that influence the safest, most efficient route to the exterior.
If you are new to the process, start by understanding the goals: minimize the length and number of turns in the duct, use smooth-walled metal pipe, seal every joint against air leaks, support the run to prevent sagging, and terminate with a hood that resists backdrafts and pests while allowing maximum airflow. When in doubt, consider professional support. In the first stages of planning, many Elizabeth homeowners benefit from expert guidance in selecting materials and mapping routes for dryer vent installation that will meet code and perform reliably for years.
Local climate adds another layer of complexity. Winters can be rather cold and damp, which means moisture from the dryer exhaust can condense if the duct runs through unconditioned spaces without proper sealing and, in some cases, insulation around the rigid pipe. Summer humidity and salt-laden breezes along the nearby ports may accelerate corrosion at exterior terminations if inferior materials are used. Choosing robust components and sealing carefully helps preserve safety and efficiency in every season.
Codes, Standards, and Safety Basics
Most modern building codes agree on a few fundamentals for safe dryer venting. Use rigid metal duct wherever possible; avoid plastic or thin foil flex duct for permanent runs. Keep total equivalent length within manufacturer limits, accounting for each elbow as additional length. Do not vent into attics, crawlspaces, garages, or soffits; always terminate outdoors. Avoid screws that protrude into the airflow and catch lint; instead, use foil-backed aluminum tape rated for high temperatures at seams and listed clamps at transitions. In multi-family buildings common to parts of Elizabeth, make sure each dryer has a dedicated exhaust path—never manifold multiple dryers into one small duct unless a listed, engineered system specifically allows it.
Appliance manuals often specify maximum equivalent lengths, varying with the model and blower strength. A common baseline is 25 feet of straight duct, subtracting length for each elbow. For example, a 90-degree elbow may count as 5 feet and a 45-degree elbow as 2.5 feet. Shorter, straighter runs always perform better, so plan your route with gentle sweeps and minimal turns. Where you must turn, pick long-radius elbows that preserve airflow.
Planning the Route in Elizabeth Homes
Begin by identifying the shortest path from the dryer’s outlet to a suitable exterior wall or roof location. In Elizabeth’s mix of single-family houses, duplexes, and apartment buildings, basement laundry locations are common. If your dryer sits in a basement along an exterior wall, a straight horizontal run through the rim joist may be the most efficient option. In a first-floor laundry with exterior access, consider a direct wall termination. For homes where the only path is upward, a vertical run to a roof cap can work, but it requires meticulous attention to condensation management and accessible cleanouts.
Check the exterior for obstructions. Avoid terminating near property lines where lint could drift onto a neighbor’s facade, a frequent concern in tightly spaced rowhomes. Keep the outlet away from hinged doors, operable windows, and gas appliance vents. Where possible, terminate at least 12 inches above grade and in a location easy to inspect and clean. Shield the path from landscaping elements that could obstruct the hood’s damper.
Choosing the Right Materials
For the main duct, select smooth, rigid metal pipe. Galvanized steel is common and durable. Use UL-listed foil-backed aluminum tape for sealing; avoid cloth duct tape, which degrades with heat and moisture. For the short connection between the dryer and the rigid duct, use a listed, crush-resistant transition connector designed specifically for dryers. Purchase long-radius elbows to reduce turbulence, and choose a low-resistance exterior hood with a gravity damper. Avoid fine mesh screens that trap lint; a pest-resistant design with a full, free-swinging damper is safer and less restrictive.
Gather additional supplies: a hole saw or masonry bit appropriate for siding or brick, a level, a stud finder, a drill/driver, safety glasses, a dust mask, a caulking gun with exterior-grade sealant, and pipe supports or metal hanging straps. In older Elizabeth homes, expect surprises inside walls—joists at unusual spacing, plaster and lath behind drywall, or brick veneer. Taking time to test and probe before cutting full-size openings reduces the chance of hidden conflicts.
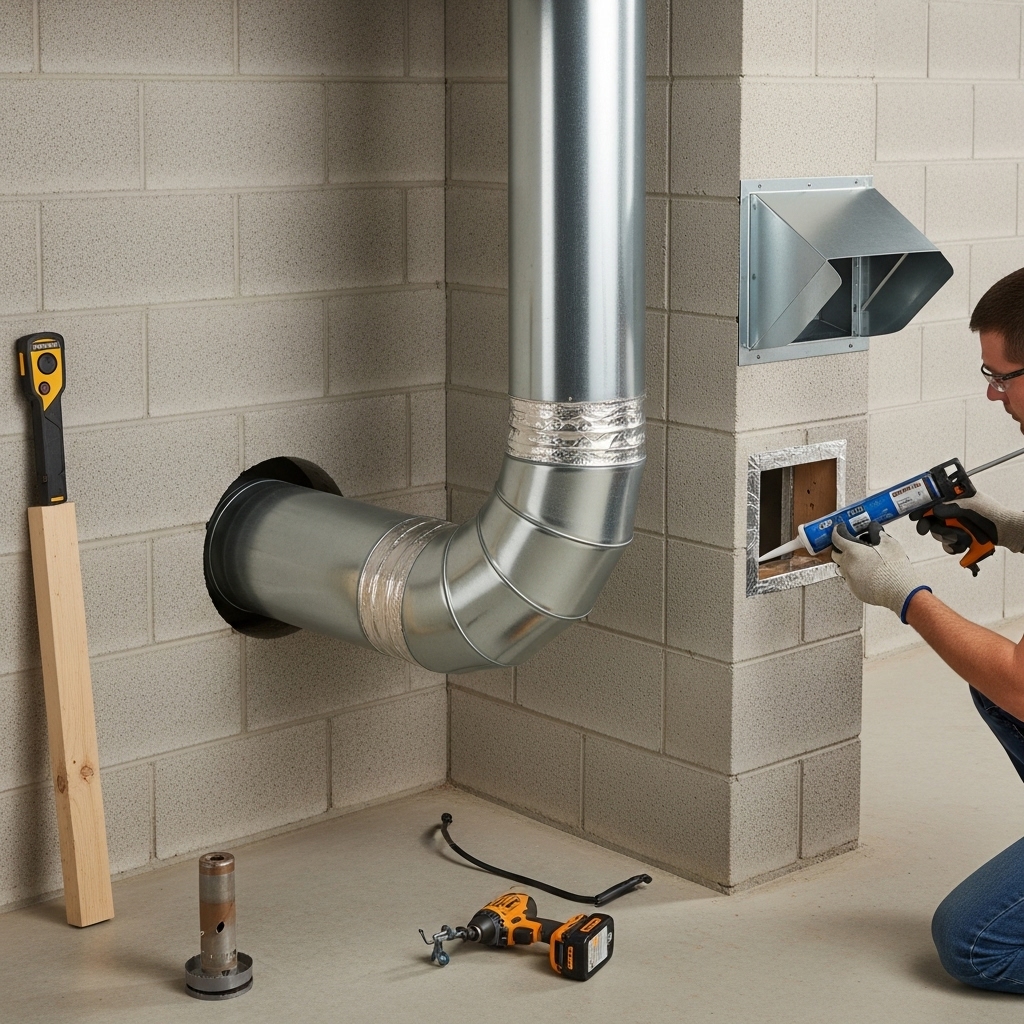
Step-by-Step: Wall Termination
1) Disconnect power and, if applicable, shut off gas to the dryer. Pull the machine forward and remove the existing transition piece. Vacuum lint from the outlet and surrounding area. 2) Mark the centerline of the vent path on the interior wall, confirming you won’t hit studs, plumbing, or wiring. 3) Drill a small pilot hole through the wall at the intended center, then verify the exterior location for clearance and proper height above grade. 4) Using a hole saw sized for the hood’s collar, cut from both sides or use a long pilot bit to guide the exterior cut for a clean opening.
5) Install a short section of rigid duct through the wall thickness. 6) Fit the exterior hood over the duct, ensuring the damper opens freely and faces downward. Apply a continuous bead of exterior-grade sealant behind the hood’s flange, press it tight to the siding or brick, and fasten per instructions. Seal all edges to shed water. 7) Inside, form the rigid duct path from the wall sleeve to the dryer location. Use as few elbows as possible. Dry-fit all pieces before taping seams to confirm clearances and alignment.
8) Secure joints with listed clamps or foil-backed aluminum tape; do not use screws that protrude into the airstream. 9) Strap horizontal runs every 4 to 6 feet to prevent sagging. In an unfinished basement ceiling, hang the duct with metal straps attached to joists, maintaining a slight pitch toward the dryer so any condensation can return toward the warm appliance and evaporate. 10) Attach the transition connector from the dryer to the rigid duct using listed clamps. 11) Restore power and, for gas units, relight or restore gas per manufacturer instructions.
Roof Termination Considerations
When venting through the roof, plan for access during future cleanings. Use a specialized roof cap with a wide throat and backdraft damper, not a standard bath fan cap. Flash and seal the cap to the roofing per manufacturer directions. Inside the house, run rigid duct as vertically as possible, limiting elbows. Condensation can be more pronounced in vertical runs passing through unconditioned attics, so ensure joints are tight and consider insulating the metal duct with a non-combustible wrap where permitted by local codes. Keep bends gentle, label a cleanout point if feasible, and verify the damper swings freely after installation.
Sealing, Supporting, and Finishing Details
Air leaks rob the dryer of performance and can deposit lint in hidden cavities. Carefully seal every seam. Maintain adequate clearance from combustibles per appliance instructions and local code. At the exterior, caulk the perimeter of the hood and ensure flashings or trim details shed water away from the opening. Inside, keep the final connection accessible. If your laundry sits in a closet, plan a layout that allows the dryer to slide forward for service without crushing the transition connector.
Support horizontal runs frequently. Sagging creates lint traps and reduces airflow. In basements prevalent across Union County, open joist bays make it easier to fasten straps and keep the duct straight. If the route crosses a finished space, consider a soffit built to maintain access panels at key junctions. Document the path with photos before closing any walls so future maintenance is straightforward.
Testing Airflow and Performance
After installation, test the system. With the dryer running on a timed heat cycle, go outside and confirm a strong, steady stream of exhaust at the hood. The damper should open fully and not chatter. Indoors, confirm the transition connector is not collapsing and that no air is escaping at seams. Many pros use an anemometer or pressure gauge to quantify performance, but simple observation is valuable. If airflow seems weak, reassess elbows, crimps, and potential obstructions. Shortening the run or swapping a tight elbow for a long-radius version can deliver noticeable improvements.
Common Mistakes to Avoid
Avoid plastic or thin foil vent materials for permanent runs; they are easily damaged, collect lint, and are not code-compliant in most jurisdictions. Do not exceed the manufacturer’s maximum equivalent length, and be mindful that every elbow reduces capacity. Never terminate into attics, soffits, ridges, or crawlspaces. Do not install screens over the outlet that can clog with lint. Keep the termination a safe distance from operable windows and doors, and never share a vent path with another appliance. Lastly, resist the urge to hide long runs behind finished ceilings without providing access; dryers require periodic cleaning throughout the system.
Elizabeth-Specific Tips
Elizabeth’s building stock often includes brick or stone foundations. When penetrating masonry, use the appropriate core bit and take your time to avoid fracturing the surface. If the exterior has vinyl or fiber-cement siding, install a properly sized mounting block or trim to ensure a flat, sealed surface for the hood. Coastal winds near the port areas can be brisk; select an exterior hood with a damper that closes positively to prevent drafts. For multi-unit dwellings, coordinate with building management and adhere strictly to fire-resistance and penetration-sealing requirements at rated assemblies.
Maintenance and Cleaning Schedule
Even the best installation requires care. Clean the lint filter after every load. Inspect the transition connector quarterly for kinks or damage. At least once a year, remove the transition connector and vacuum the dryer outlet and the first section of rigid duct. Check the exterior hood every month for lint accumulation or a stuck damper. In homes with heavy laundry use—large families or frequent loads of towels—schedule a full duct cleaning more often. Mark your calendar for seasonal checks; winter freeze-thaw cycles can loosen exterior caulking and allow water intrusion if ignored.
Mid-Project Checkpoint
Halfway through an installation, pause and reassess. Confirm your total equivalent length against the dryer’s manual and consider whether any elbows can be eliminated or swapped for larger-radius fittings. Ensure your supports are frequent enough to keep the duct perfectly straight. Verify that each joint is fully seated before taping. If you encounter unexpected constraints—beams, masonry ledges, or tight joist bays—do not force a sharp bend that will permanently restrict the airway. In such cases, many homeowners in Elizabeth consult specialists for professional dryer vent installation that preserves airflow and complies with local requirements.
Troubleshooting During Installation
If the exterior damper will not open fully during a test run, look first for a crushed transition connector, an elbow immediately behind the dryer, or a seam that has slipped out of alignment. If the duct resonates or rattles, add a support strap near the noise source and ensure the hood is firmly seated with sealant around the flange. When cutting through old plaster walls, pre-score the finish coat to minimize cracking, and use backer blocking to secure the interior sleeve if the wall depth is irregular. If you smell lint or humidity indoors while the dryer runs, recheck every joint for air leaks.
Energy and Indoor Air Quality Benefits
A properly installed, low-resistance vent dramatically reduces drying time, saving energy and wear on fabrics. Shorter cycles mean less heat and moisture lingering indoors, which protects paint, trim, and framing from condensation issues. In tight homes or those with recent weatherization measures, venting efficiently also lowers the burden on dehumidifiers and air conditioners. Over the lifetime of a dryer, these advantages add up, improving comfort and reliability while reducing the chance of lint accumulation that can lead to overheating.
Simple Step Recap
Plan the shortest path with the fewest bends. Choose smooth metal duct and long-radius elbows. Penetrate the wall or roof carefully and seal the exterior hood. Assemble the run with tight joints, foil-backed tape, and proper supports. Keep the transition short and crush-resistant. Test airflow, fix restrictions, and schedule maintenance. With patience and attention to detail, an Elizabeth homeowner can complete a safe, durable installation that performs well in all seasons.
Frequently Asked Questions
Q: Can I use flexible foil duct inside walls? A: No. Building codes and manufacturers generally prohibit thin flexible foil or plastic ducts for concealed, permanent runs. Use smooth rigid metal pipe.
Q: How long can the vent be? A: Follow the dryer manufacturer’s equivalent length limits. As a rule of thumb, keep runs under 25 feet, subtracting for each elbow. Shorter is always better.
Q: Is roof venting acceptable in Elizabeth? A: Yes, provided you use a proper roof cap, seal flashings, keep elbows to a minimum, and manage condensation. Wall terminations are simpler and often preferred when feasible.
Q: Do I need a screen on the outlet to keep birds out? A: Avoid fine screens; they trap lint. Choose a code-compliant hood with a weighted or gravity damper designed for dryer airflow.
Q: How often should I clean the vent? A: Inspect monthly at the exterior and clean the full run at least annually, more often with heavy use or long duct paths.
Q: Can I share the dryer vent with a bathroom fan? A: No. Each appliance needs its own dedicated exhaust system sized for its airflow.
Q: What kind of tape should I use? A: Use UL-listed, foil-backed aluminum tape rated for high temperatures; avoid cloth duct tape.
Q: What if my dryer sits in an interior room? A: You may need a longer path or a roof termination. Plan carefully to minimize elbows, and consider professional evaluation to maintain adequate airflow over a longer distance.
Ready to Get Started?
If you want the safety, efficiency, and peace of mind that come from a meticulous installation, schedule a visit with local experts who understand Elizabeth’s housing types, climate, and code expectations. Whether you need a fresh route mapped, an upgrade from old flex duct, or a thorough performance test, reach out today and book reliable dryer vent installation that protects your home, your dryer, and your time.
