Introduction: The Value of a Thorough Dryer Vent Cleaning Inspection
An effective dryer vent cleaning inspection does more than remove lint; it diagnoses hidden blockages, verifies safe construction, and confirms performance from the appliance outlet to the exterior hood. In Elizabeth, New Jersey—where housing ranges from historic Elizabethport rowhouses to Midtown mid-rises and newer developments near Kean University—vent paths can be short and simple or long and winding through walls and roofs. A structured inspection ensures your system meets safety and performance benchmarks before, during, and after cleaning. If you want predictable dry times, lower energy waste, and reduced fire risk, start with a methodical inspection and follow it with high-quality cleaning from a team experienced in dryer vent cleaning.
Elizabeth’s weather adds nuance. Humid summers can dampen lint and make clogs sticky, while winter cold intensifies condensation in uninsulated ducts, especially in basements and unheated spaces. A thorough inspection accounts for these local realities by assessing not only lint accumulation but also materials, routing, terminations, and the laundry room’s environment.
Inspection Step 1: Interview and Visual Survey
Begin with a short interview: How long do loads take? Has drying time increased gradually or suddenly? Do you notice unusual warmth, moisture, or a faint burnt-lint odor in the laundry area? Gather the appliance model and whether it’s electric or gas. Note building type and location—Elizabethport townhome, Elmora single-family, or a multifamily property in North Elizabeth—because these patterns often hint at typical vent layouts and risks.
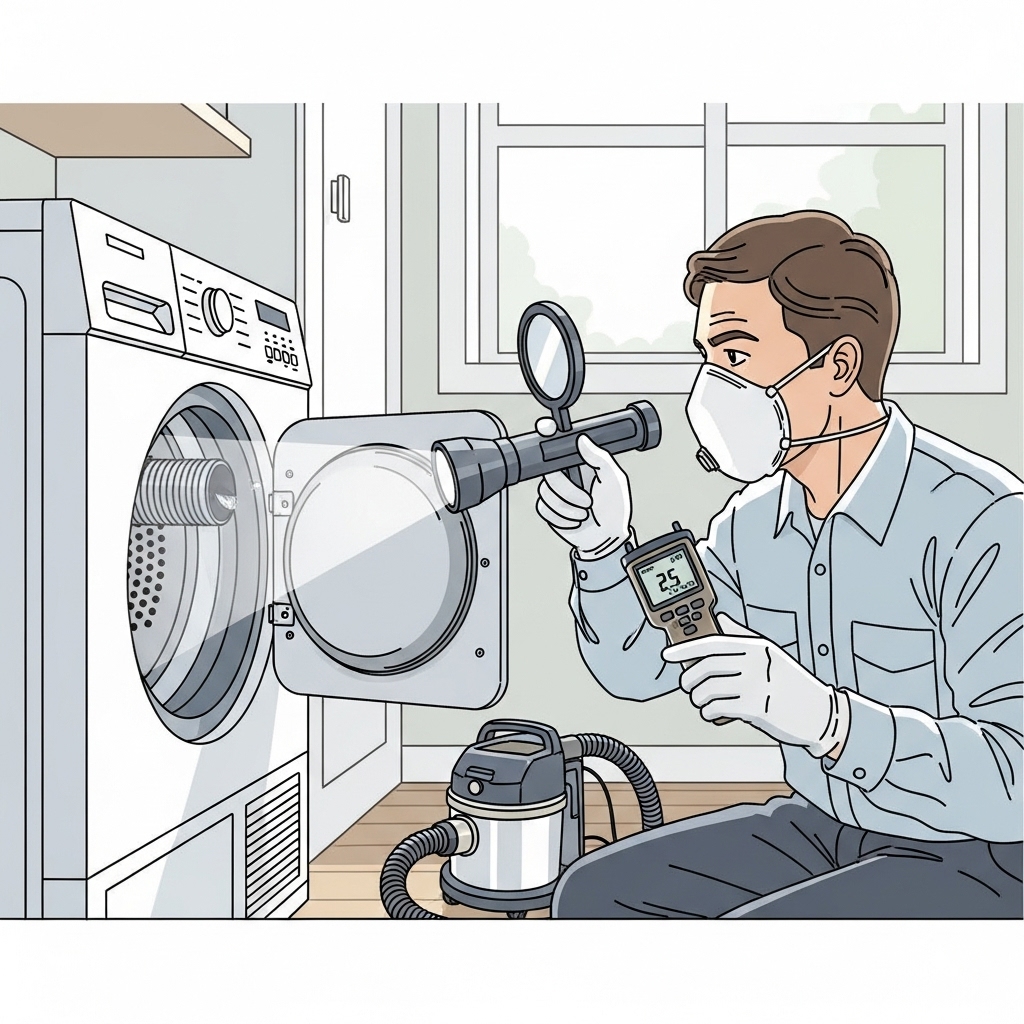
Perform a visual survey around the dryer. Confirm that the lint screen is intact, the transition connector is metal (semi-rigid preferred), and that there are no kinks or crushed sections behind the appliance. Look for discoloration on walls or cabinets that may indicate heat buildup. Ensure the power cord and, for gas units, the connector and shutoff valve are in good condition. These first observations often explain obvious performance issues before tools are even unpacked.
Inspection Step 2: Mapping the Vent Path
Trace the vent from the dryer outlet to the exterior termination. Count elbows and estimate total length. Each 90-degree bend increases resistance; long routes are common in taller or older Elizabeth buildings where dryers are located in interior closets or basements. Identify the termination style: sidewall hood, soffit vent, or roof cap. Sidewall hoods are easier to access and test; roof caps require special safety considerations and often accumulate wind-blown debris.
Note the duct material. Rigid metal is the gold standard for longer runs; semi-rigid aluminum is typical for short transitions. If you see plastic or very thin foil ducts serving as the primary route, mark them for replacement. Screws protruding into the duct also warrant correction because they snag lint and foster blockages. In older rehabs, watch for piecemeal sections taped together without proper collars; these weak points leak air and lint, reducing efficiency and cleanliness.
Inspection Step 3: Airflow and Pressure Clues
Run the dryer on air fluff and feel the exhaust at the exterior hood. A healthy system forces the damper wide open and produces a strong, steady stream. Weak flow signals a blockage, crushed section, or disconnected joint. If you have simple tools, a vane anemometer or pressure gauge can provide quantitative readings. Even without instruments, your hands and ears can tell a lot: listen for rattles from loose joints and feel for warm air leaking from seams in the laundry area, especially behind the dryer.
Evaluate the laundry room environment. Excess heat, humidity, or odors point to restricted exhaust or lint buildup around the heater housing. In Elizabeth’s cold months, condensation can occur in long, uninsulated ducts, leading to damp lint clumps. Spotting this pattern during inspection helps target cleaning and future upgrades such as insulating exposed runs in basements or unconditioned spaces.
Inspection Step 4: Interior Dryer Passages
Remove the lint screen and inspect the cavity with a flashlight. Lint can accumulate below the screen, especially when fabric softeners coat the mesh and reduce airflow through the filter. Wash the screen if water beads on it—a sign of residues. With the dryer unplugged (and gas valve off for gas models), examine the rear outlet, blower housing area, and space beneath the appliance. Lint below and behind the dryer often recirculates, masking the true cause of poor exhaust.
If you detect a burnt-lint smell or unusually high heat, it may indicate lint near the heater assembly. In such cases, a skilled technician should open the dryer cabinet to clean and inspect internal components safely. Homeowners can handle basic exterior cleaning, but interior cabinet work is best left to those who service appliances regularly.
Inspection Step 5: Exterior Termination and Bird/Pest Risks
Elizabeth’s waterfront winds and seasonal birds can complicate exterior terminations. Inspect the hood or roof cap for lint mats, stuck dampers, or screens (which should be removed from dryer exhausts). Look for nesting material and signs of pest entry. Dampers should open easily and close fully. Rust, missing flappers, or heavy staining from exhaust are clues that the termination isn’t working correctly and needs repair or replacement.
Check surrounding conditions too. Landscaping close to the hood can trap lint, while snow drifts in winter can obstruct low sidewall vents. In tight alleys between rowhouses, hoods may be exposed to swirling debris—another reason to incorporate exterior checks into your inspection routine.
Inspection Step 6: Cleaning Strategy and Execution
After documenting the system’s condition, define a cleaning plan tailored to the layout. For short, straight runs, brushing from the laundry side while vacuuming works well. For longer routes, plan bi-directional cleaning—interior and exterior—so clogs are broken from both ends. If a booster fan is present, power it down and clean its housing and blades. Refrain from using screws in reassembly and choose metal foil tape to seal joints. Replace the transition connector if it’s crushed or torn.
During cleaning, proceed carefully through elbows and avoid forcing the brush at high drill speeds. Withdraw periodically to collect lint and verify progress. In Elizabeth’s humid seasons, expect lint to clump and require extra passes. Keep the work area tidy to avoid redistributing dust through the home.
Post-Cleaning Verification
With the system reassembled, run the dryer and return to the exterior hood. You should see a wide-open damper and feel strong, consistent exhaust. Verify that dry times return to normal—a basic mixed load should complete in an expected cycle time, not multiple runs. Feel the laundry room walls and cabinets; they should remain comfortably cool with only a slight warmth near the dryer front. Document before-and-after observations for your records or to share with property management if you live in a multifamily building.
If results remain poor, escalate the inspection: look for a crushed elbow hidden behind drywall, a disconnected joint in a ceiling cavity, or a roof cap jammed by debris. At this point, specialized tools or partial disassembly may be necessary to complete the job without damage.
Common Findings in Elizabeth Homes
Across Elizabeth, repeated patterns emerge. In older two-families, we often see foil transitions crushed behind stacked washers and dryers. In condo towers with roof terminations, elbows near the top collect lint where wind-driven backdrafts meet moist exhaust. In basements with long horizontal runs, dust from renovations combines with lint to create dense mats that cling to joints. Recognizing these local tendencies speeds troubleshooting and helps set realistic expectations for cleaning frequency.
Another common issue is the presence of screens at exterior hoods. While screens deter pests, they are not appropriate for dryer vents because they trap lint. Replace screened hoods with proper dryer terminations that include a damper but no mesh. This simple change often prevents recurring clogs.
When to Bring in a Specialist
Some systems exceed the safe reach of homeowner tools: roof exits on steep pitches, complex runs with four or more elbows, or vents concealed behind finished ceilings. If you find any of these during your inspection, or if airflow fails to improve after thorough cleaning, it’s time for specialized help. Teams focused on dryer vent cleaning bring rotary brush systems, air sweeps, and diagnostic instruments to verify the job is complete. They can also replace hazardous materials, correct poor terminations, and document results for insurance or HOA requirements.
Frequently Asked Questions
How often should an inspection be done? Annually for most homes, and semiannually for heavy-use households or longer vent runs typical in larger buildings. Schedule sooner if dry times increase or you notice heat or odors.
What’s the difference between a quick check and a full inspection? A quick check might only look at the lint screen and exterior hood. A full inspection maps the entire path, evaluates materials, checks airflow, and documents findings before and after cleaning.
Do I need to be present? Yes, your input about symptoms and access points improves accuracy. You’ll also want to review the findings and discuss maintenance recommendations tailored to your home.
Is it safe to brush the duct with a drill? Yes, when used gently and at low speeds. Excess force can tear elbows or dislodge joints. If resistance is high, stop and reassess rather than pushing through.
Can moisture in the vent cause mold? Moisture from restricted exhaust can dampen lint, and over time this can lead to unpleasant odors or microbial growth. Fixing airflow and, where appropriate, insulating cold sections reduces this risk.
What if I rent my home? Tenants should report symptoms to landlords or property managers. Proactive inspection and cleaning protect the building and appliances and are often part of routine maintenance schedules.
Move Forward with Confidence
A systematic inspection sets the stage for safe, efficient cleaning and reliable drying performance. Whether you live near the waterfront in Elizabethport, along tree-lined Elmora Avenue, or in a North Elizabeth multifamily, the principles remain the same: map, assess, clean, and verify. If your inspection reveals complex routing, inaccessible terminations, or persistent weak airflow, book professional dryer vent cleaning and enjoy the assurance that your system is clear from end to end.
