Introduction: A Practical Guide for New Jersey Homeowners
From shore communities to suburban neighborhoods and city townhouses, New Jersey homes depend on reliable ductwork to deliver comfort through humid summers and frosty winters. This guide walks you through planning, executing, and verifying repairs so your system runs smoothly and efficiently. Whether you plan hands-on work or want to understand what professionals do, you will learn strategies to find leaks, fix damaged sections, and confirm results. If you decide to partner with a specialist for precision diagnostics and durable sealing, consider seeking professional air duct repair to ensure long-term performance and healthy indoor air.
In many houses, duct problems stem from a combination of small issues that grew over time—aging tape that dried out, insulation displaced during renovations, crushed flex duct in tight attic corners, or loose boots behind registers. Tackling these issues in a deliberate order helps you avoid rework and quickly restores balanced airflow.
Understand Your System: Supply, Return, and Balance
Your HVAC system is a loop. Supply ducts carry conditioned air to rooms, while returns bring air back to the air handler. If either side is compromised, comfort and air quality suffer. Many homeowners focus on the supply side, but the return side is equally critical, especially in homes with basements and crawlspaces that can contribute dust and humidity when returns leak.
- Supply side: Leaks reduce airflow to rooms, create hot or cold spots, and strain the blower.
- Return side: Leaks draw from unconditioned areas, adding dust and moisture to indoor air.
- Balance: Proper sizing, intact ducts, and tuned dampers deliver even temperatures across rooms.
Planning Your Repairs
Begin with a survey to list visible defects and suspected problem areas. Photograph seams, boots, and supports so you can compare before-and-after results. Prioritize repairs that will deliver the biggest impact—sealing return leaks, fixing crushed branches, and closing large gaps at plenums and takeoffs. Group tasks by area to minimize trips and ensure you have the right materials on hand.
- Make a map of trunk lines and branches with notes on each connection.
- Gather UL-rated foil tape, mastic, clamps, hangers, and basic hand tools.
- Plan safe access to attics and crawlspaces; clear obstacles for stable footing.
- Set aside time for testing after repairs; treat it as part of the job, not an afterthought.
Materials and Methods That Work
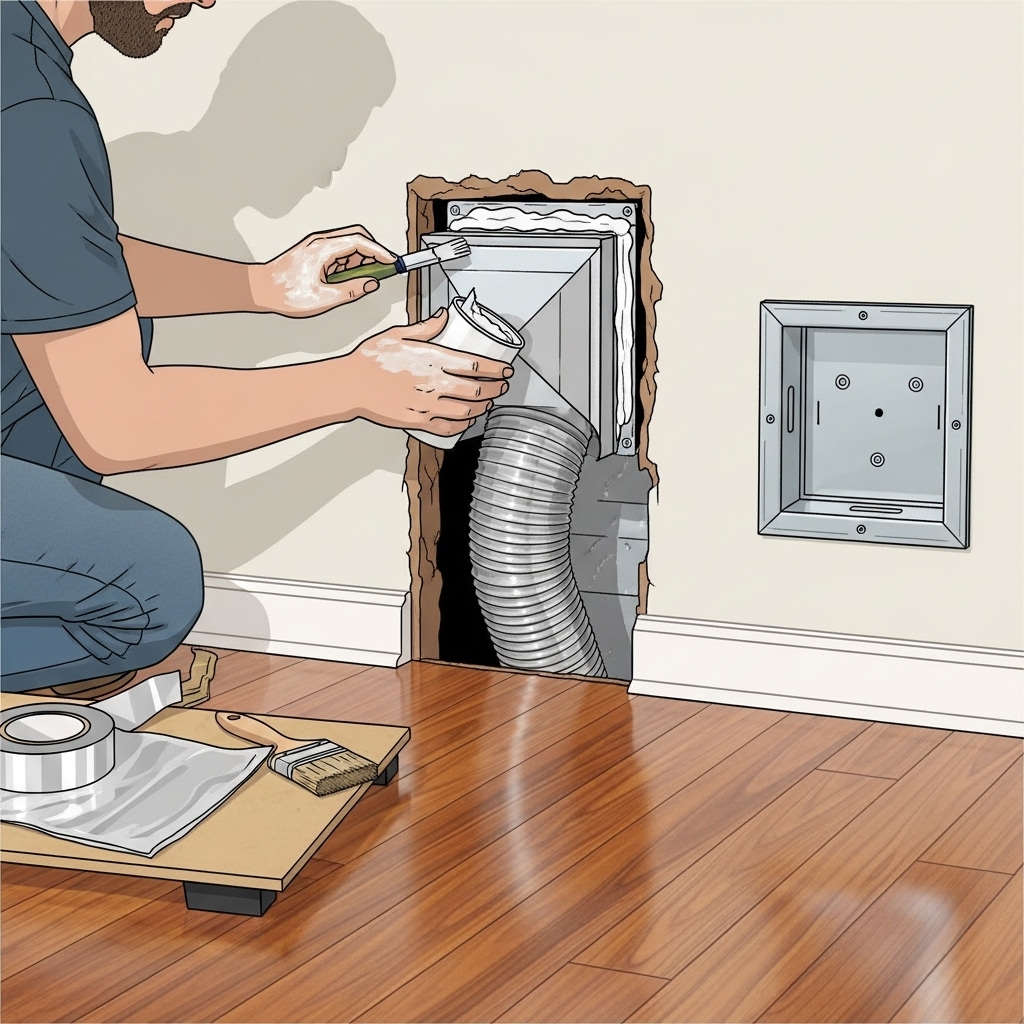
Effective duct sealing uses materials designed for HVAC conditions. Cloth “duct tape” fails quickly with heat and humidity. Instead, rely on mastic for irregular joints and UL 181-listed foil tape for straight seams. Use mechanical fasteners—screws and clamps—before sealing to stabilize connections. For flexible ducts, ensure the inner core makes full contact with collars and couplers; then seal and insulate the outer jacket.
- Mastic with embedded mesh for wide gaps and corners.
- Foil tape for lap seams and over screw heads.
- Sheet metal screws spaced around round connections for stability.
- Wide saddles or straps to support flex duct without pinching.
Step-by-Step: Sealing and Repair
Organize your work in logical phases, starting at the air handler and moving outward. This approach helps you catch compounding leaks and ensures each fix supports the next.
- Shut off system power at the breaker and thermostat to prevent blower operation while working.
- Inspect the supply plenum and trunk. Clean surfaces, then mastic seams and corners thoroughly.
- Secure and seal takeoffs. Verify collars are fully seated; add screws before sealing.
- Address branch lines. Replace crushed flex, re-route tight bends, and support runs at regular intervals.
- Seal boot-to-drywall gaps, then reinstall registers snugly.
- Examine the return side. Seal seams from the return grilles back to the air handler, focusing on joints near basements, garages, and attics.
- Verify insulation coverage on all exposed ducts to prevent condensation and heat loss.
Airflow Testing and Simple Diagnostics
After sealing, evaluate results with practical checks. Listen for whistling near previously leaky seams. Compare room-to-room temperatures after the system has run for a while. If comfort improved but some rooms still lag, you may need balancing adjustments or targeted upgrades. For complex issues—like high static pressure, undersized returns, or zoning challenges—professional air duct repair can provide measurements, balancing, and repairs that align with system capacity and design.
- Use a smoke pencil at seams to spot remaining leaks.
- Measure supply and return temperatures to verify proper temperature split.
- Open interior doors during testing; closed doors can starve return airflow.
- Look for condensation on cold ducts and correct insulation gaps.
New Jersey Climate Considerations
Local weather influences how ducts should be sealed and insulated. In humid summers, unsealed returns can pull moist air, taxing your system and potentially encouraging microbial growth on cool surfaces. In winter, under-insulated ducts lose heat, leaving distant rooms chilly. Focus on attic and crawlspace runs—these are the most vulnerable in the Garden State’s seasonal swings.
- Prioritize insulation on long supply runs in unconditioned spaces.
- Seal return leaks near basements to reduce dust and odors.
- Recheck seals and supports after temperature extremes or major storms.
Common Errors and How to Avoid Them
Rushing the job or using the wrong materials can negate your efforts. Take time to clean surfaces before sealing. Use appropriate clamps for flex cores, and do not compress insulation under straps. Avoid sharp turns and tight S-bends that spike static pressure. Finally, never seal over components that require access for maintenance.
- Skipping surface prep causes tape to peel and mastic to crack.
- Using narrow straps on flex creates pinch points and reduces airflow.
- Failing to support long spans leads to sagging and eventual tears.
- Ignoring returns allows dust and moisture to infiltrate.
Upgrades That Complement Repairs
While sealing and patching are foundational, certain improvements can further stabilize comfort and air quality. Consider adding or resizing returns in chronically uncomfortable rooms, replacing severely corroded boots, or swapping damaged flex sections for properly sized, smooth-radius runs. If renovations changed room layouts, a modest redesign of branch routing may be warranted to restore balance.
- Right-size returns to match room needs and door undercut clearances.
- Replace warped or rusted boots for clean register fits.
- Add balancing dampers where none exist on accessible branches.
- Ensure filter access is convenient to support regular maintenance.
Frequently Asked Questions
Q: How long do duct repairs last? A: With proper materials and prep, seals can remain effective for many years. Periodic inspections ensure joints stay tight as temperatures and humidity fluctuate through NJ seasons.
Q: What is the best sealant? A: Use UL-rated foil tape for straight seams and water-based mastic for irregular joints and larger gaps. Avoid cloth duct tape.
Q: Can I fix airflow with dampers alone? A: Dampers help balance, but leaks and restrictions must be addressed first. Otherwise, damping can increase system pressure and noise without solving the root cause.
Q: Should I insulate return ducts? A: Insulating returns in hot attics or cold crawlspaces can prevent condensation and thermal gain or loss. Always seal first, then insulate.
Q: How can I tell if a room needs more return air? A: If closing the door worsens comfort or creates noticeable pressure when the system runs, the room may lack adequate return pathways.
Q: Will sealing ducts reduce dust? A: Yes, especially on the return side, sealing prevents the system from drawing dust and fibers from unconditioned spaces.
Q: What about odd noises like pops and bangs? A: Sudden pressure changes, oil-canning metal, or temperature swings can cause noises. Verifying static pressure and adding supports or expansion joints can help.
Maintenance Tips to Protect Your Investment
Keep filters clean, registers unobstructed, and storage items away from duct pathways in attics and basements. After major weather events, quickly survey accessible areas for displaced insulation or loose joints. Document your repairs with photos and notes so future maintenance is faster and more accurate.
- Change filters on schedule to control pressure drop and dust.
- Vacuum return grilles and registers to keep debris out of the system.
- Inspect hangers and straps annually and adjust for sagging.
- Confirm that dampers remain in set positions after seasonal changes.
Move Forward with Confidence
Effective ductwork is the backbone of whole-home comfort. By using HVAC-rated materials, prioritizing return sealing, correcting flex routing, and verifying results with simple tests, you can make lasting improvements. When you want expert diagnostics, balanced airflow, and durable sealing, schedule professional air duct repair for a healthier, more comfortable New Jersey home.
